
Welcome to our EasyCatalog support site.
We help creative designers excel and automate with data driven content.
contact@cunka.com
EasyCatalog Support Site
Training
Email us at contact@cunka.com and we can tailor training to suit your designers.
EasyCatalog Development Template
You can download all of our inhouse development tools for free.
EasyCatalog Training Template Download
About Us
Brian Cowell creates brochures, catalogues (1500+ pages with full indexes), manuals, and user documentation using InDesign and the EasyCatalog suite of plugins.
He has worked with creative designers for over 10 years transforming data sets to both print and interactive content. Has recently honed his skills in finding manual and automatic (Javascript/LUA) pagination solutions with EasyCatalog. Provides feedback & suggestions to 65bit.com to help the product grow.
- EasyCatalog plugin modules used
-
-
Pagination module
-
Scripting module
-
XML Data Provider module
-
- EasyCatalog skills
-
-
Template setup
-
Pagination Rules
-
Javascript programming (Adobe InDesign / EasyCatalog)
-
LUA programming (EasyCatalog)
-
XML data with XSLT transformations (Using Saxonica / with EasyCatalog)
-
EXCEL / CSV data (EasyCatalog)
-
Data taxonomy structures
-
Cleansing and preparing data for pagination
-
Training and mentoring EasyCatalog users
-
Regular Expression (REGEX) solutions
-
Perfion PIM database management - Administrator
Enterworks PIM/ DAM - Administrator
You can contact Brian at contact@cunka.com
Data Source Panel UPDATED
Shortcuts
The Data Source panel shortcuts using a combination of keys and mouse clicks.
| MAC users should note the screenshots shown are from a PC. The magnifying glass icon on a PC will appear as a binocular icon your computer. |

| Number | Short cut | function |
|---|---|---|
1 |
Ctrl+Alt + left mouse button |
Opens every branch in the panel. |
2 |
Ctrl+Shift + left mouse button |
Opens every branch in the selected branch of the panel. |
3 |
Shift+Alt + left mouse button |
Hides the field. |
4 |
Triple clicking the left mouse button |
Selects everything in the panel. |
5 |
Ctrl+Alt (on Magnifing glass / Binoculars icon) |
Removes any applied subsets. |
6 |
Double clicking the left mouse button |
Panel is compressed to a tab only. |
7 |
Double clicking the left mouse button |
Auto sizes the column width to fit the largest content. |
Preferences
The Data Source panel display can be configured to change its appearance from the Panel Preferences menu.
Right click anywhere in the Data Source panel to display a menu to select Panel Preferences.
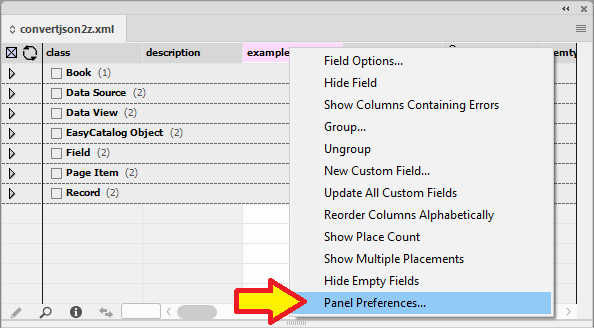
The Panel Preferences allow you to control how the tool tips behave, as well as the preview size. There is also a checkbox to allow the configuration files to be displayed in the panel.
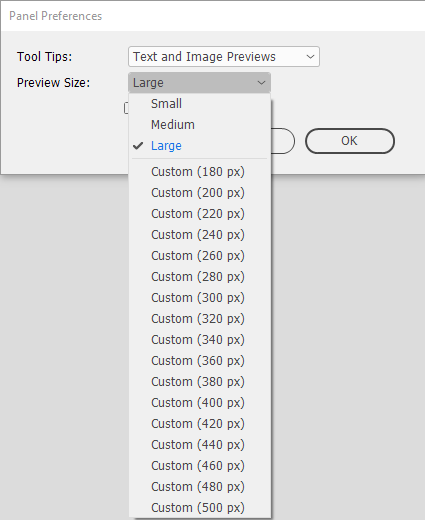
- Tool Tips
-
-
None
-
Text Only
-
Text and Image Previews
-
- Preview Size
-
-
Small
-
Medium
-
Large
-
Custom (180 px)
-
Custom (200 px)
-
Custom (220 px)
-
Custom (240 px)
-
Custom (260 px)
-
Custom (280 px)
-
Custom (300 px)
-
Custom (320 px)
-
Custom (340 px)
-
Custom (360 px)
-
Custom (380 px)
-
Custom (400 px)
-
Custom (420 px)
-
Custom (440 px)
-
Custom (460 px)
-
Custom (480 px)
-
Custom (500 px)
-
Preview Size Examples
Hover over an image to size its size.


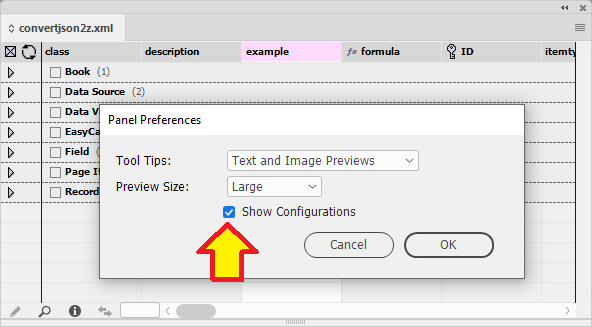
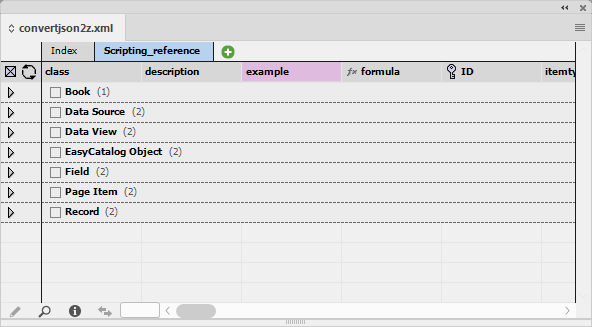
Here is an an example where the "Show Configurations" has been selected in the Panel Preferences. The configurations files are shown above the fields row
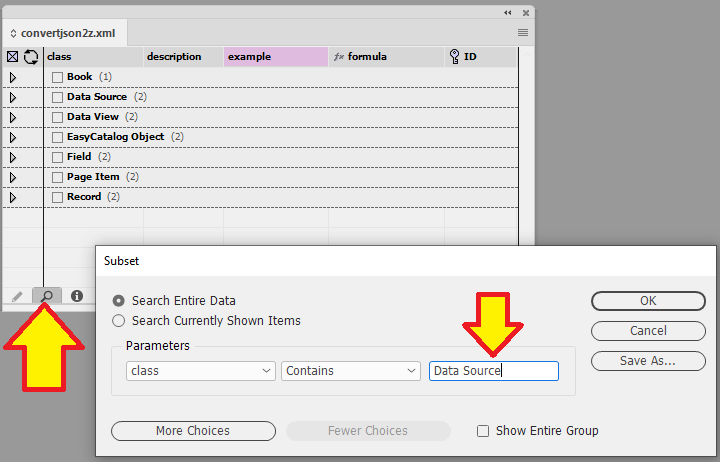
Subset (Filtering)
Using a Subset
The Data Source panel view can be configured to filter data to meet a certain criteria. This is called a "Subset".
You can create and save as many "Subsets" as you need. They can be saved within your configuration file.
From an automation point of view, "Subsets" are very handy as it allows you control when and how the subset will be paginated.
The example below shows the subset built where it says only show if the class field contains the term Data Source
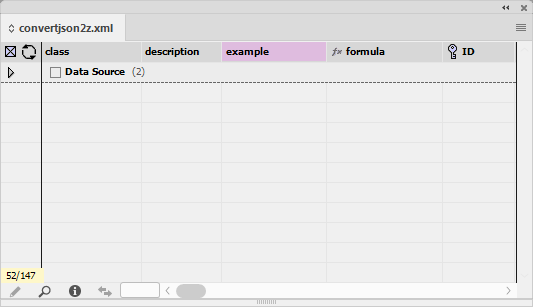
Example of what the panel looks like with the subset applied.
By selecting More Choices its possible to filter down on many more fields.
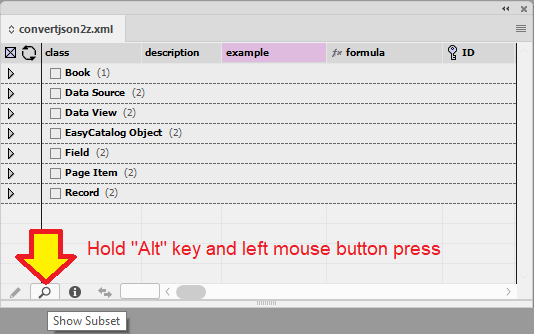
To quickly remove any applied subsets, simply hold the Alt key and left mouse click on the magnifying icon. (Binocular icon on a MAC)
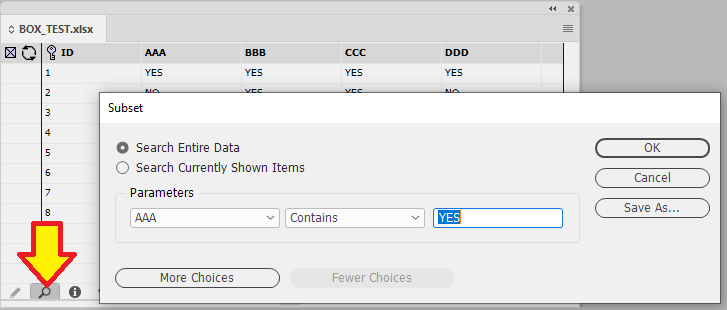
Example 1 - Find "YES" in the field AAA
In this simple example, a panel is made up of various fields that contain the values "YES" and "NO".
The objective is to find all the fields with the value "YES" in the field AAA.
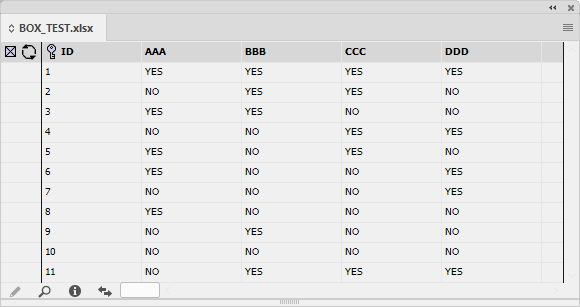
Clicking on the Magnifying Glass (Binocular icon on a MAC) will bring up the Subset menu. In the Parameter box we select the AAA field. Next the selection "Contains" is entered following the value of "YES".
So our subset formula says only show records if the field AAA contains the word YES
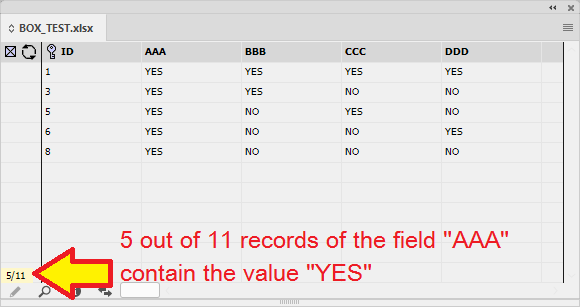
The number in the corner of the panel indicates how many records are shown from the total amount of records. In this example we are shown 5 out of 11 records.
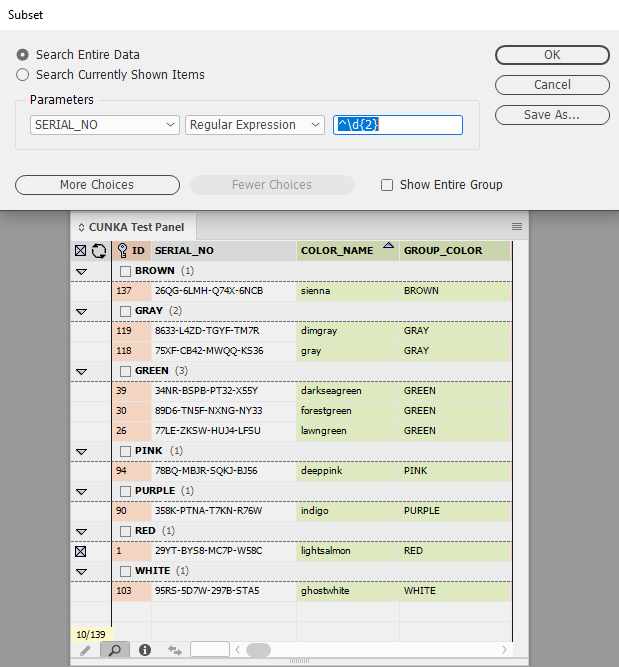
Regular Expression Subset
The subset dialog allows the use of a regular expression to assist with filtering results.
Example 1 - Values beginning with 2 numerical digits
In this example a regular expression is used on the field SERIAL_NO that is looking for a value that begins with 2 numerical digits.
^\d{2}
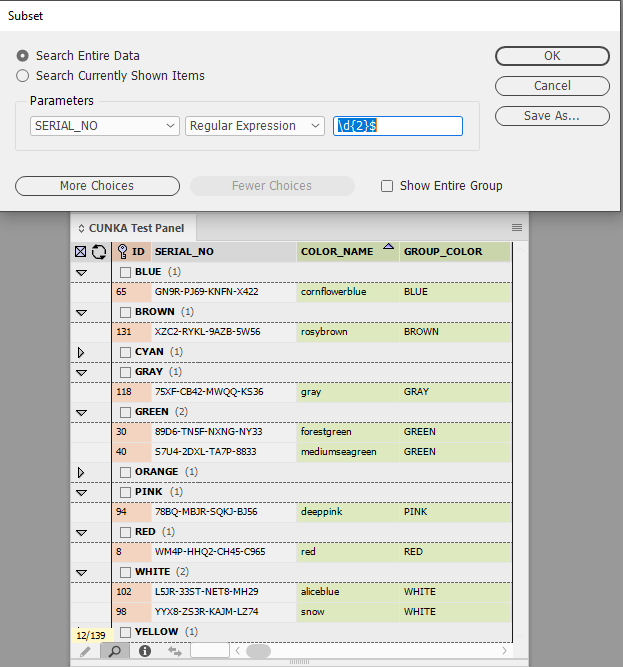
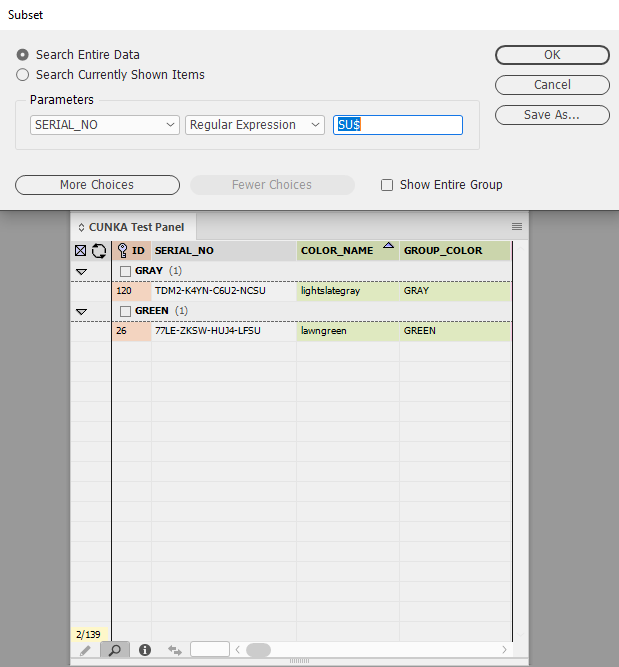
Example 2 - Values ending with 2 numerical digits
In this example a regular expression is used on the field SERIAL_NO that is looking for a value that ends with 2 numerical digits.
\d{2}$
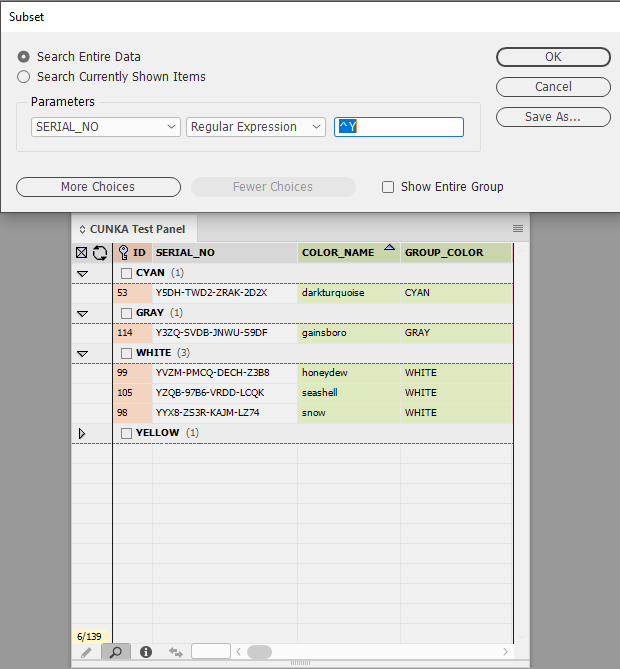
Example 3 - Values starting with "Y"
In this example a regular expression is used on the field SERIAL_NO that is looking for a value that starts with "Y".
^Y
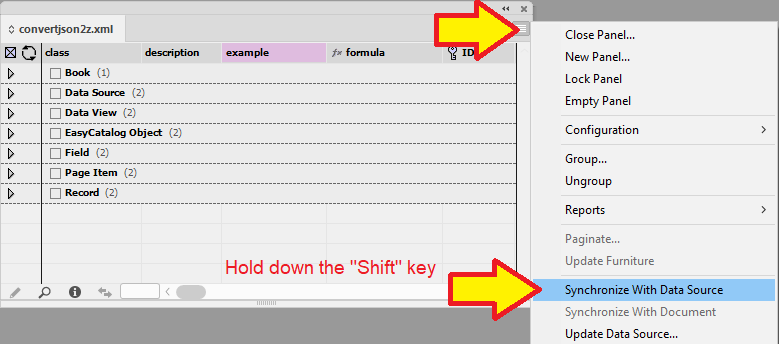
Synchronize a new Data Source
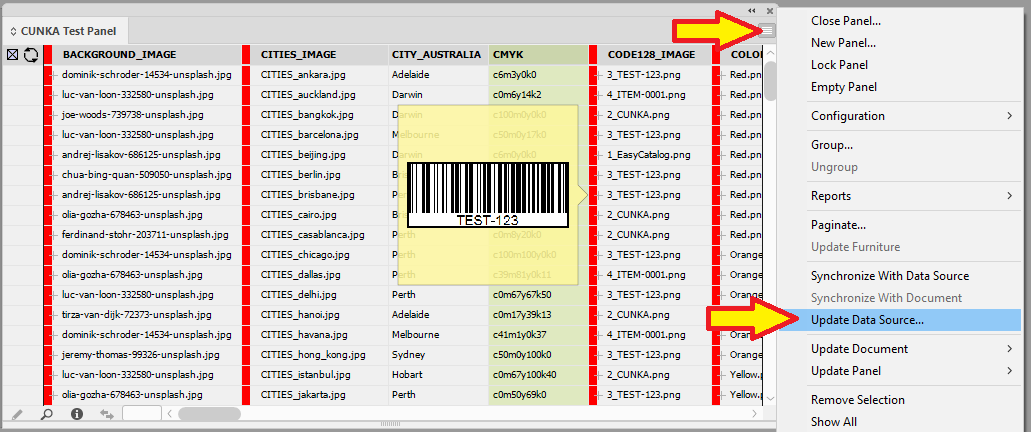
If you are using a static data source like an XML/Excel/CSV file, there may be times when you need to update the data source.
|
PERMANENT DATA LOSS ! This process overwrites the existing data. |
To update the data source , you must hold down the Shift key when selecting the Synchronize with Data Source option. This will allow you to select the new updated source.
Sort by Appearance
The Sort by Appearance selection allows fields that have the Appearance attribute applied to be sorted and arranged.
| Applying colors to field columns makes field navigation a lot easier. |
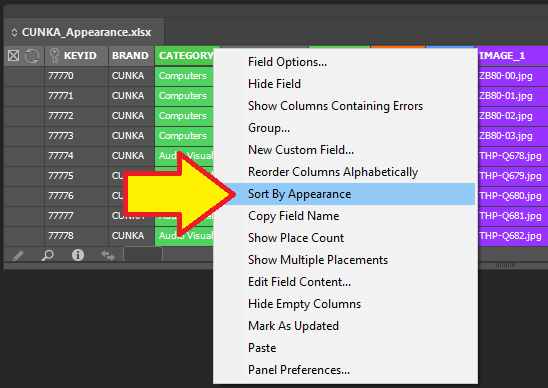
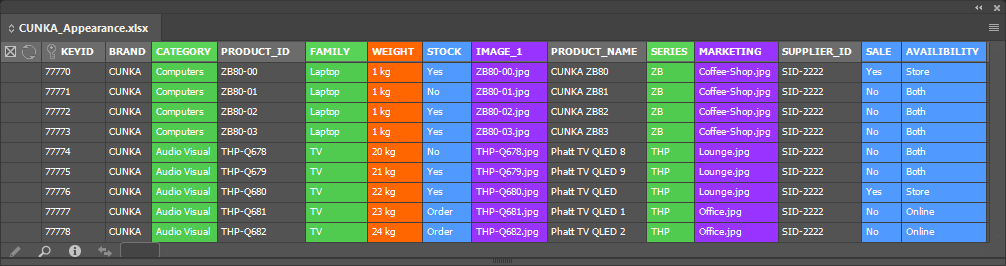
Before 'Sort by Appearance'
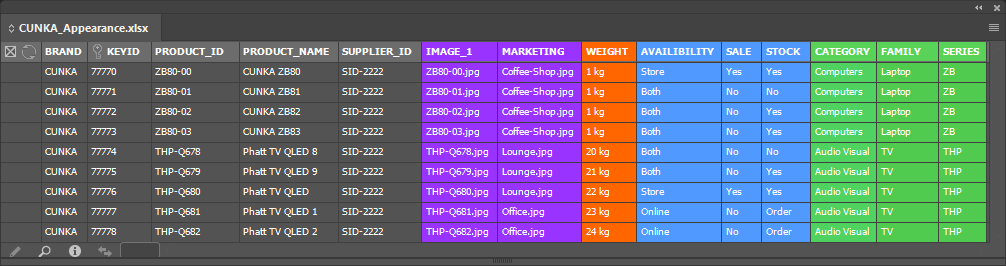
After 'Sort by Appearance'
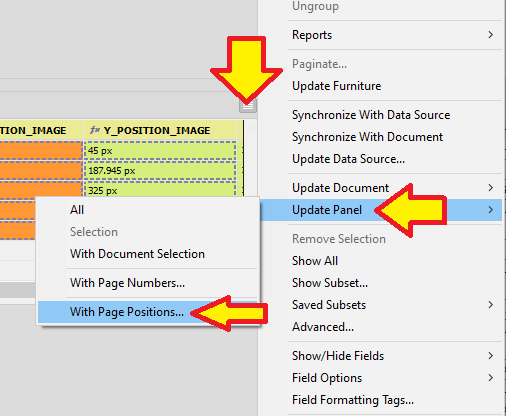
Update Panel NEW
With Page Positions
Every records actual position on the document can be updated back into the data source panel.
Using the option With Page Positions… a records X and Y, as well as Height and Width can be updated and stored.
| The X and Y positions of the actual frame containing the field will be used as the update in the data source panel. (NOT the position of the field within that frame). |
This is handy if you need to track the position of records for any pagination that is required to be positioned.
Select With Page Positions… from the menu
Data Source Panel Menu → Update Panel → With Page Positions…
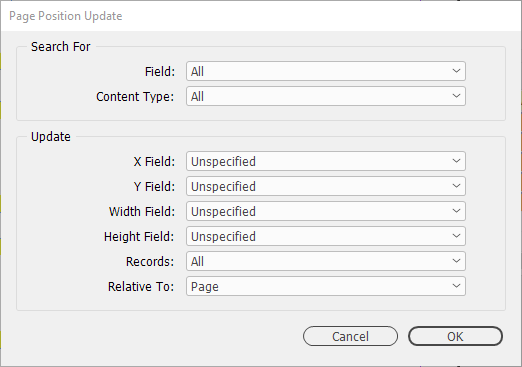
Search For
- Field
-
Limit the update to searching for a specific field (rather than any field for the record) and whether only text fields , picture fields or both types should be searched for.
Field |
Description: |
|---|---|
All |
All fields for the record will be searched for in the document. |
Field Name |
The document will be searched for the specified field name, and its position be used to update the |
- Content Type
-
Limit the update to searching for a specific frame type.
Content Type |
Description: |
|---|---|
All |
Both text and picture boxes will searched for a field in the document for each record. |
Text |
Only text-based fields will be searched in the document. |
Picture |
Only picture fields will be searched in the document. |
Update
Nominate the fields in the data source panel to be updated with the position/dimension of the Search For Field.
- X Field, Y Field, Width Field, Height Field
-
Specified field(s) that holds the value for either positions or dimensions.
X Field |
Description: |
|---|---|
Unspecified |
No specified field has been nominated from the data source panel. |
Field Name |
A specified field from the data source panel that will have its value 'updated' that is either a position co-ordinate, or a dimension value. |
- Records
-
Determine whether all records, or a select amount from the data source panel will be updated.
Records |
Description: |
|---|---|
All |
All records in the data source panel will be updated. |
Panel Selection |
Only records selected in the data source panel will be updated. |
- Relative To
-
Determine where the X/Y co-ordinates will be taken from.
Relative To |
Description: |
|---|---|
Page |
The co-ordinates used to update the X and Y fields will be relative to the top-left of the frame is place on. |
Origin |
The co-ordinates used to update the X and Y fields will be relative to origin point on the ruler. |
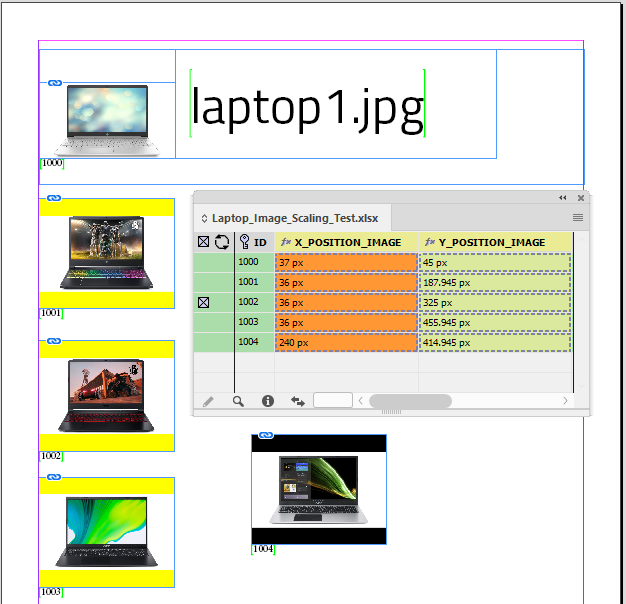
Example - Update X/Y positions for images
The field IMAGE places a picture into a frame.
The fields X_POSITION_IMAGE and Y_POSITION_IMAGE hold X/Y co-ordinates of the frames.
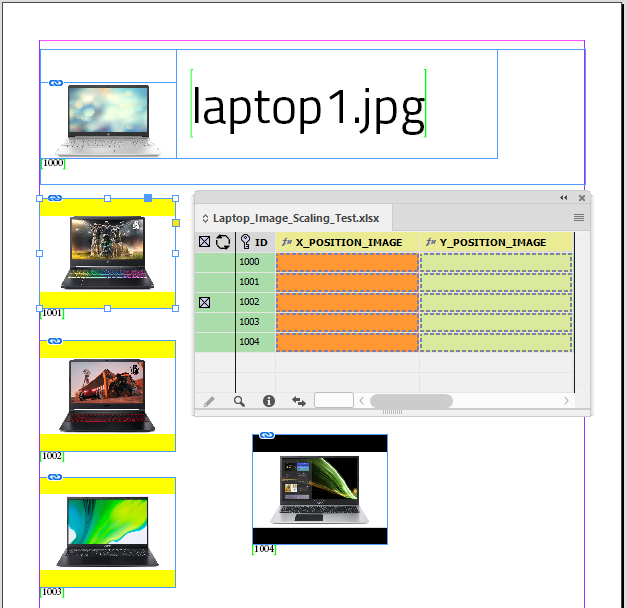
Using With Page Positions…
Data Source Panel Menu → Update Panel → With Page Positions…

The frames X/Y positions are updated and stored in the data source panel.
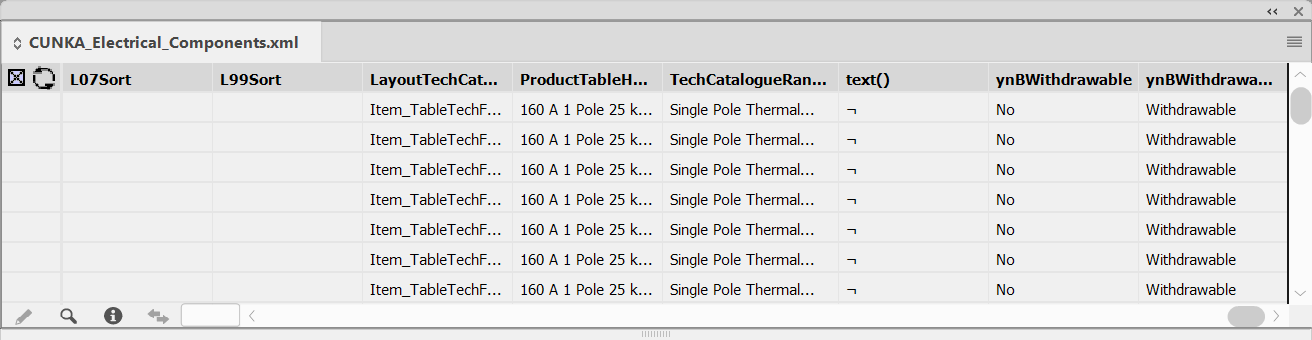
Excluding Fields NEW
The data source in use may contain fields which are not actually required.
The result can cause data source panels to become complex and may require extra resources to maintain.
EasyCatalog 2023 now allows you to exclude fields permanently.
|
Errors and issues will occur if you apply Excluding fields incorrectly. Make sure the fields you are excluding are NOT used in any dependents before applying. e.g. other fields, groups, scripts, rules.. |
To exclude a field or a set of fields permanently from a data source panel:
-
press the
(i)info button
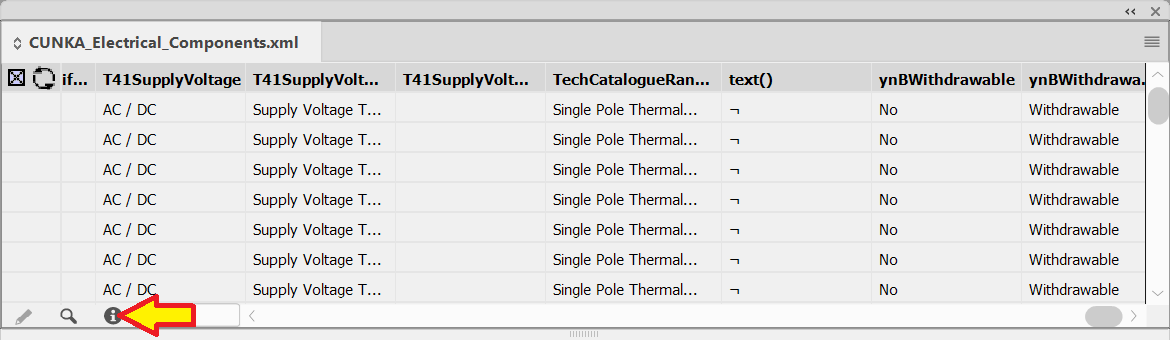
Then click the icon at the top left of the information dialog box.
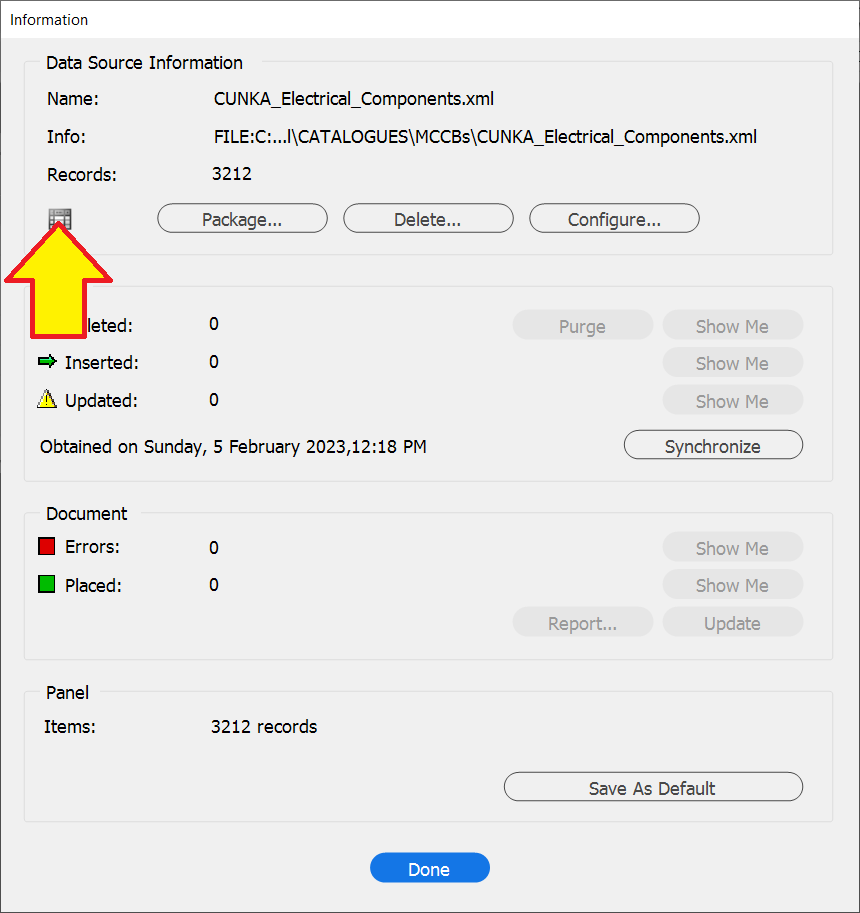
This presents a dialog box similar to this.
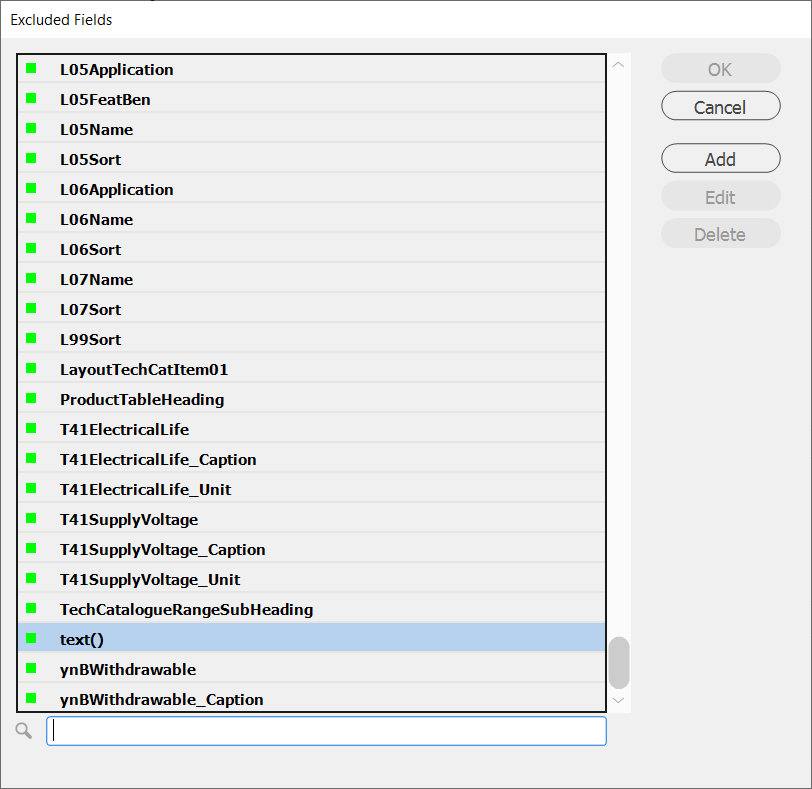
Fields with a green indicator are what is currently included in the data source panel.
To exclude a field, double click on the field text until the indicator turns red.

You can search for fields using the search box on the bottom of the dialog box.
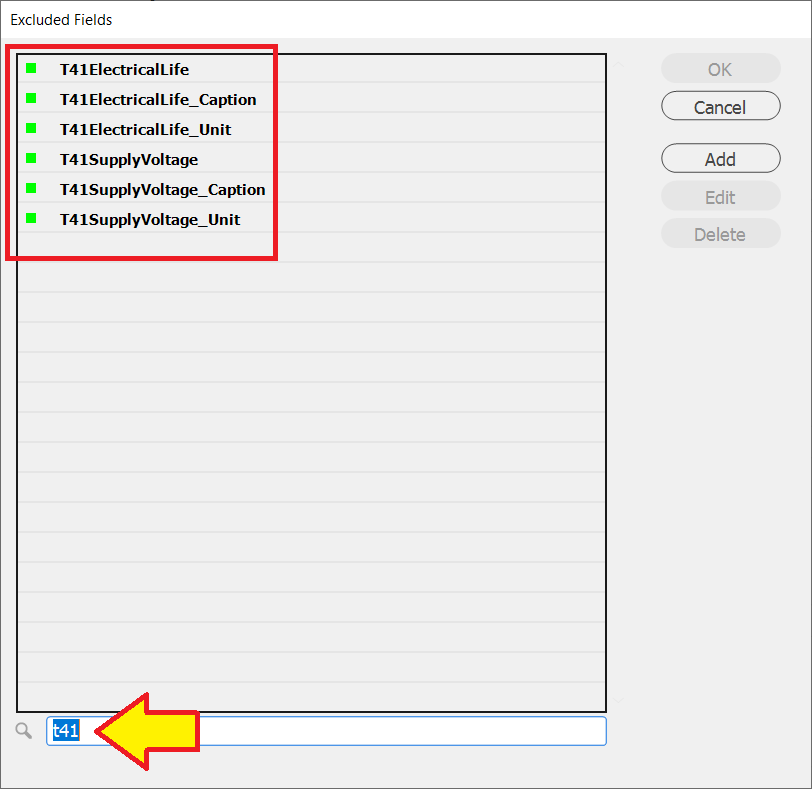
Regular Expressions for Excluding Fields
Excluding fields can be done by using regular expressions to find fields that fit a certain naming pattern.
This allows you to quickly exclude groups of fields in an expression, rather then finding excluding each field individually.
To use a regular expression in the Excluded Fields dialog, use the Add button.
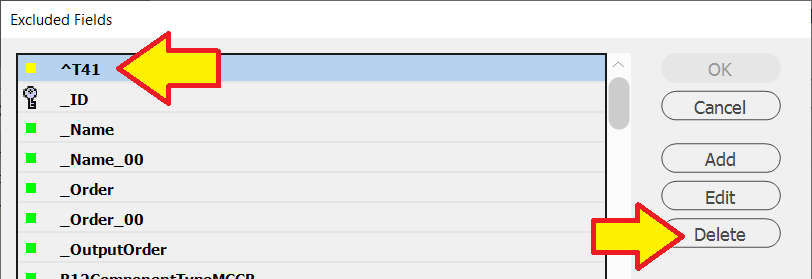
Example : Exclude all fields in the data panel that begin with T41
In the Excluded Fields dialog box:
-
Press the
Addbutton -
Enter the Wild Card dialog box the Regular Expression:
^T41
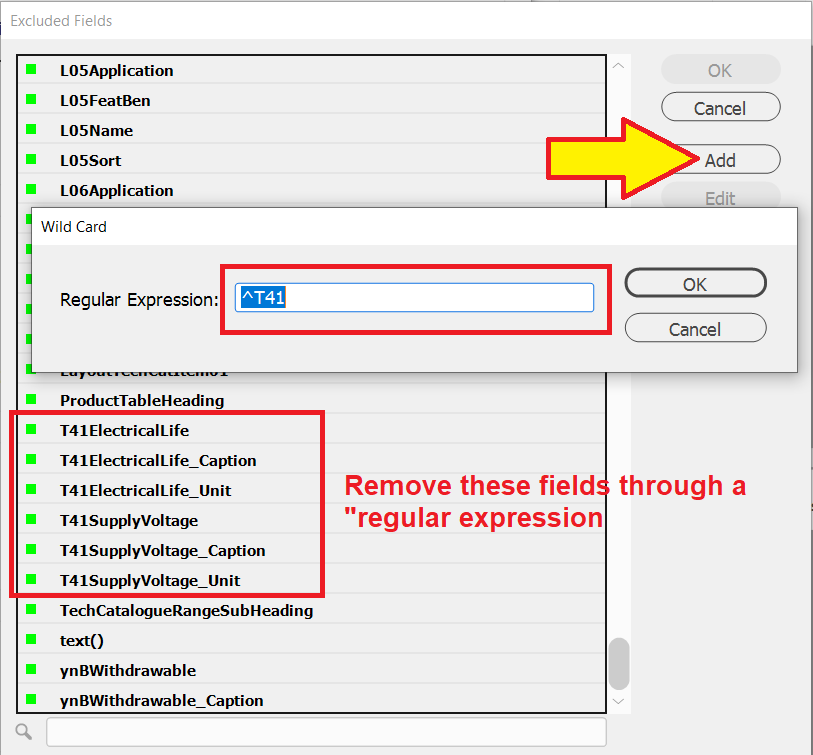
The ^T41 regular expression will appear at the top of the dialog box with a yellow box indicator.
-
Press the
OKbutton
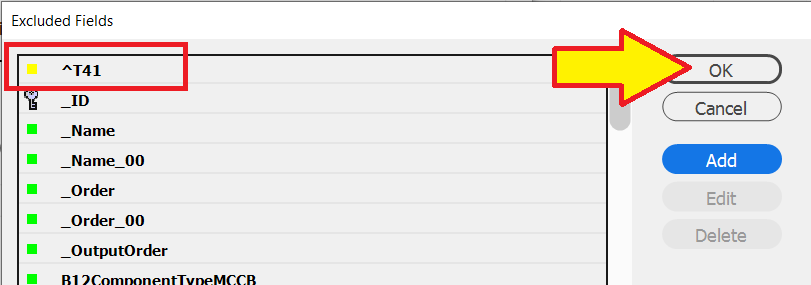
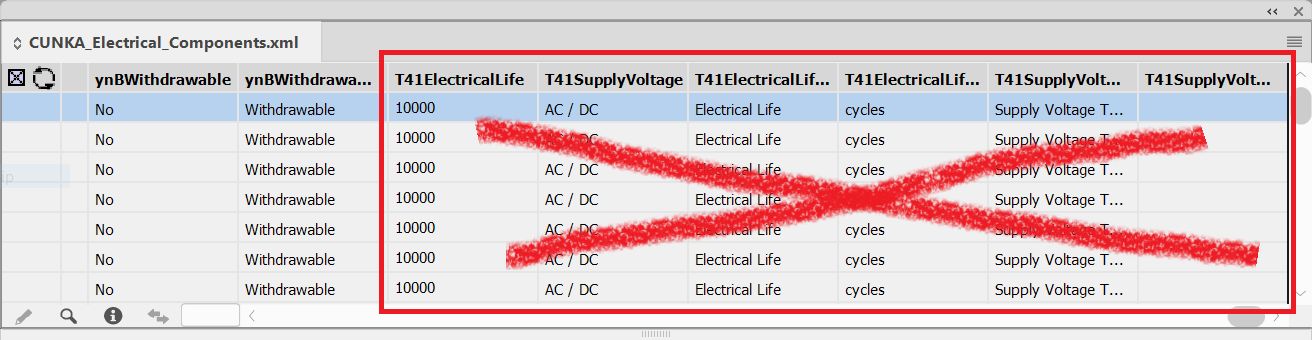
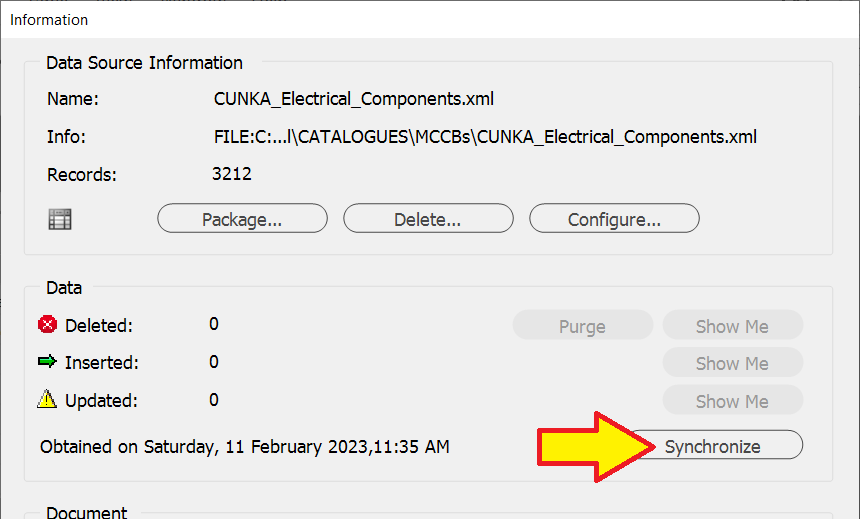
The data source panel will need to be synchronized to apply the Excluded Fields settings.
-
Press the
Synchronizebutton.
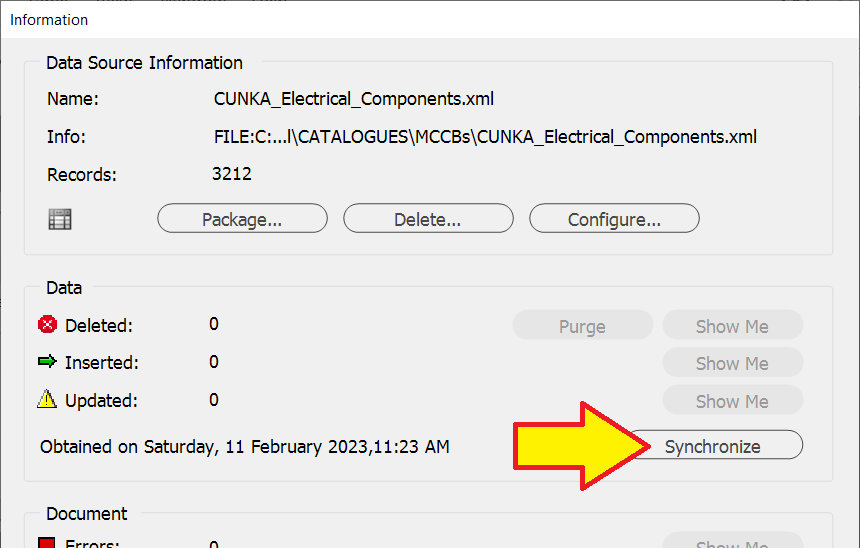
Now that the data source panel is going to change, it will ask "Do you wish to continue?"
At this point you must make a decision whether you will make the change.
In this example for the data source panel I have :
-
Pressed the
Yesbutton
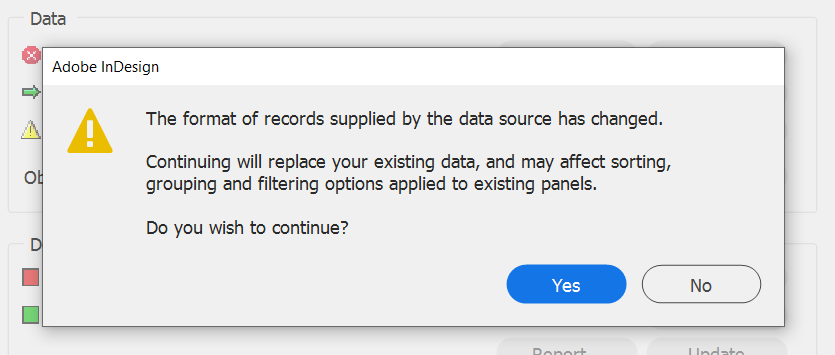
The data source panel will now display without the fields beginning with T41.
Remove an applied Regular Expression applied for Excluding Fields
You may want to include fields that were previously removed with a regular expression.
The following example shows a regular expression applied that was excluding any fields that began with the name T41.
In the Excluding Fields dialog select the regular expression you wish to remove.
-
Press the
Deletebutton -
Press the
OKbutton
Even though the regular expression is now removed, the data source panel will need to be synchronized to complete the update changes.
-
Press the
Synchronizebutton
The fields will now appear in the data source panel.
Just be aware EasyCatalog will put them initially back at the end of the data source panel.
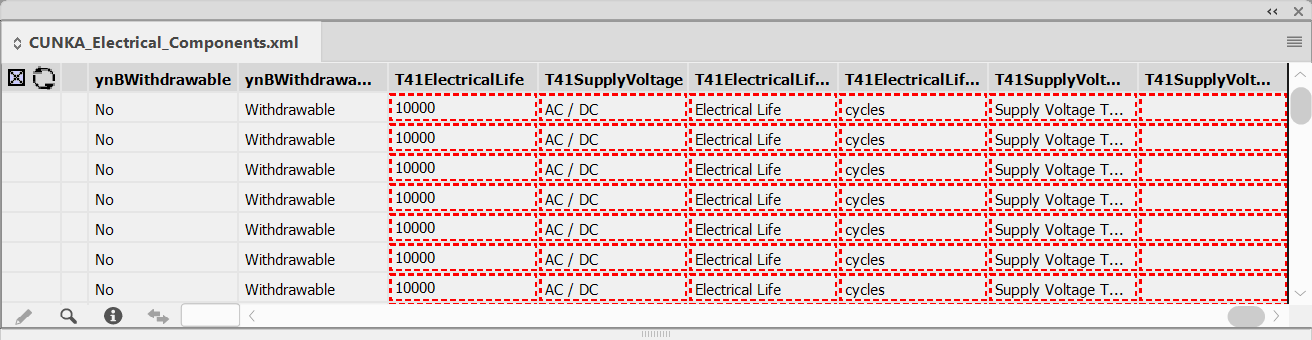
To remove the red dashed boxes, go and Syncronize the data source panel again.
|
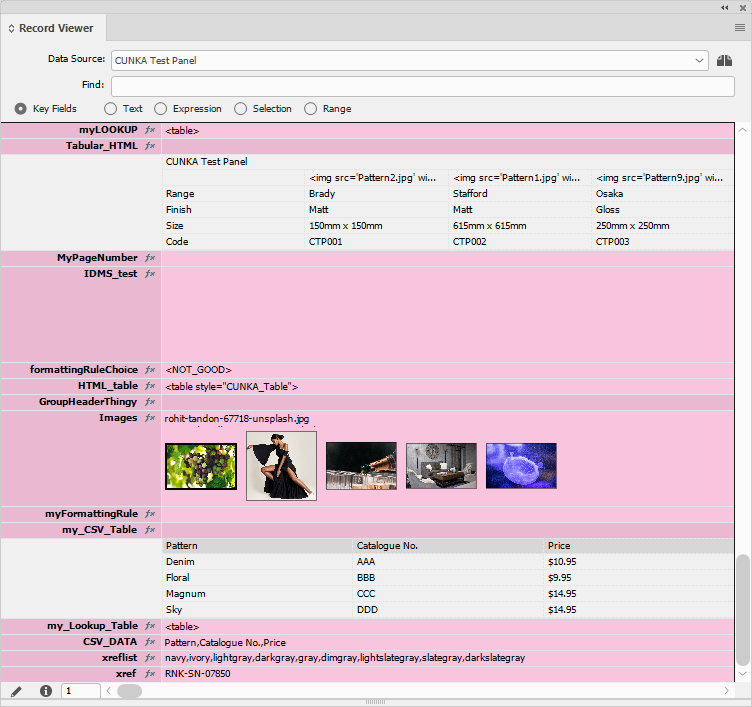
Record Viewer
The EasyCatalog Record Viewer displays a selected data source a single record at a time. The data appears vertically, making working with records containing a large number of fields easy.
Using the Record Viewer, you can view individual records, quickly filter and place your data on the page.
In addition, to help identify fields already placed in the document, the Record Viewer panel can also show the record(s) in the current document selection.
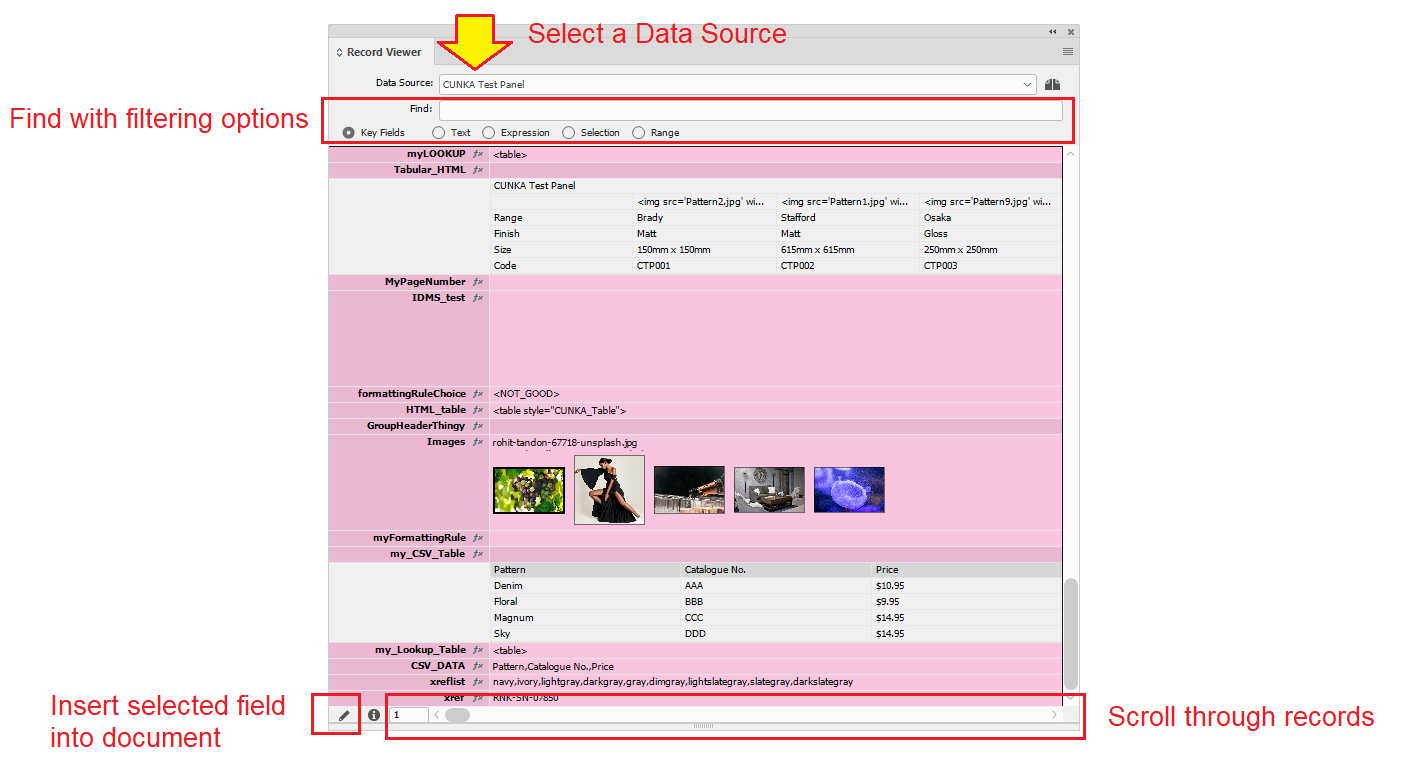
Overview
The top dropdown box is where you select the Data Source records you wish to use.
Make sure you have selected the right Data Source. If you have many similar data source panels, its easy to be looking at the wrong one.
|
The Find text box helps you find records through filtering.
The pencil icon on the bottom left corner of the Record Viewer allows to insert selected field into the document.
Bottom row allows you to scroll through the records.
| Be aware it is NOT a text scroll bar, its a records scroll bar. |
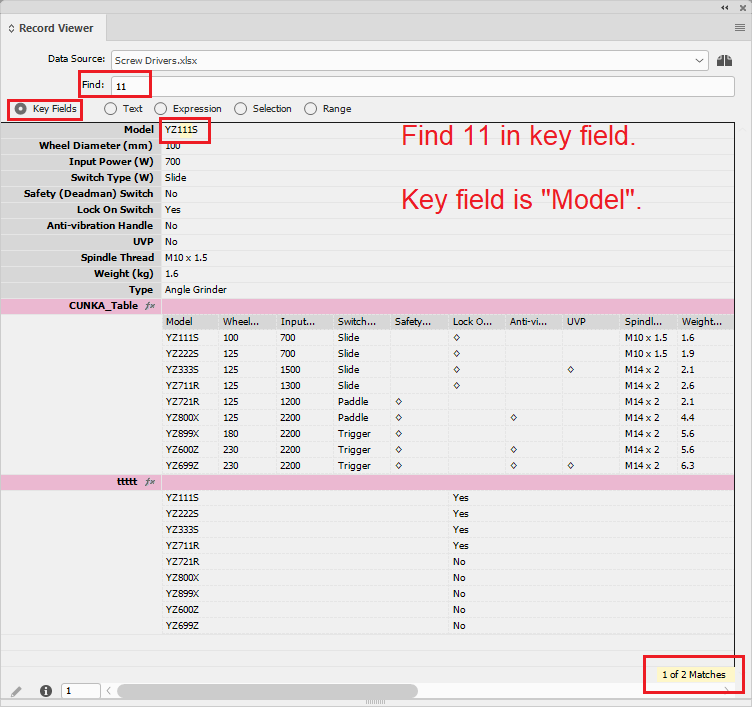
Finding Records
EasyCatalog Record Viewer offers a number of ways to step through the records from you data source, and can also filter the records shown based on the content of their fields.
The records shown when stepping using the scroll-bar/arrow buttons, can be filtered by entering search criteria into the Find text box.
To search for an exact match, enter the search term in double quotes.
Eg. "11"
Results are in yellow highlighting.
- Key Fields
-
Will search the data source key field(s).
Key fields are unique indentifiers used to distinguish records.
Eg. ID, Model
- Text
-
Will search all fields.
Does not find text in tables.

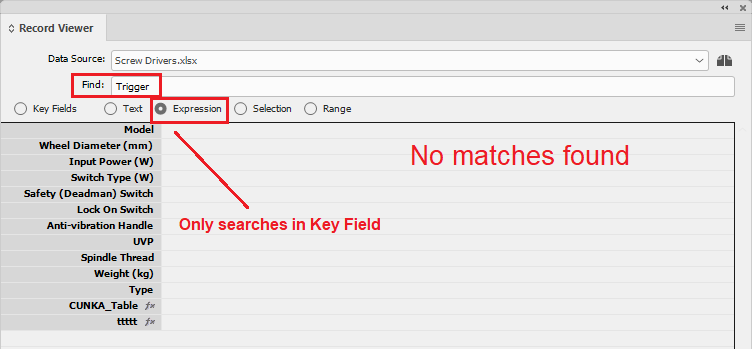
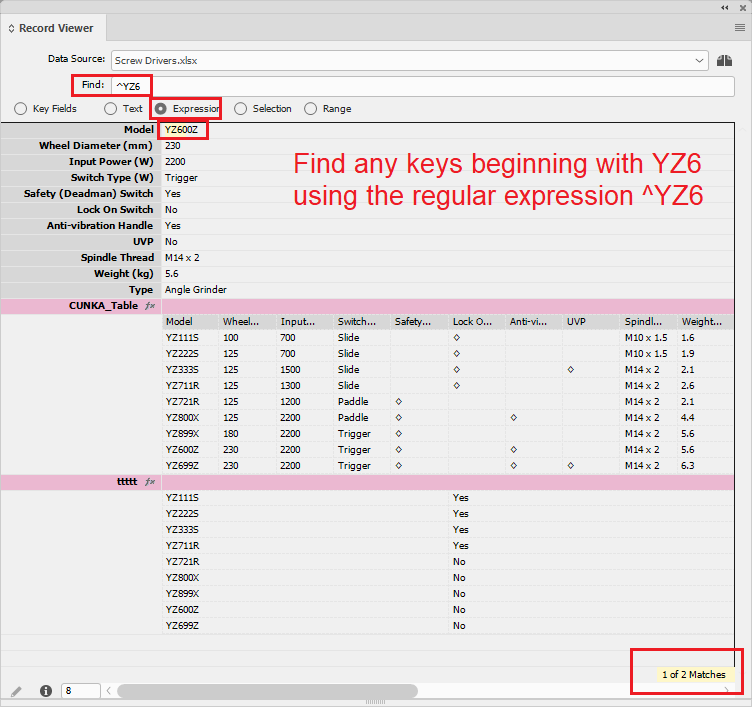
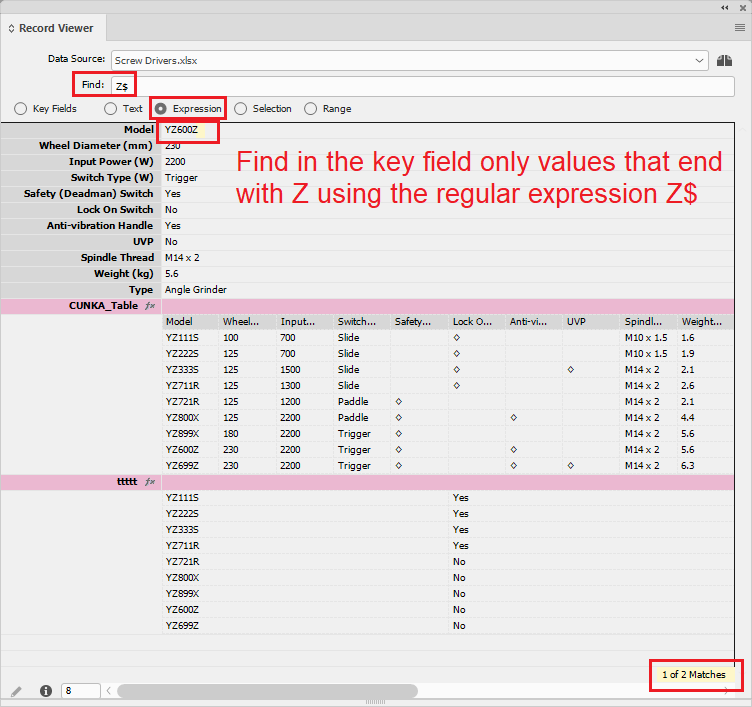
- Expression
-
Enter a regular expression into the
Findfield.
Will search the data source key field(s).
| Regular Expression | Details |
|---|---|
^YZ6 |
Shows all records beginning with ‘YZ6’ |
Z$ |
Shows records ending with ‘Z’ |
^Y.*S$ |
Shows records that begin with ‘Y’ and end with ‘S’ |
6.1 |
Shows all records that contain ‘6’ followed by any character followed by ‘1’ |
.*11 |
Shows all records that contain ‘11’ |
^YZ6
.*11

Z$
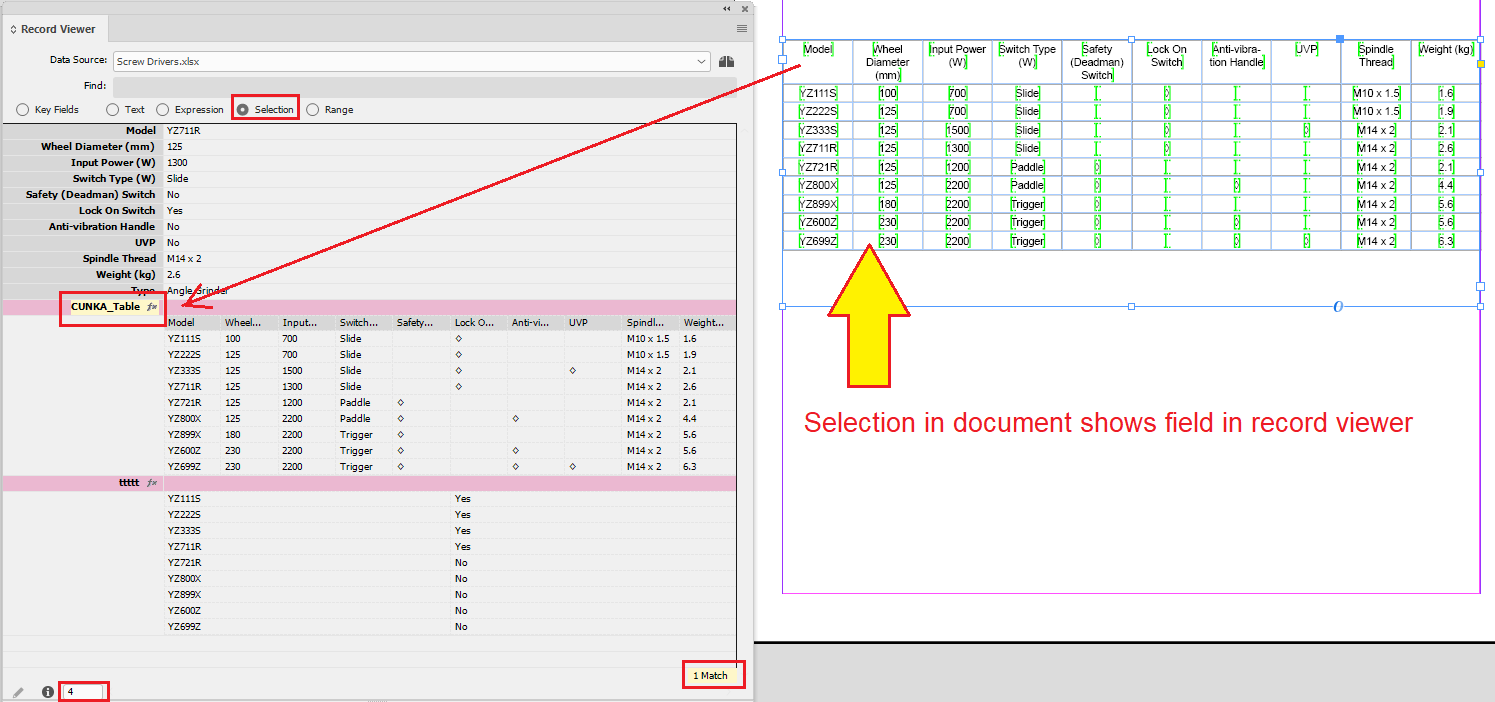
- Selection
-
The fields in the current document selection will be shown in the panel. The names of the selected fields will be highlighted in yellow in the Record Viewer panel.
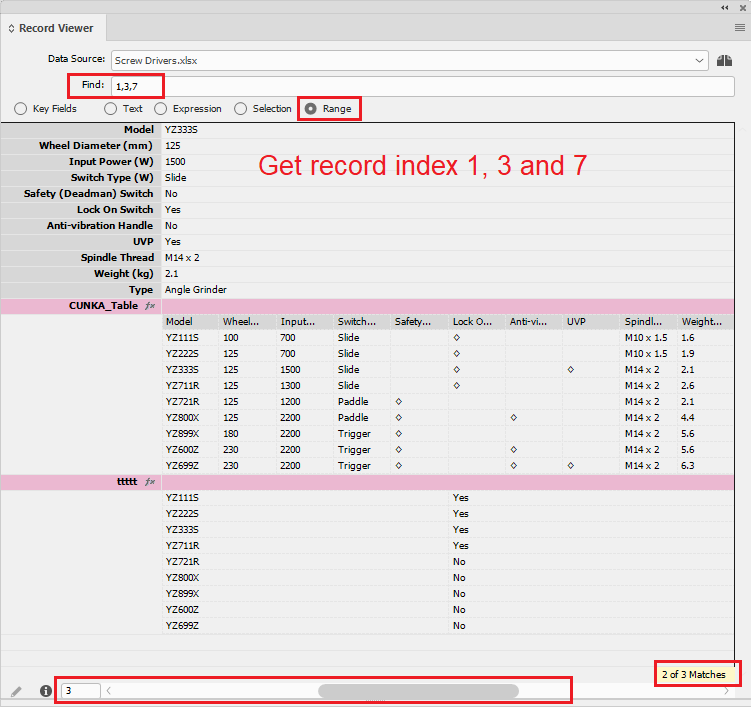
- Range
-
Enter a numeric range of record index numbers into the ‘Find’ field. Ranges and single index numbers are allowed - for example: 1,2,10-20 will display records 1, 2 and 10 thru 20 (inclusive) in the panel.
Keyboard Short Cuts NEW
InDesign has a long list of keyboard short cuts that can be applied to enhance user productivity.
EasyCatalog continues the list of short cuts available bringing the many commands features that exist only in menus into an actual keyboard function.
| By default EasyCatalog keyboard short cuts are never set up. |
EasyCatalog Short Cuts
Short Cut Setup
The EasyCatalog keyboard short cuts can be found within the InDesign short cuts.
InDesign Menu:
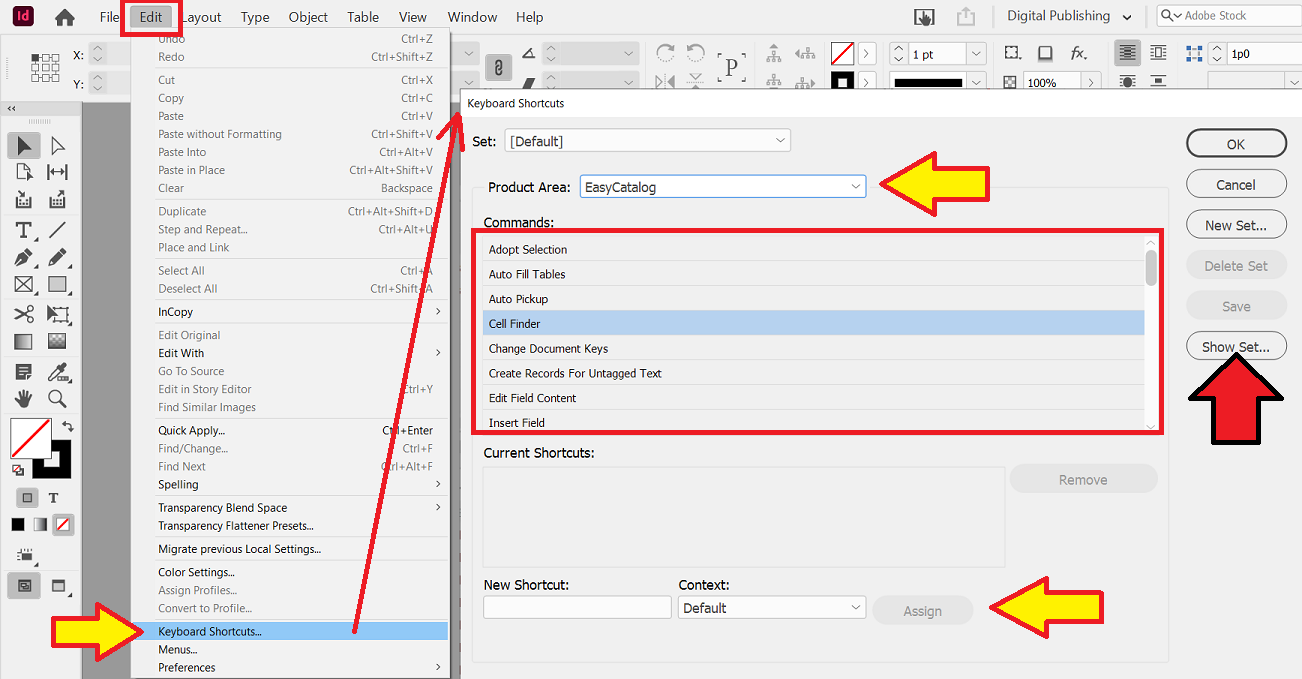
If you are unsure of any existing short cuts that both InDesign and EasyCatalog are using:
-
Press the
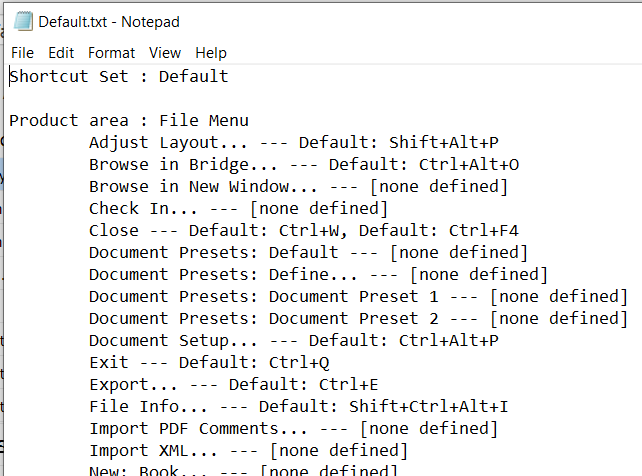
Show Set…button to see a generated text file listing of short cut assignments
Default Short Cut Settings
Here is the list of default Commands that EasyCatalog can assign along with the keyboard short cut assignments.
By default the keyboard short settings are empty and await a user to set up.
| Commands | Keyboard Short Cut |
|---|---|
Adopt Selection |
no short cut |
Auto Fill Tables |
no short cut |
Auto Pickup |
no short cut |
Cell Finder |
no short cut |
Change Document Keys |
no short cut |
Create Records For Untagged Text |
no short cut |
Edit Field Content |
no short cut |
Insert Field |
no short cut |
Key Finder |
no short cut |
Lock/Unlock Selection |
no short cut |
Make Panel Containing Selection |
no short cut |
Markup Field |
no short cut |
Markup Multiple Fields |
no short cut |
New Panel From Template 1 |
no short cut |
New Panel From Template 2 |
no short cut |
New Panel From Template 3 |
no short cut |
New Panel From Template 4 |
no short cut |
New Panel From Template 5 |
no short cut |
Paginate… |
no short cut |
Quick Search Selection |
no short cut |
Relink Selected Tags to Selected Fields |
no short cut |
Remove Field Markers |
no short cut |
Replace Fields in Selection |
no short cut |
Select Related Objects |
no short cut |
Select Text Between Markers |
no short cut |
Set Focus To Quick Search |
no short cut |
NEW Show All |
no short cut |
NEW Show Subset… |
no short cut |
Synchronize With Data Source |
no short cut |
Toggle Field Markers |
no short cut |
Update Content For All Keys |
no short cut |
Update Data Source With Document Selection |
no short cut |
Update Document |
no short cut |
Update Document With Panel Selection |
no short cut |
Update Furniture on Selected Pages |
no short cut |
Update Panel |
no short cut |
Update Selection |
no short cut |
Update XML Tags With Record Selection |
no short cut |
Combined Data Sources
EasyCatalog now allows you to combine separate data sources into a single panel through a feature called a Combined Data Source.
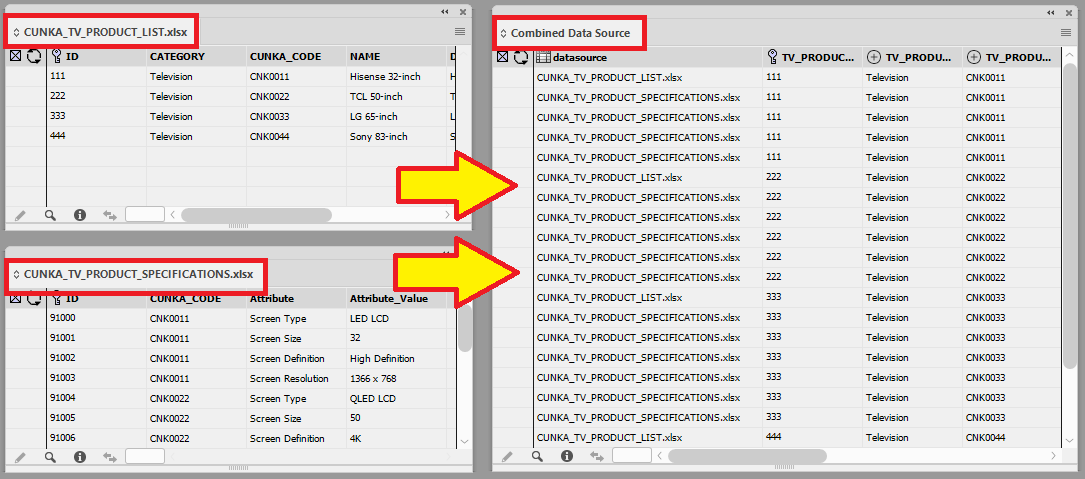
- Go to our detailed explanation and example page
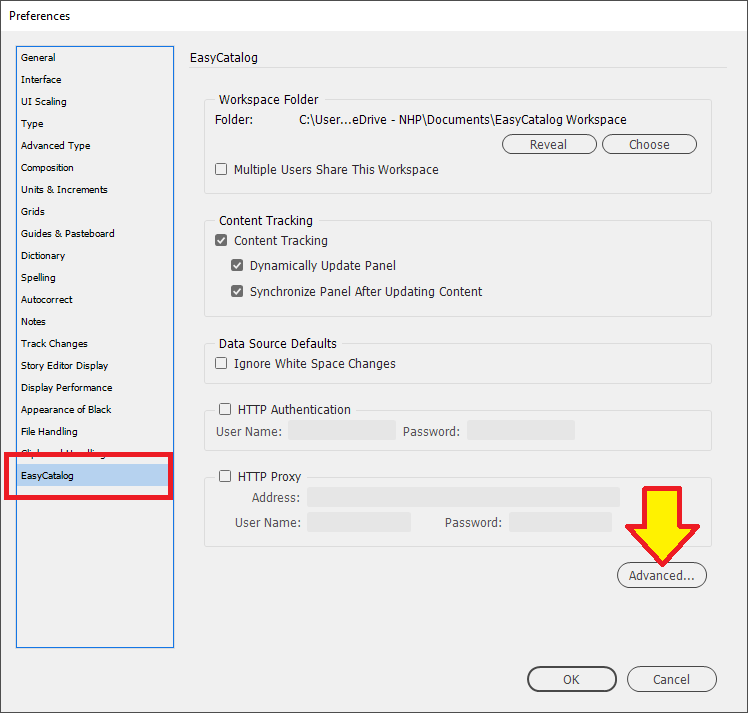
Advanced Preferences
The EasyCatalog Preferences panel provides access to additional Advanced Preferences panel that allow you to tailor settings to your environment.
| InDesign is required to be relaunched to apply any changes. |
Locating the Panel
The Advanced Preferences panel can be found by going to the InDesign menu Edit→Preferences then selecting EasyCatalog…
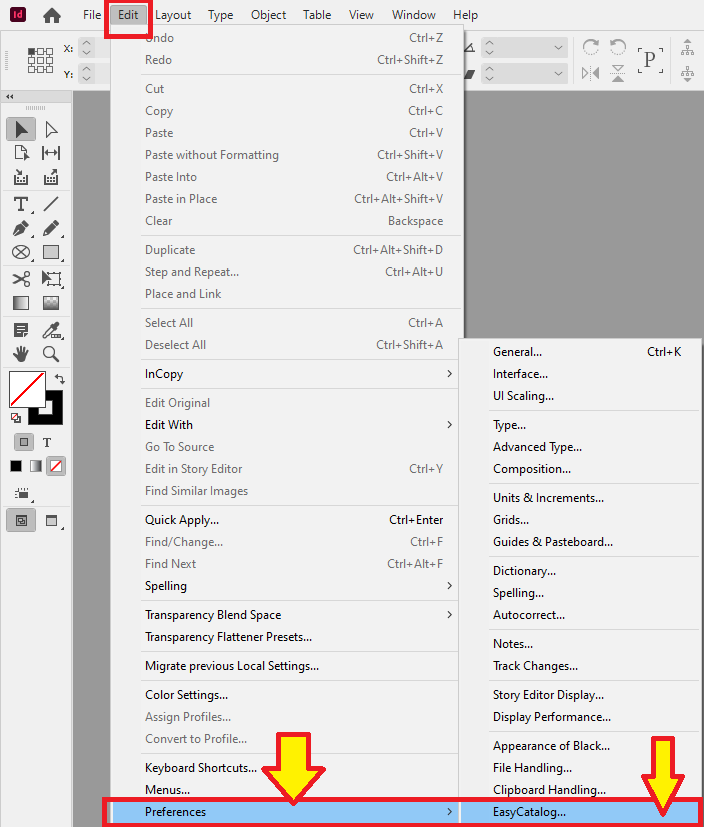
Select Advanced… to view the Advanced Preferences panel.
Settings
| EasyCatalog v16.23859 settings are displayed and listed. |
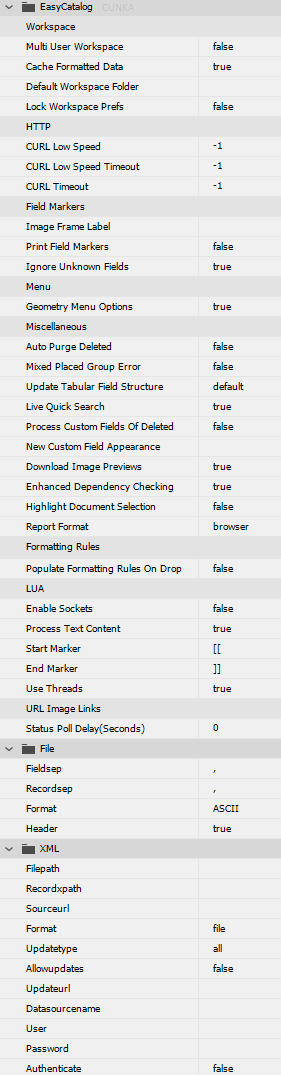
Workspace
| Setting | Description |
|---|---|
Multi User Workspace |
Defines the the default setting when the preferences are rebuilt. |
Cache Formatted Data |
true = EasyCatalog stores the ‘formatted’ content of a field for quicker data source loading. |
Default Workspace Folder |
This is the default setting applied when the preferences are rebuilt. |
Lock Workspace Prefs |
Prevents users making changes to the general Preferences. |
HTTP
Allows modification of the default settings used for HTTP requests via CURL.
| Setting | Description |
|---|---|
CURL Low Speed |
Set low speed limit time period. |
CURL Low Speed |
Limit Set low speed limit in bytes per second. |
CURL Timeout |
Set maximum time a request is allowed to take. |
Field Markers
| Setting | Description |
|---|---|
Image Frame Label |
The default Frame Label can be replaced with a custom value using commands such as FIELDSTR(FieldX). |
Print Field Markers |
true = Field markers will print. Use with caution! |
Ignore Unknown Fields |
true = When populating field specifiers, if the field specifier/field is for a field that does not exist in the record being paginated it will be ignored. The field will also be ignored during Adopt Fields. (This is the default setting) |
Menu
| Setting | Description |
|---|---|
Geometry Menu Option |
Enable or disable menu options relating to the Geometry functionality |
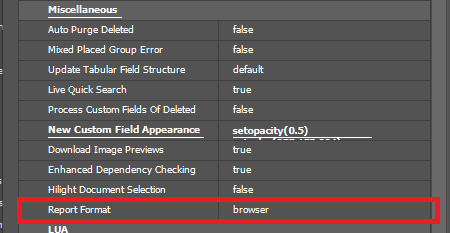
Miscellaneous
| Setting | Description |
|---|---|
Auto Purge Deleted |
true = Will purge any deleted records automatically after each Synchronise with Data Source operation. |
Mixed Placed Group Error |
true = If a group contains a mix of placed and unplaced records, it will be shown in an error state. |
Update Tabular Field Structure |
default, always and never. |
Live Quick Search |
Returns results as you type into the search area part of the panel. This setting is on by default. |
Process Custom Fields Of Deleted |
Process custom fields of deleted records. |
New Custom Field Appearance |
Applies a default drawing style to new custom fields. Pasting this example LUA code gives custom fields a gold color. setopacity(0.5) setcolor(255,255,79.05) drawrect(x,y,width,height) |
Download Image Previews |
Downloads a URL based image in order to generate a preview. |
Enhanced Dependency Checking |
Provides in depth custom field dependency checking with enhanced reporting in the event of a cyclic dependency. |
Highlight Document Selection |
Highlights the selected fields in a document using a blue outline in a data panel. |
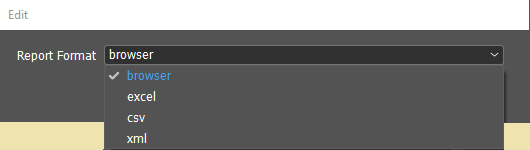
Report Format |
Defines the export format when using the |
Formatting Rules
| Setting | Description |
|---|---|
Populate Formatting Rules on Drop |
This is the default setting for "Populate on Drag 'n' Drop" for formatting rules. |
LUA
| Setting | Description |
|---|---|
Enable Sockets |
false = the default setting. |
Process Text Content |
Any text between the Start Marker and End Marker is treated as Lua code, executed when the text is updated. |
Start Marker |
Defines the start marker used for embedded Lua code. |
End Marker |
Defines the end marker used for embedded Lua code. |
Use Threads |
Use Lua threads to speed up the execution of advanced custom fields. |
URL Image Links
| Setting | Description |
|---|---|
Status Poll Delay (seconds) |
Control the frequency of checks for URL (Live) Links. |
Import/Export Settings
The Advanced Preferences panel settings can be saved and reloaded when required.
The Export… button will save all the Advanced Preferences to a file. (XML format)
The Import… button allows any previously exported Advanced Preferences to be reloaded.
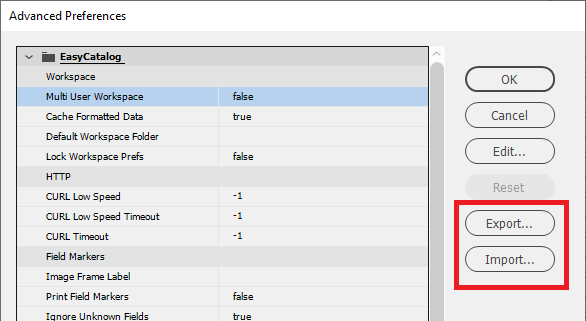
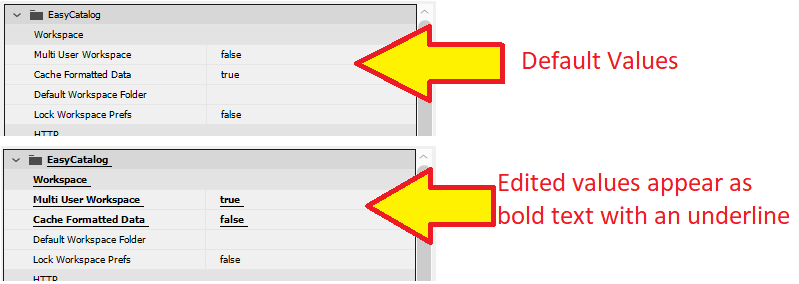
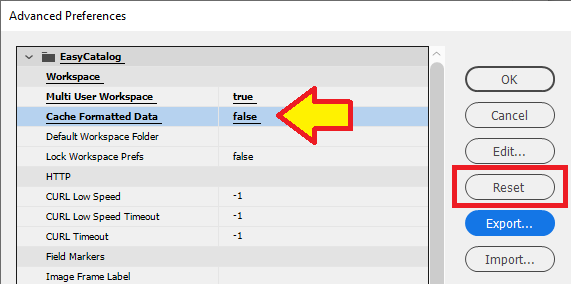
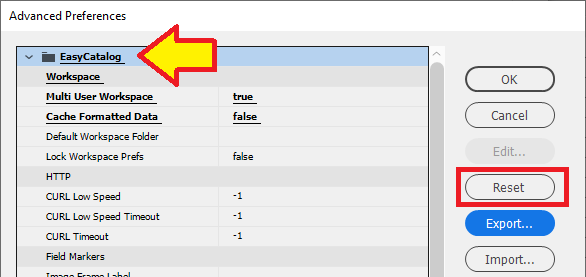
Reset Settings
Settings in the Advanced Preferences panel can be reset to the default settings used by EasyCatalog.
When a value is changed, its attribute and attribute value are displayed with bold text and an underline.
Export CSV / Excel File
EasyCatalog allows you to easily export all the data from an existing data source panel to CSV or Microsoft Excel file formats.
Excel File
Hold down Shift+Ctrl (Windows) or Shift+Cmd (Mac) when selecting “Update Data Source” to export an Excel file containing the data source’s data rather than a CSV file.
| Does not include custom fields. |
| You will find this actually works if you hold either Shift … or Ctrl or Alt on a PC as well. |
Reports
- EasyCatalog can generate helpful data reports of the
-
-
data source
-
the panel
-
document (front-most document)
-
- Reports can be created in
-
-
web browser (this is the default setting)
-
EXCEL file format
-
CSV file format
-
XML file format
-
This can be useful in assisting your maintenance of templates and libraries and understanding where fields/data have been placed.
An additional option called "Custom Report" is also available via Lua code scripting.
All reports are stored in the EasyCatalog Workspace folder.
Report Preferences
Reports can be generated in EXCEL / CSV / XML file formats, or viewed directly in the web browser.
Default setting is web browser.
- InDesign Menu → Edit → Preferences → EasyCatalog… → Advanced…
-
-
Report Format (under Miscellaneous heading)
-
Selecting Reports
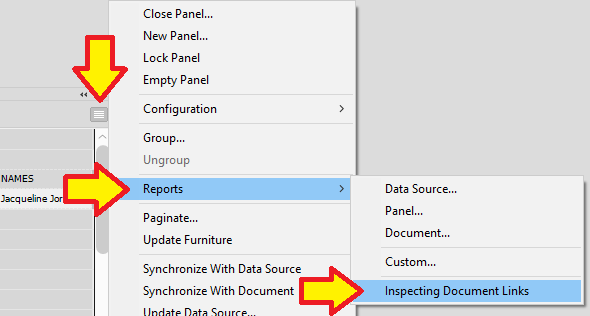
To create a report, select the panel and right click the top right corner → Reports. Then select the report type.

Data Source Report
This report shows all records and fields in the data source in a similar format to the EasyCatalog data panel.
If the record or field is placed on the front-most document it will be shown in red or green to show its status.
Panel Report
This report will shown only the records that are in the panel. They will appear in the same order as the panel obeying any sorting, grouping and filtering options you have configured.
If the record or field is placed on the front-most document it will be shown in red or green to show its status.
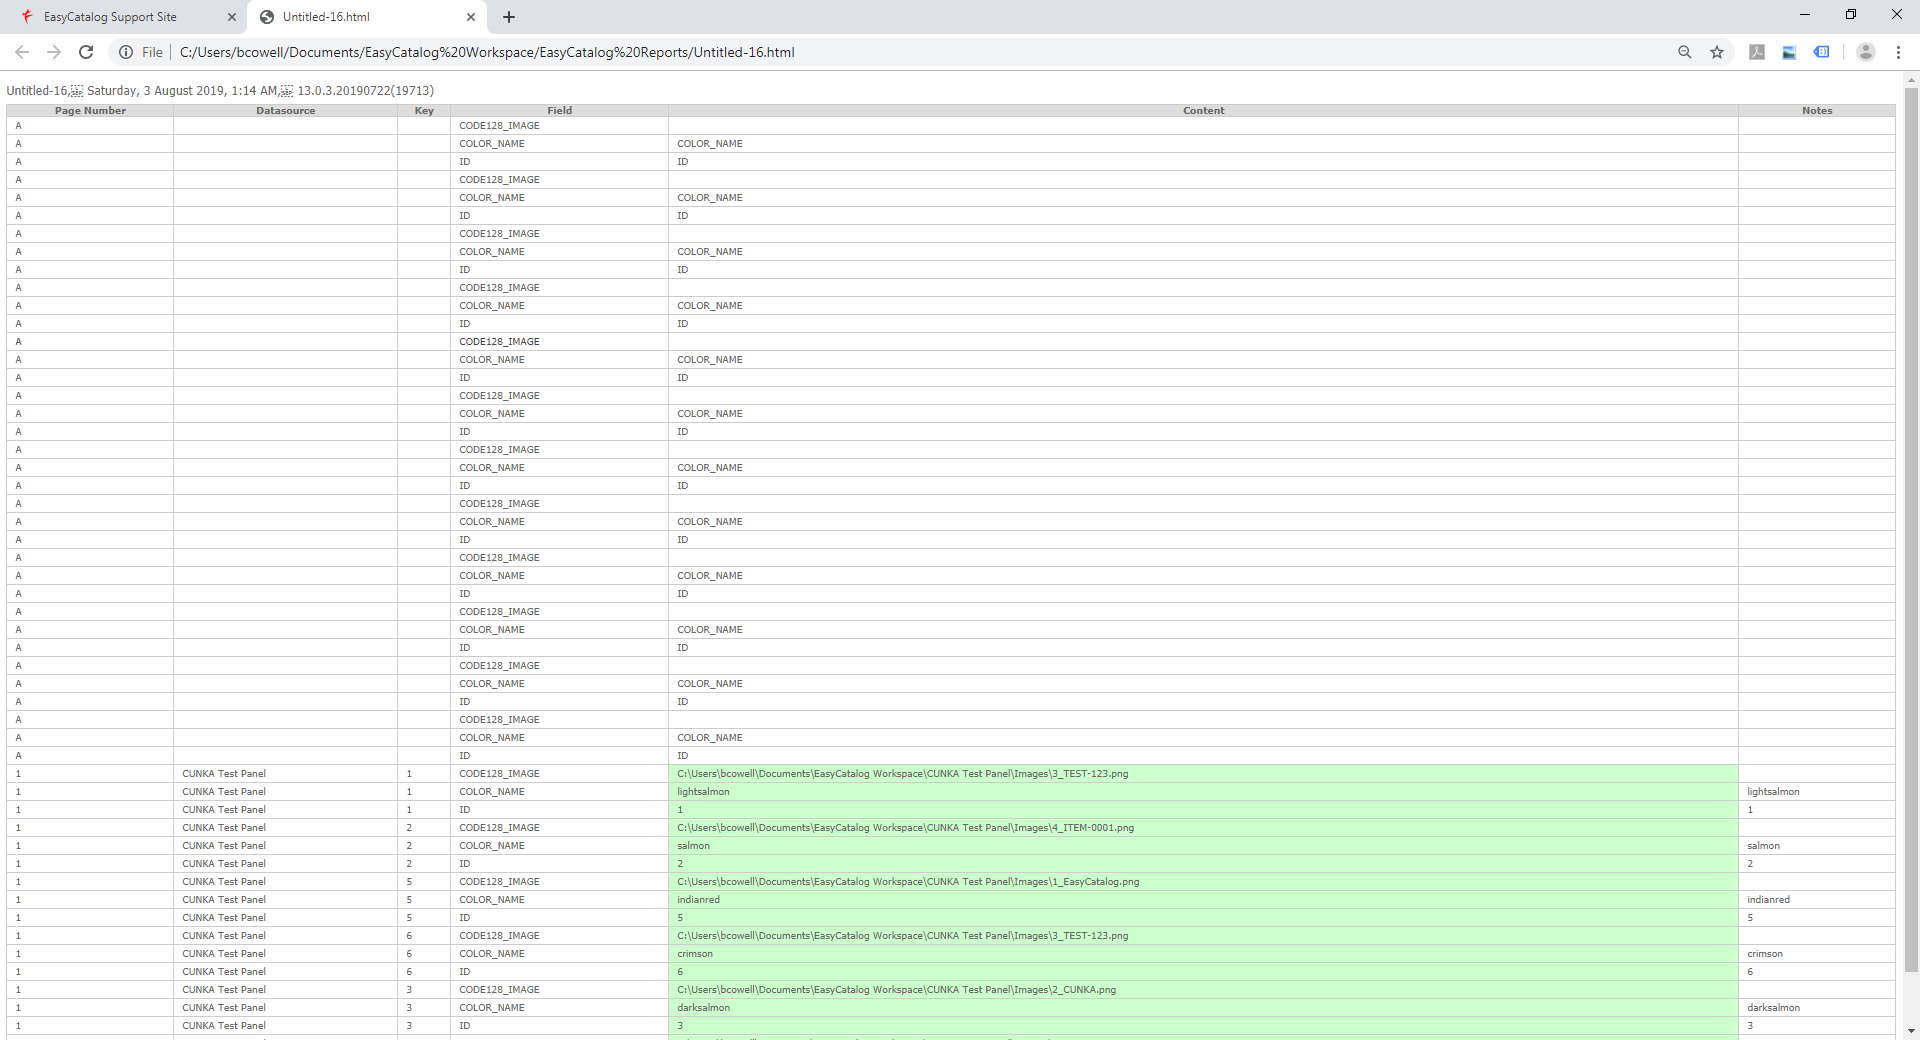
Document Report
Page Number |
Page number/master pages |
|---|---|
Datasource |
Panel datasource name |
Key |
Key value (usually the ID key) |
Field |
Field name |
Content |
For text it’s the field value, if it’s an image it’s the image path and file name. |
Notes |
Text saved under the Notes tab. If no text the default is to show the Field value again. |
Custom Report
Through LUA code, the custom report option provides a mechanism for a programmer to inspect a data source, panel or document, and output the information in virtually any format.
All your custom reports can be saved under a unique name to the “Report Menu” for later use, or to be later recalled from the menu for editing.
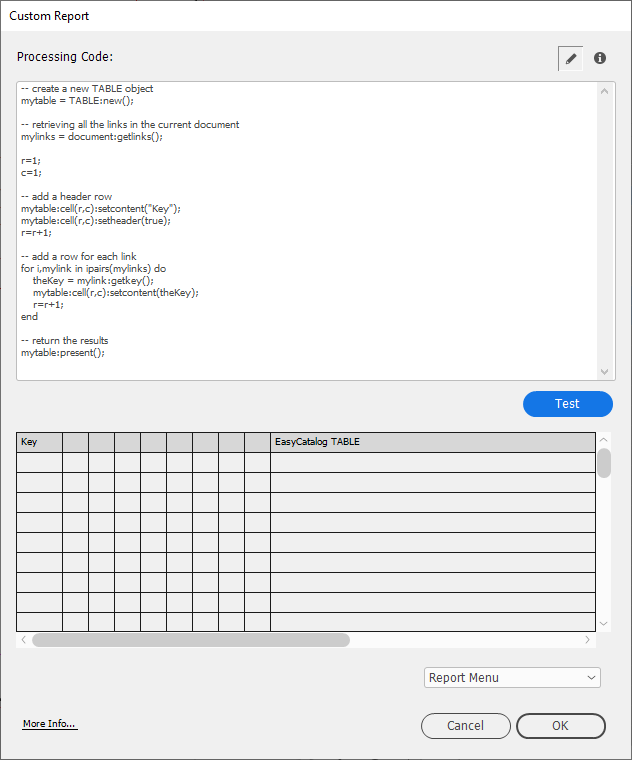
Saved "Custom Reports" can then appear in the menu.
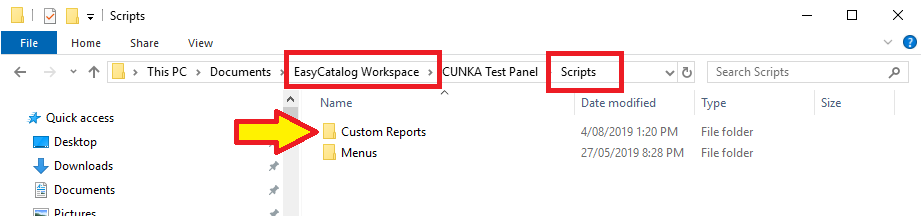
| Custom Reports exist only in the EasyCatalog Workspace they are created in. You will need to copy them to other workspaces for use. |
Create a Custom Report
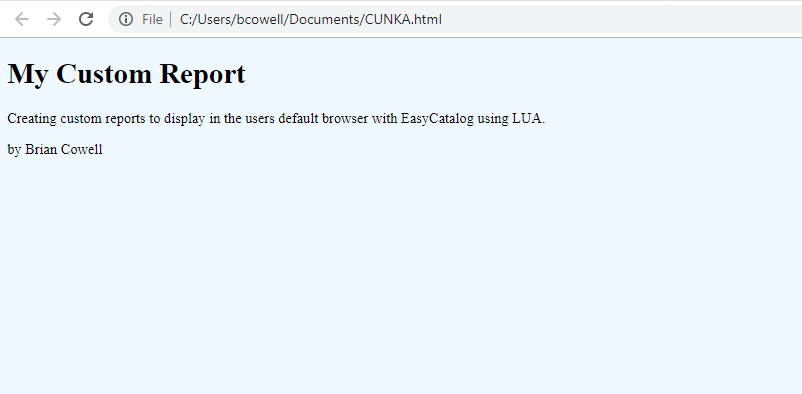
Creating a custom report in EasyCatalog is straight forward. The caveat with LUA is you must first save a file before it can be opened in the browser.
This example uses LUA in EasyCatalog to save a basic HTML file and open it in the browser.
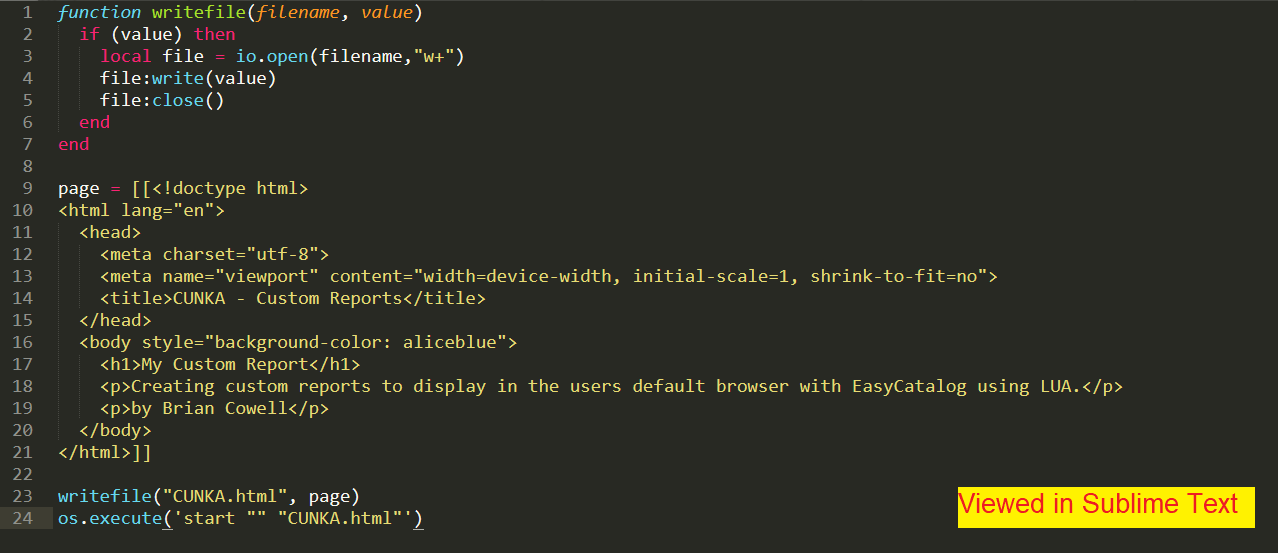
-- Save a file to the users document folder
function writefile(filename, value)
  if (value) then
    local file = io.open(filename,"w+")
    file:write(value)
    file:close()
  end
end

-- Create the HTML Code
-- Very basic HTML page
page = [[<!doctype html>
<html lang="en">
  <head>
    <meta charset="utf-8">
    <meta name="viewport" content="width=device-width, initial-scale=1, shrink-to-fit=no">
    <title>CUNKA - Custom Reports</title>
  </head>
  <body style="background-color: aliceblue">
    <h1>My Custom Report</h1>
    <p>Creating custom reports to display in the users default browser with EasyCatalog using LUA.</p>
    <p>by Brian Cowell</p>
  </body>
</html>]]

-- Save the file
writefile("CUNKA.html", page)

-- Open the saved file in the default browser
os.execute('start "" "CUNKA.html"')
The result is this simple page.
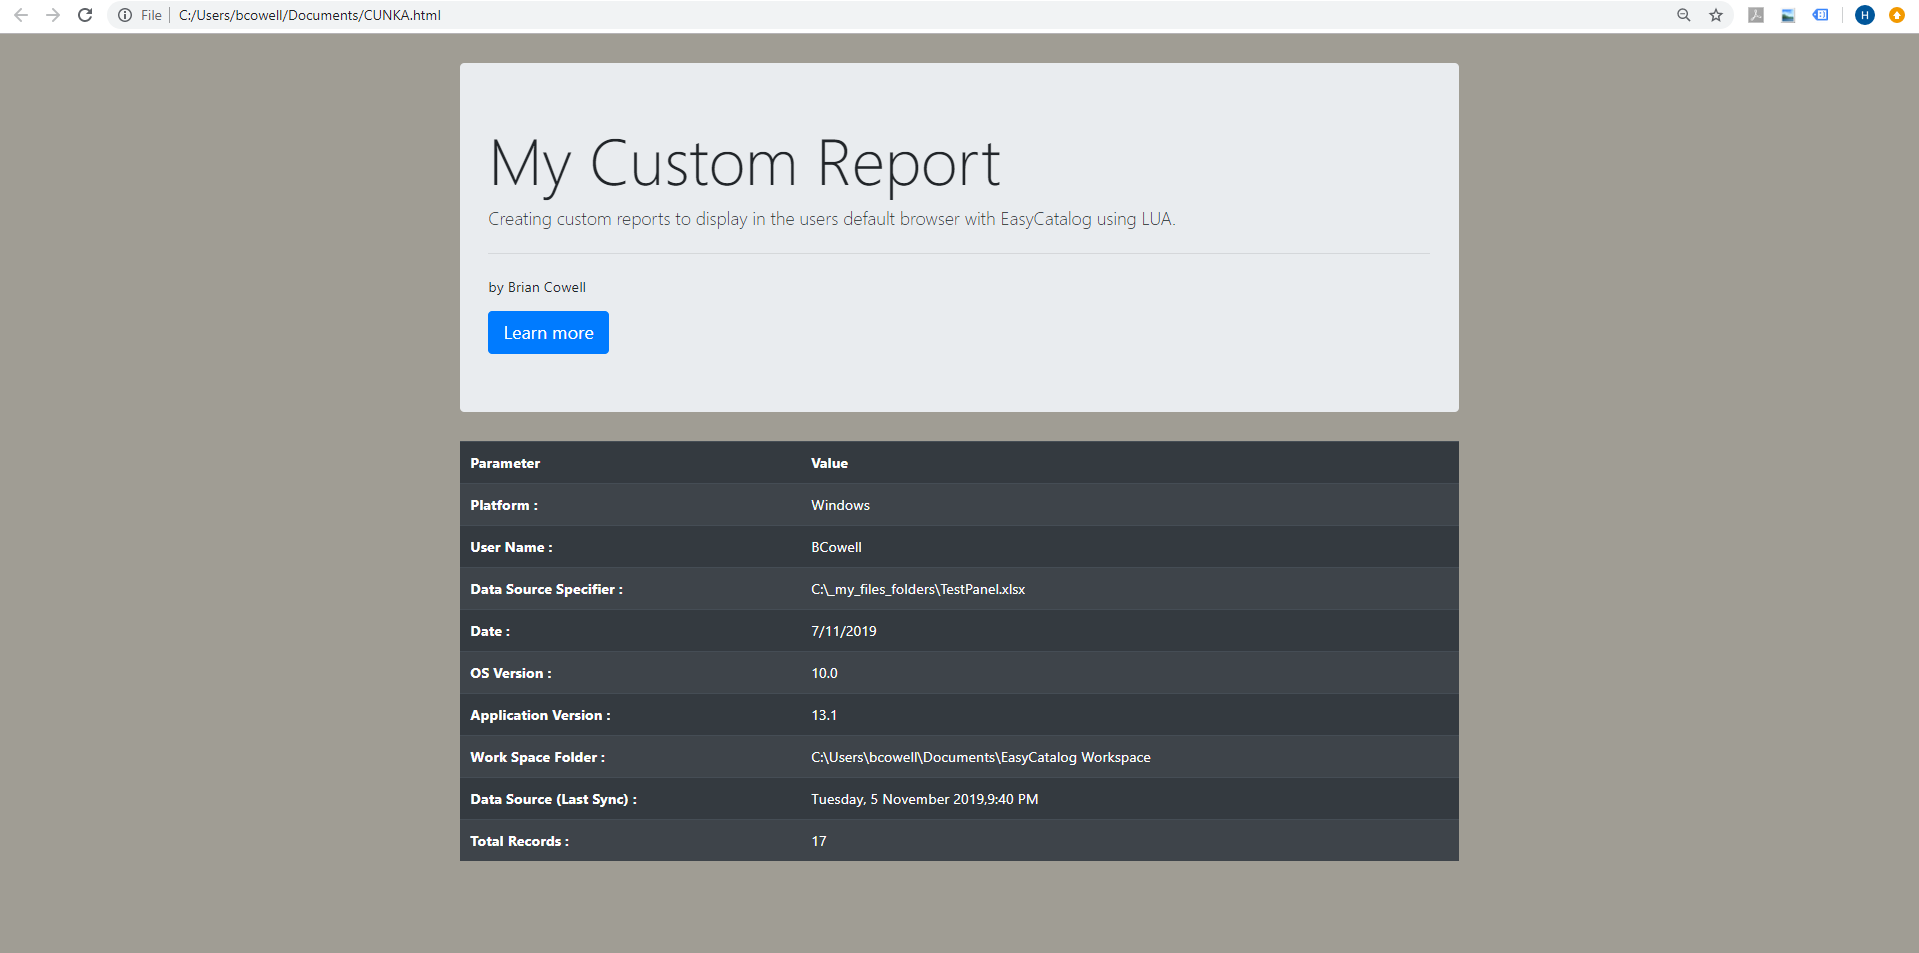
This is a screen shot of a more advanced report that is using Bootstrap 4 and displaying the environment variables.
Editing The Report CSS Styling
The Data Source, Panel and Document reports are generated from EasyCatalog firstly as a XML file. The XML file calls the transformation file (called xslt.xml) that creates the final HTML document which is opened in your default web-browser.
The generated XML files and the xslt.xml file can be found in the EasyCatalog Reports folder inside of your EasyCatalog Workspace folder.
Here is the code of the xslt.xml file showing where you can edit the CSS colored red.
xslt.xml
<?xml version="1.0" encoding="UTF-8" ?>
<xsl:stylesheet version="1.0" xmlns:xsl="http://www.w3.org/1999/XSL/Transform">
	<xsl:template match="/">
		<html>
			<head>
				<style type="text/css">
					table,td
					{
						border: 1px solid #CCC;
						border-collapse: collapse;
						font: small/0.9 "Tahoma", "Bitstream Vera Sans", Verdana, Helvetica, sans-serif;
					}
					table
					{
						border :none;
						border :1px solid #CCC;
					}
					thead th,
					tbody th
					{
						background : #DDD repeat-x;
						color : #666;
						padding : 2px 2px;
						border-left : 1px solid #CCC;
					}
					tbody th
					{
						background : #fafafb;
						border-top : 1px solid #CCC;
						text-align : left;
						font-weight : normal;
					}
					tbody tr td
					{
						padding : 5px 10px;
						color : #666;
					}
					tbody tr:hover
					{
						background : #FFF  repeat;
					}
					tbody tr:hover td
					{
						color : #454545;
					}
					tfoot td,
					tfoot th
					{
						border-left : none;
						border-top : 1px solid #CCC;3
						[red]#padding : 4px;
						background : #FFF  repeat;
						color : #666;
					}
					caption
					{
						text-align : left;
						font-size : 120%;
						padding : 10px 0;
						color : #666;
					}
					table a:link
					{
						color : #666;
					}
					table a:visited
					{
						color : #666;
					}
					table a:hover
					{
						color : #000;
						text-decoration : none;
					}
					table a:active
					{
						color : #003366;
					}
					p.special
					{
						color : green;
						border : solid red;
					}
                    td.uptodate {
						background-color : #ccffcc;
					}
                    td.outofdate {
						background-color : #ffbbbb;
					}
				</style>
			</head>
            	<body>
				<table border="1" width="100%">
					<caption>
						<xsl:value-of select="easycatalog/@title"/>,
						<xsl:value-of select="easycatalog/@datetime"/>,
						<xsl:value-of select="easycatalog/@version"/>
					</caption>
					<thead>
						<tr>
						<xsl:for-each select="//entry[@index=1]">
							<xsl:for-each select="keyvalue">
								<th scope = "col"><xsl:value-of select="@key"/></th>
							</xsl:for-each>
						</xsl:for-each>
						</tr>
					</thead>
						<xsl:for-each select="//logentries">
							<xsl:if test="@name[not(.='')]" >
								<tr>
									<td colspan = "999" bgcolor="#EEE" ><b><xsl:value-of select="@name"/></b></td>
								</tr>
							</xsl:if>
							<xsl:for-each select="entry">
								<tr>
									<xsl:for-each select="keyvalue">
										<td>
  											<xsl:attribute name="class">
    												<xsl:value-of select="@docstate" />
 											</xsl:attribute>
 											<xsl:value-of select="@value"/>
										</td>
									</xsl:for-each>
								</tr>
							</xsl:for-each>
						</xsl:for-each>
					</table>
			</body>
		</html>
	</xsl:template>
</xsl:stylesheet>
Field Options
Field Options allow a fields text (or images) to be formatted before it is placed in a document.
You can format the field to be:
-
A certain data type
e.g. alphanumeric, number, date/time, hyperlink, currency, barcode… -
Additionally cleansed and styled
e.g. remove and replace unwanted text, apply an InDesign Character style to the contents -
Placing an image
e.g. its location (Folder/URL), scaling, position, alignment -
Retrieved from a database
e.g. set up attributes to connect to the database -
Viewed in the data source panel using colors
e.g. use a color to show image fields -
A new field with custom content
e.g. using a custom field to join the contents of other fields
| By setting Field Options you can, for instance, ensure that your price fields are formatted to use the correct currency symbol and number of decimal places. |
To find more detail on Field Options go to our dedicated Field Options page:
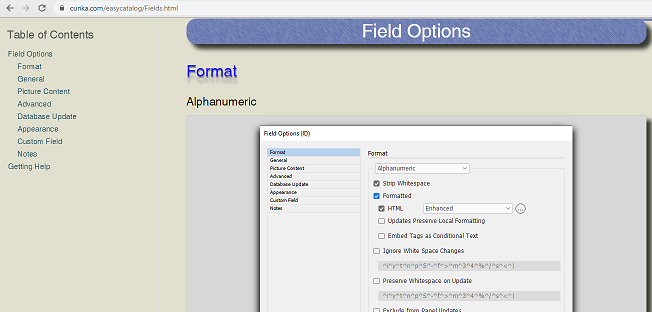
Format UPDATED
See our page for Format: Format
General
See our page for General: General
Picture Content
See our page for Picture Content: Picture Content
Advanced
See our page for Advanced: Advanced
Database Update
See our page for Database Update: Database Update
Appearance
See our page for Appearance: Appearance
Custom Field
See our page for Custom Field: Custom Field
Notes
See our page for Notes: Notes
Preprocessing
See our page for Preprocessing: Preprocessing
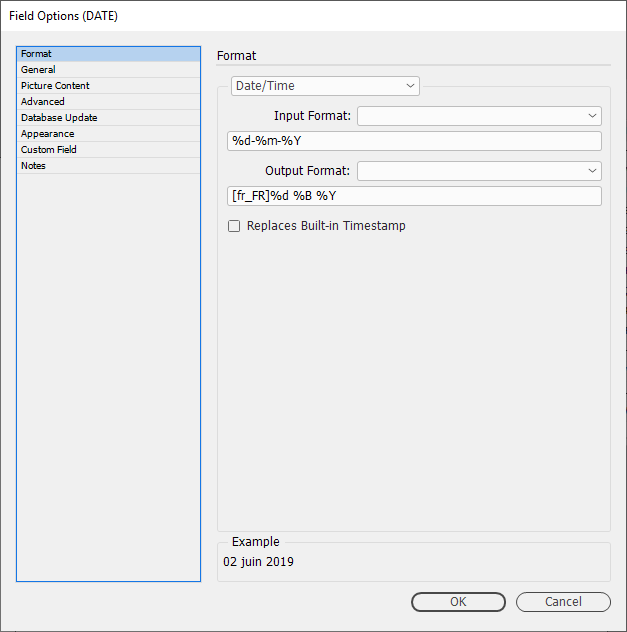
Date/Time
By selecting the "Date/Time" as the Format for a field, you can set how the time should be formatted.
Specifiers for Date & Time
The format of the date/time stamps in the existing source data can be changed to anything you may need.
Any time and date can be broken down individually to what is known as a ‘specifier’. Each ‘specifier’ begins with a '%' sign followed by a letter that. E.g. a full year like 2019 is represented by %Y.
By combining a series of specifiers together, its possible to indicate the format of any date or time. In order to that we need to know the:
-
Input Format - original source data
-
Output Format - desired display

Example - 17 June 2019
In this example we want to change the original date stamp of 17-06-2019 to 17 June, 2019
The - character is important. In this example it is the seperator and is part of this particular date stamp format. Your date stamp could have a / or a : as a seperator. (Even a space character)
|
Input Format
-
%d = 17
-
%m = 06
-
*Y = 2019
%d-%m-%Y
Output Format
* %d = 17
* %B = June
* *Y = 2019
%d %m, %Y
| The output uses the space & comma characters between the 'specifiers'. |
List of Specifiers
| Specifier | Description | Example |
|---|---|---|
%d-%m-%y %H:%M:%S |
Year represented by 2 digits. |
|
%Y-%m-%d %H:%M:%S |
Year shown in full. |
|
%y-%m-%d %H:%M:%S |
Year represented by 2 digits. |
|
%d/%m/%Y |
day/month/year |
|
%m/%d/%Y |
month/day/year |
|
%d/%A/%Y |
day/abbreviated weekday name/year |
|
%Ec |
Current date&time on your computer |
|
%a |
Abbreviated weekday name |
|
%A |
Full weekday name |
|
%b |
Abbreviated month name |
|
%B |
Full month name |
|
%c |
Date and time representation |
|
%C |
Year divided by 100 and truncated to integer (00-99) |
|
%d |
Day of the month, zero-padded (01-31) |
|
%D |
Short MM/DD/YY date, equivalent to %m/%d/%y |
|
%e |
Day of the month, space-padded ( 1-31) |
|
%F |
Short YYYY-MM-DD date, equivalent to %Y-%m-%d |
|
%g |
Week-based year, last two digits (00-99) |
|
%G |
Week-based year |
|
%h |
Abbreviated month name (same as %b) |
|
%H |
Hour in 24h format (00-23) |
|
%I |
Hour in 12h format (01-12) |
|
%j |
Day of the year (001-366) |
|
%m |
Month as a decimal number (01-12) |
|
%M |
Minute (00-59) |
|
%n |
New-line character (‘\n’) |
|
%p |
AM or PM designation |
|
%r |
12-hour clock time |
|
%R |
24-hour HH:MM time, equivalent to %H:%M |
|
%S |
Second (00-61) |
|
%t |
Horizontal-tab character (‘\t’) |
|
%T |
ISO 8601 time format (HH:MM:SS), equivalent to %H:%M:%S |
|
%u |
ISO 8601 weekday as number with Monday as 1 (1-7) |
|
%U |
Week number with the first Sunday as the first day of week one (00-53) |
|
%V |
ISO 8601 week number (00-53) |
|
%w |
Weekday as a decimal number with Sunday as 0 (0-6) |
|
%W |
Week number with the first Monday as the first day of week one (00-53) |
|
%x |
Date representation |
|
%X |
Time representation |
|
%y |
Year, last two digits (00-99) |
|
%Y |
Year |
|
%z |
ISO 8601 offset from UTC in timezone (1 minute=1, 1 hour=100) |
|
%Z |
Timezone name or abbreviation |
|
%% |
A % sign |
|
Prefix for other languages
Dates can now be prefixed for other spoken languages.
Month and weekday names can be localised when formatting dates. By default they will use the language specified by the InDesign user interface, but this can be changed by prefixing the format with the language required.
[fr_FR]
Example 1 - French language prefix [fr_FR]
[fr_FR]%d %B %Y
| %d-%m-%Y | [fr_FR]%d %B %Y |
|---|---|
11-04-2019 |
|
23-01-2019 |
|
05-03-2019 |
|
Example 2 - English prefix [en_US]
[en_US]%d %B %Y
| %d-%m-%Y | [en_US]%d %B %Y |
|---|---|
11-04-2019 |
|
23-01-2019 |
|
05-03-2019 |
|
Example 3 - German prefix [de_DE]
[de_DE]%d %B %Y
| %d-%m-%Y | [de_DE]%d %B %Y |
|---|---|
11-04-2019 |
|
23-01-2019 |
|
05-03-2019 |
|
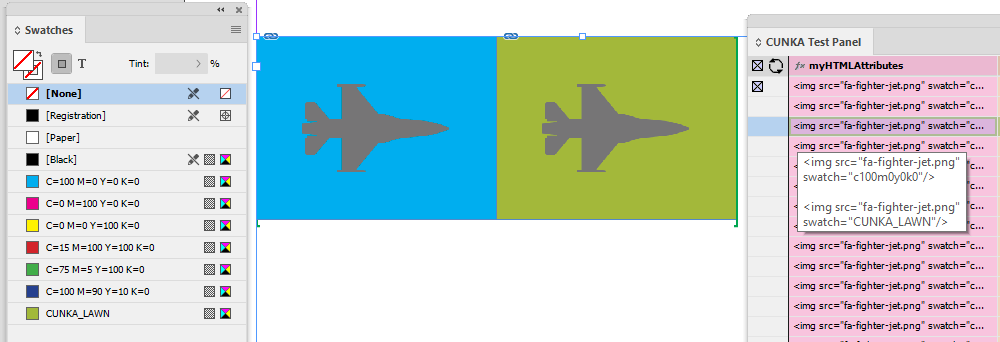
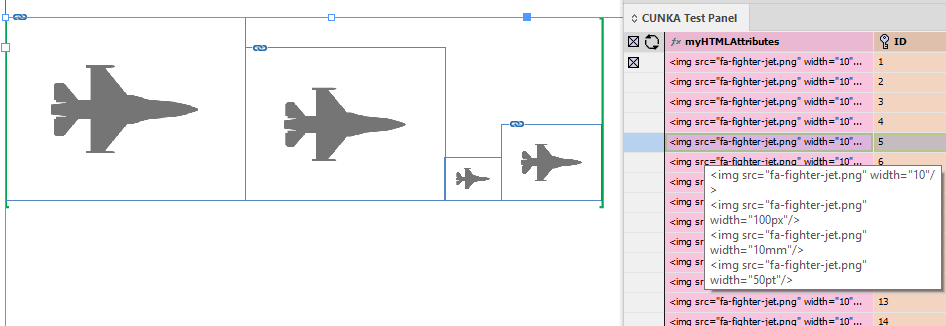
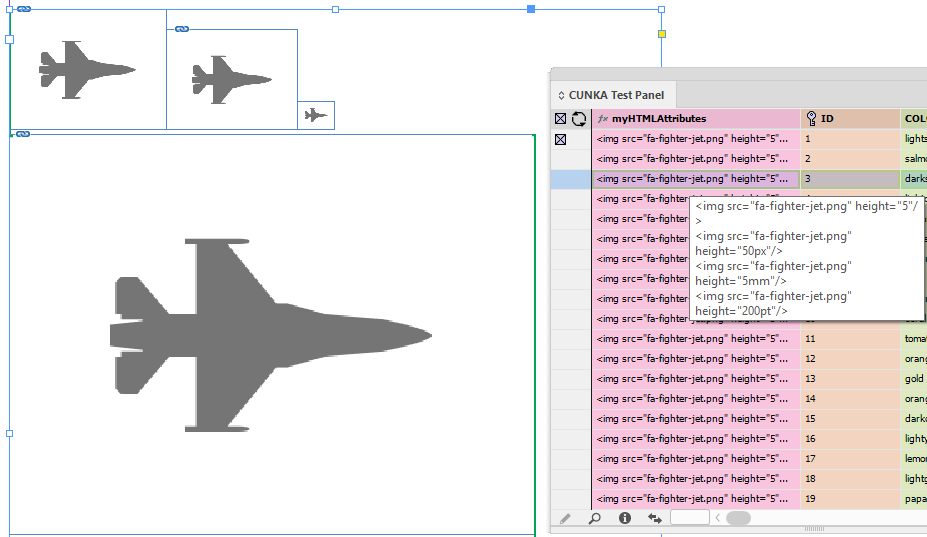
Formatted Text (HTML)
"Standard" & "Enhanced" HTML Parsers
When field content contains formatting information, the 'Formatted' option instructs EasyCatalog to apply the formatting tags defined in the ‘Field Formatting Tags’ dialog.
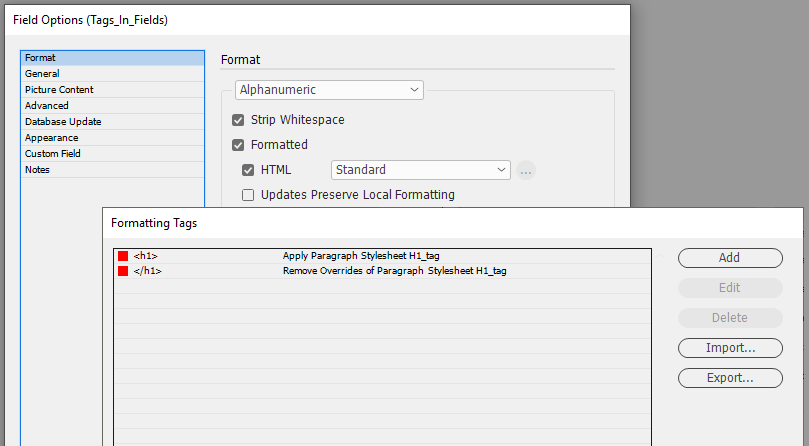
The 'Standard' setting is a legacy method of providing basic HTML tag support in EasyCatalog. It simply looks for tag matches in the ‘Formatting Tags’ settings. It doesn’t work as a proper HTML parser so its possible to have unbalanced tags. End tags can just be used and it really doesn’t understand the difference between start and end tags. So while it still exists, its best to use the 'Enhanced' settings as the creators of Easycatalog intend to phase out its use in the future.
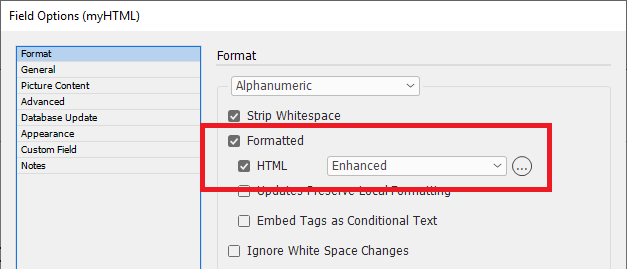
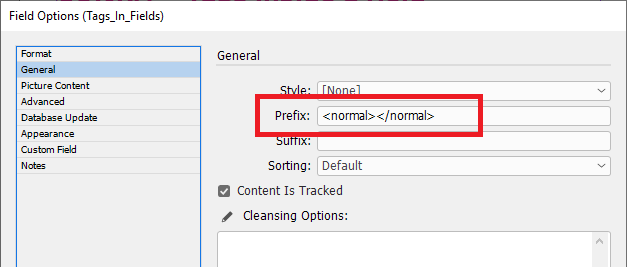
The 'Enhanced' setting utilizes a proper HTML parser and maps character or stylesheet names to tag names. It applies a style for the range of a tag. It also balances tags and will tidy up bad HTML. It does not rely on the settings in Formatting Tags. When a field is updated the text is deleted, so whatever styles are at play after that will be applied to the new content. We recommend prefixing the field with a <normal> (or similar) character stylesheet so this is the first thing applied to the field when updated. This ‘cleans’ the residual formatting out.
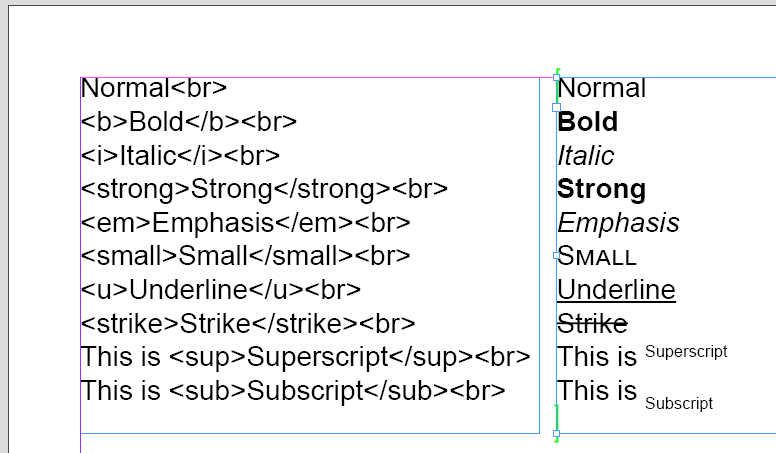
Enhanced HTML Features
Before any processing begins, the "Enhanced" HTML parser corrects any unbalanced tags and the entire field is enclosed within an implied <body> node.
| Any HTML tag which matches the name of an InDesign Character or Paragraph style will apply that style. |
Tag |
Attribute |
Value |
|---|---|---|
footnote |
- |
|
font |
face |
|
size |
|
|
color |
|
|
p |
shade |
|
align |
|
|
style |
|
|
a |
href |
|
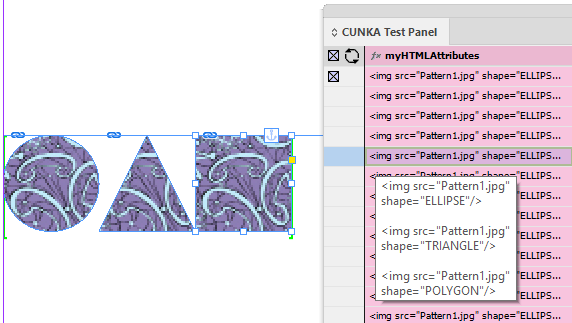
img |
src |
|
clippingpath |
|
|
fitting |
|
|
url |
|
|
shape |
|
|
swatch |
|
|
width |
|
|
height |
|
|
style |
|
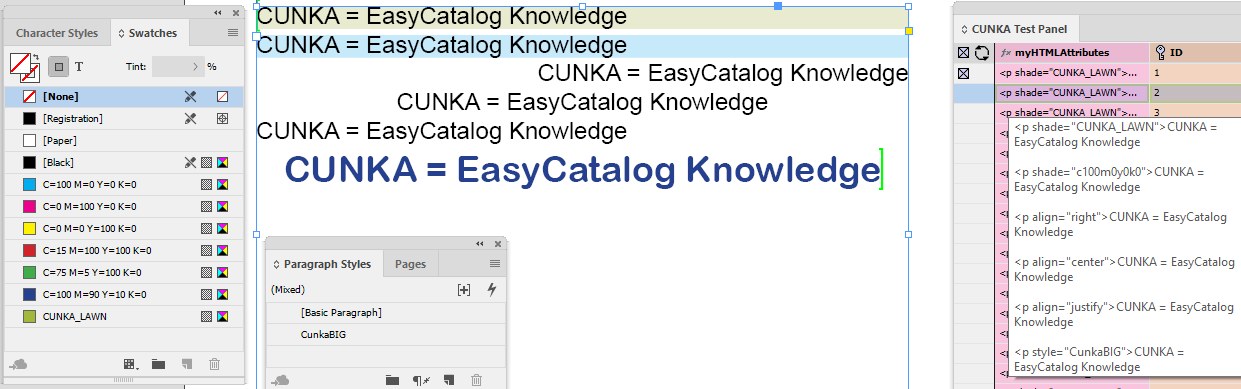
Tags to apply Paragraph/Character Styles
When Formatted is selected in the Format tab of field options, EasyCatalog will try to match any HTML style tag to the name of either an InDesign paragraph style, or an InDesign character style, and then apply it.
Example code:
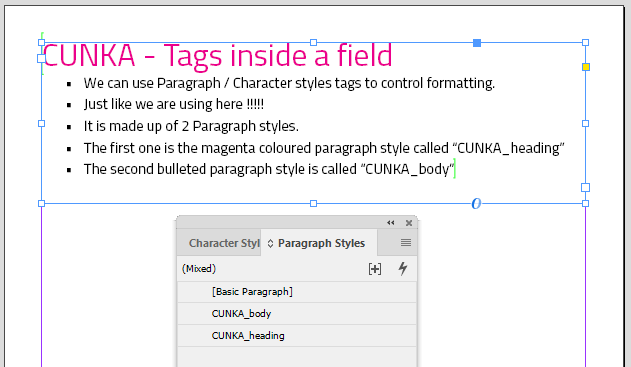
<p><CUNKA_heading>CUNKA  - Tags inside a field</CUNKA_heading></p>
<p><CUNKA_body>We can use Paragraph / Character styles tags to control formatting.</CUNKA_body></p>
<p><CUNKA_body>Just like we are using here !!!!!</CUNKA_body></p>
<p><CUNKA_body>It is made up of 2 Paragraph styles.</CUNKA_body></p>
<p><CUNKA_body>The first one is the magenta coloured paragraph style called “CUNKA_heading”</CUNKA_body></p>
<p><CUNKA_body>The second bulleted paragraph style is called “CUNKA_body”</CUNKA_body></p>
Allow All Whitespace
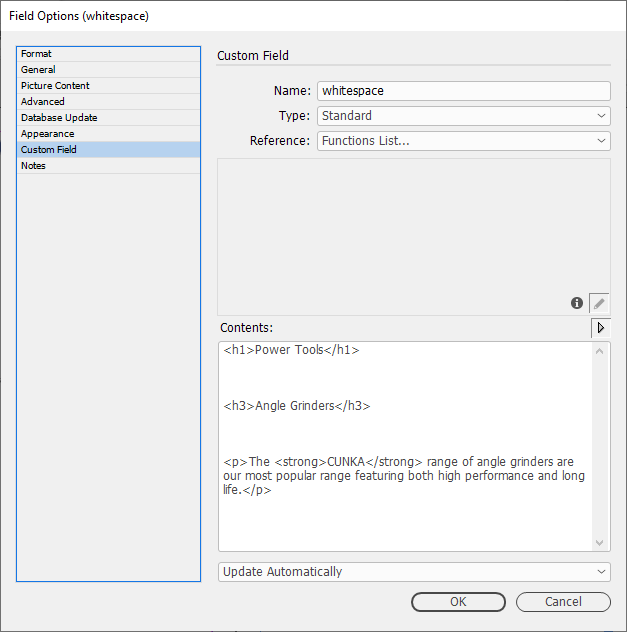
Text can come with white space that may be included intentionally. EasyCatalog has the setting Allow All White Space to handle such scenarios.
Example
Consider the following HTML code that has white space between the HTML tags.
<h1>Power Tools</h1>


<h3>Angle Grinders</h3>


<p>The <strong>CUNKA</strong> range of angle grinders are our most popular range featuring both high performance and long life.</p>
The custom field whitespace contains the HTML code.
Selecting "Enhanced" brings up the "HTML Options dialog".
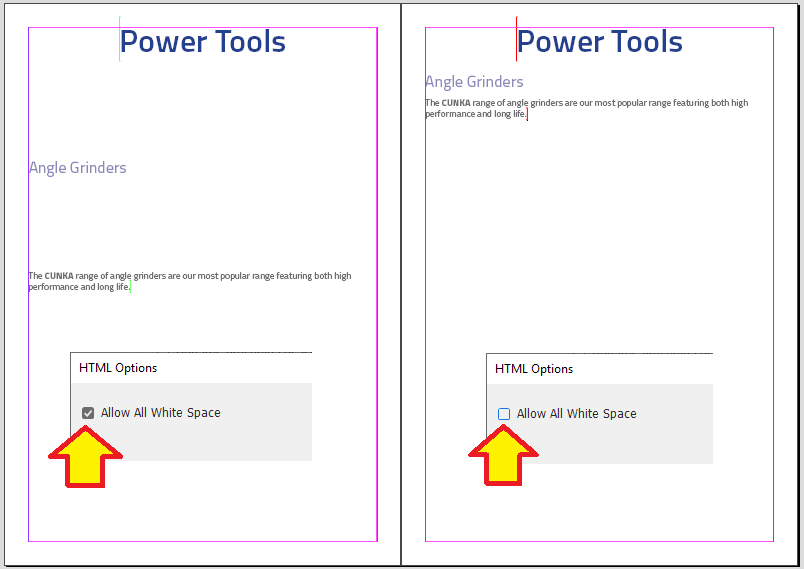
You can now chose Allow All White Space, or deselect it.
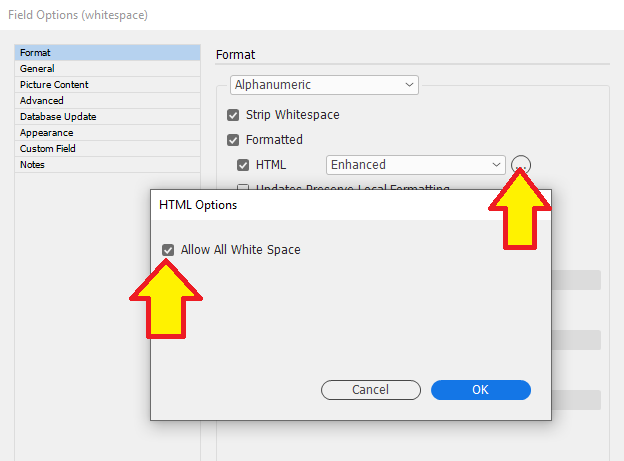
The following shows the setting Allow All White Space both selected and unselected.
Cleansing
Applying Cleansing Options UPDATED
The content of each field can be cleansed in a non-destructive way before it is used in the document. This allows content to be changed, formatted or removed.
The Cleansing Options action acts like a simple search-and-replace function.
{replace this} = {with this};
The Data Source Panel always displays the data cleansed.
Removing the applied Cleansing Options restores the original field content.
Since the "=" symbol is used for the actual cleansing, if any data contains an equals sign, you must use two of them together. eg. <table>=<table style=="CUNKA_GOLD">
Example 1 - Simple Cleansing
All # characters are replaced with a $
Cleansing functions end with and are separated by a ;
#=$;
| Before Cleansing | After Cleansing |
|---|---|
#3000 |
$3000 |
#20.10 |
$20.10 |
Example 2 - Multiple Cleansing
All # characters are replaced with a $
All _ characters are replaced with a .
Cleansing functions end with and are separated by a ; character
#=$;_=.;
| Before Cleansing | After Cleansing |
|---|---|
#3000_00 |
$3000.00 |
#20_10 |
$20.10 |
Example 3 - Removing Characters
All # characters are removed
Cleansing functions end with and are separated by a ; character
Specify nothing on the right-hand side of the = cleansing option strips the character on the left.
|
#=;
| Before Cleansing | After Cleansing |
|---|---|
#CUNKA |
CUNKA |
20# |
20 |
Example 4 - Replacing strings
All CUNKA characters are removed
Cleansing functions end with and are separated by a ; character
CUNKA=EasyCatalog;
| Before Cleansing | After Cleansing |
|---|---|
Email us at CUNKA |
Email us at EasyCatalog |
Call the CUNKA hotline |
Call the EasyCatalog hotline |
CUNKA |
EasyCatalog |
Example 5 - Fixing HTML
All <table tags are inserted with style="cunkaFruity"
Cleansing functions end with and are separated by a ; character
The == duplication of the equals sign must be used if the equal sign is needed in the cleansed result.
|
<table=<table style=="cunkaFruity";
| Before Cleansing | After Cleansing |
|---|---|
<table> |
<table style="cunkaFruity"> |
Example 6 - Replace empty data with a message
Sometime you may want to indicate that a field contains no information. Take for example images that may be required to all have a caption. When the caption field is empty you would like to say on the page Missing Caption!
Using REGEXV2, the ^ character means from the start.
The $ character means from the end.
Since there is no characters at the beginning and end, the empty field will have the Missing Caption! applied.
REGEXV2:^$=Missing Caption!;
| Before Cleansing | After Cleansing |
|---|---|
Missing Caption! |
Example 7 - Fixing "%" Encoding
URL "%" encoding ("%" followed by two hexadecimal digits) can sometimes appear in HTML code. One of the most regular seen is %20 which replaces space characters in text.
-
%3c = <
-
%20 = space
-
%3e = >
%3c=<;%20= ;%3e=>
| Before Cleansing | After Cleansing |
|---|---|
%3cBR%20%3e |
<BR > |
Example 8 - Replacing spacing to include "%20" URL encoding NEW
URLs cannot contain spaces.
The encoding for a space character for a URL usually %20. (or +)
Cleansing functions end with and are separated by a ; character.
=%20;
| Before Cleansing | After Cleansing |
|---|---|
yourwebsite.com/picture .jpg |
yourwebsite.com/picture%20%20%20.jpg |
InDesign Metacharacters/Special Characters
InDesign metacharacters, such as those used in the Find/Change dialog, can also be used as part of the cleansing statement and within the prefix and suffix fields.
Metacharacters begin with a caret (^) and represent special characters in InDesign, such as a bullet point or a tab.
|
Characters not covered could possibly be handled through the use og REGEXV2. See our sections Insert Unicode Characters and Using Regular Expressions UPDATED for more information. |
Metacharacters Table
| Code | Description | Character |
|---|---|---|
^# |
Auto Page Numbering |
|
^x |
Section Marker |
|
^8 |
Bullet |
• |
^^ |
Caret |
^ |
^2 |
Copyright Symbol |
© |
^p |
End of Paragraph |
|
^n |
Forced Line Break |
|
^7 |
Paragraph Symbol |
¶ |
^r |
Registered Trademark Symbol |
® |
^6 |
Section Symbol |
§ |
^t |
Tab |
|
^\ |
End Nested Style |
|
^y |
Right Indent Tab |
|
^i |
Indent to Here |
|
^_ |
Em Dash |
— |
^m |
Em Space |
|
^= |
En Dash |
– |
^> |
En Space |
|
^f |
Flush Space |
|
^| |
Hair Space |
|
^s |
Nonbreaking Space |
|
^< |
Thin Space |
|
^- |
Discretionary Hyphen |
|
^~ |
Nonbreaking Hyphen |
- |
^{ |
Double Left Quotation Mark |
“ |
^} |
Double Right Quotation Mark |
” |
^[ |
Single Left Quotation Mark |
‘ |
^] |
Single Right Quotation Mark |
’ |
^k |
Discretionary line break |
Example 1 - Asterisks Converted To InDesign Bullet Points
All asterisk characters * are converted to the InDesign bullet point metacharacter ^8
Cleansing functions end with and are separated by a ; character.
*=^8;
| Before Cleansing | After Cleansing |
|---|---|
*cunka.com |
|
*cunka.com |
|
Example 2 - Removing Forced Line Breaks
All forced line breaks characters ^n are removed.
Cleansing functions end with and are separated by a ; character.
^n=;
| Before Cleansing | After Cleansing |
|---|---|
|
cunka.com |
|
cunka.com |
Example 3 - Adding registered trademarks ®
For for the trademark symbol ™ see Example 1 - Append trademark symbol
Look for the text myCompany and add a registered trade mark symbol using ^r.
Cleansing functions end with and are separated by a ; character.
myCompany=myCompany^r;
| Before Cleansing | After Cleansing |
|---|---|
We use myCompany products. |
We use myCompany® products. |
Using Regular Expressions UPDATED
A more advanced method of cleansing data through pattern matching can be applied using regular expressions.
| Always use the updated and more advanced REGEXV2 over the older REGEX expression when cleansing. |
The ^ character is interpreted as an InDesign meta-character, so ^^ should be used for the regular expression ^ character:
|
Example 1 - Convert all the data in the field to be uppercase.
REGEXV2:(.)=\U\1;-
( )creates a group. Connects result to\1. -
.matches any character (except for line terminators) -
\Uuppercase transformation -
\1places the found group.
| Field Text | REGEXV2 result |
|---|---|
cat-NZ0003E |
CAT-NZ0003E |
Cat-AU99e |
CAT-AU99E |
CAt-JP01ax |
CAT-JP01AX |
#1fC0d |
#1FC0D |
Example 2 - Convert all the data in the field to be lowercase.
REGEXV2:(.)=\L\1;-
( )creates a group. Connects result to\1. -
.matches any character (except for line terminators) -
\Llowercase transformation -
\1places the found group.
| Field Text | REGEXV2 result |
|---|---|
cat-NZ0003E |
cat-nz0003e |
Cat-AU99e |
cat-au99e |
CAt-JP01ax |
cat-jp01ax |
#1FC0d |
#1fc0d |
Example 3 - Convert all the data in the field to be title case.
REGEXV2:(\w)(\w*)=\U\1\L\2;-
( )creates a group. Connects result to\1. -
\wmatches any word character -
( )creates a group. Connects result to\2. -
\wmatches any word character -
*matches as many times as possible -
\Uuppercase transformation -
\1places the found group. -
\Llowercase transformation -
\2places the found group.
| Field Text | REGEXV2 result |
|---|---|
indian red |
Indian Red |
light salmon |
Light Salmon |
dark golden rod |
Dark Golden Rod |
pale golden rod |
Pale Golden Rod |
Example 4 - Append "CUNKA-" where the data begins with 3 numbers.
REGEXV2:^^(\d{3})=CUNKA-\1;-
^^from the start of the line -
( )creates a group. Connects result to\1. -
\dmatches a digit 0-9 -
{3}matches exactly 3 times -
\1places the found group.
| Field Text | REGEXV2 result |
|---|---|
91234 |
CUNKA-91234 |
1a345 |
1a345 |
87878 |
CUNKA-87878 |
10.00 |
10.00 |
Example 5 - From the end of the data, remove the last 3 numbers.
REGEXV2:\d{3}$=;-
$from the end of the line -
\dmatches a digit 0-9 -
{3}matches exactly 3 times
| Field Text | REGEXV2 result |
|---|---|
91234 |
91 |
1a345 |
1a |
87878 |
87 |
10.00 |
10.00 |
Example 6 - If the 2nd last number is an 8, change it to a "z".
REGEXV2:(8)(.)$=z\2;-
$from the end of the line -
(.)creates a group. Connects result to\2. -
(8)matches the number 8 -
\2places the found group.
| Field Text | REGEXV2 result |
|---|---|
cat-NZ0008X |
cat-NZ000zX |
cat-NZ00008 |
cat-NZ00008 |
cat-JPAAAAA87 |
cat-JPAAAAAz7 |
cat-AU000800 |
cat-AU000800 |
Example 7 - If the 2nd last number is an 8, append the color from the Field "myCOLOR".
REGEXV2:(8)(.)$=\1\2 (FIELDSTR(myCOLOR));-
$from the end of the line -
(.)creates a group. Connects result to\2 -
(8)creates a group. Connects result to\1 -
\1places the found group -
\2places the found group -
FIELDSTR(myCOLOR)another filed called "myCOLOR" in the data source panel
| FIELD "myCOLOR" | Field Text | REGEXV2 result |
|---|---|---|
YELLOW |
Cat-NZ0008X |
Cat-NZ0008X (YELLOW) |
GREEN |
TTT-NZ00008 |
TTT-NZ00008 |
MAGENTA |
CUNKA-JPAAAAA87 |
CUNKA-JPAAAAA87 (MAGENTA) |
BLUE |
65bit-AU000800 |
65bit-AU000800 |
Example 8 - Find & replace certain names
Lets look at an example where the field text is supplied to EasyCatalog with various manufacturers names. The requirement is to find/replace with your company name.
The field text could be 1 or many lines. There may also be mistakes where the manufacturers name has been entered in all lowercase or uppercase.
REGEXV2:(?i)\b(Panasonic|Samsung|Sony|LG|Akai)\b=CUNKA;-
(?i)makes everything after it case insensitive -
\b \banything between is a word. -
( )creates a group. -
|acts like a boolean OR.
| Field Text | REGEXV2 result |
|---|---|
Panasonic is a TV manufacturer. |
CUNKA is a TV manufacturer. |
Example 9 - Change certain words to be colored text
The field text has come into EasyCatalog with no formatting applied. The objective is find certain words in the text and make them the color green.
(Assuming an InDesign Paragraph Style called GREEN exists)
In this instance we need to find certain words, and apply HTML style tags. The action will require the <GREEN> tag inserted before the found word, and the </GREEN> tag inserted after it.
REGEXV2:(?i)\b(Rain|Thunder|Lightning)\b=<GREEN>\1</GREEN>-
(?i)makes everything after it case insensitive -
\b \banything between is a word. -
( )creates a group. Connects result to\1. -
|acts like a boolean OR. -
\1places the found group.
With ( ) in a REGEXV2 expression, it is known in regular expressions as a captured group. Each captured grouped are numbered as they are captured starting at 1.
To reuse the result of the captured group a back reference must be used. In this case the back reference \1.
| Field Text | REGEXV2 result |
|---|---|
The secret word is thunder. |
The secret word is <GREEN>thunder</GREEN>. |
Example 10 - Empty text field alternative text
A field is used to provide a caption for an image. However, there is no indication that the field is empty and will need to be populated. With REGEX, we can find an empty field and place in an alternative caption.
REGEXV2:^$=MISSING CAPTION!!!;-
^from the beginning of the line -
$to the end of the line
The REGEXV2 cleansing instruction will only add the 'MISSING CAPTION!!!' text when the field it is applied to contains no text.
| Field Text | REGEXV2 result |
|---|---|
MISSING CAPTION!!! |
|
Side Facing Diagram |
Side Facing Diagram |
MISSING CAPTION!!! |
|
Say Something |
Say Something |
Example 11 Selectively apply a line break
Field has a unit value in brackets that has unfortunately been included on the same line. A HTML break (<br>) is needed and the white space removed.
REGEXV2:(.*[^^\s])(\s+)(\(.*\))$=\1<br>\3-
$from the end of the line -
(\(.*\))creates a group. Finds the brackets at the end. Connects result to\3 -
(\s+)creates a group. Finds the whitespace before the brackets. Connects result to\2 -
(.*[^^\s])creates a group. Finds everything else. Connects result to\1 -
\1places the found group -
\3places the found group -
<br>inserts the required HTML break.
| Field Text | REGEXV2 result |
|---|---|
Wheel Diameter (mm) |
Wheel Diameter<br>(mm) |
Weight (mm) |
Weight<br>(mm) |
Safety (Deadman) Switch |
Safety (Deadman) Switch |
Input Power (W) |
Input Power<br>(W) |
Type(L series) |
Type(L series) |
Example 12 Append text to end
Text will appended to the end of everything in this field.
REGEXV2:$=-0000-CUNKA;-
$from the end of the line -
append the text
-0000-CUNKA
| Field Text | REGEXV2 result |
|---|---|
YWQ-999 |
YWQ-999-0000-CUNKA |
YEE-123 |
YEE-123-0000-CUNKA |
AAA |
AAA-0000-CUNKA |
Example 13 Append text to end from another field
Text will appended to the end of everything in this field from another existing field.
REGEXV2:$= FIELDSTR(MYITEM);-
$from the end of the line -
=insert a space character after the equals sign to ensure text is not joined -
append text from the other field called
MYITEM
| Field Text | Field Text from MYITEM | REGEXV2 result |
|---|---|---|
Brown |
dog |
Brown dog |
Green |
grass |
Green grass |
Blue |
sky |
Blue sky |
Example 14 Insert text from another field before the field text
Text will appended to the end of everything in this field from another existing field.
REGEXV2:^=FIELDSTR(MYITEM) ;-
$from the end of the line -
insert text from the other field called
MYITEM -
;insert a space character before the semicolon to ensure text is not joined
| Field Text | Field Text from MYITEM | REGEXV2 result |
|---|---|---|
Pagination Module |
EasyCatalog |
EasyCatalog Pagination Module |
Knowledgebase |
CUNKA |
CUNKA Knowledgebase |
No Cleansing |
No Cleansing |
Example 15 Remove/replace all the contents of a field
There may occasions when you want to remove all the contents of a field, and possibly replace with new content.
REGEXV2:^(.*)$=;-
^from the beginning of the content -
(.*)creates a group. Gets all the content. -
$to the end of the content
| Field Text | REGEXV2 result |
|---|---|
Purple Rasberries |
|
CUNKA Ice Cream |
|
Brians Chocolate Cake |
REGEXV2:^(.*)$=Ice Cold Caramel Milk;-
^from the beginning of the content -
(.*)creates a group. Gets all the content. -
$to the end of the content -
Ice Cold Caramel Milkreplacement text
| Field Text | REGEXV2 result |
|---|---|
Purple Rasberries |
Ice Cold Caramel Milk |
CUNKA Ice Cream |
Ice Cold Caramel Milk |
Brians Chocolate Cake |
Ice Cold Caramel Milk |
Example 16 Extract text NEW
Text you require may be embedded in a larger body of text. In this example we need the image url only from a HTML block of code.
REGEXV2:.*(https*.+(?:.jpg|.png)).*=\1;-
.*everything before the URL -
(https*.+(?:.jpg|.png))creates a group. Gets the image URL by looking for https and ending with .jpg or .png. -
.*everything after the image URL -
\1places the found URL only
| Field Text | REGEXV2 result |
|---|---|
<div class="product" data-id="1ZSXD342EQQ"> |
https://our-website.com/product-images/No-Image-Available.jpg |
Unicode Character Replacement
REGEXV2 itself does not support the \uFFFF unicode syntax used with many online regex testers.The supported unicode syntax in EasyCatalog is \x{FFFF}
|
Example 1
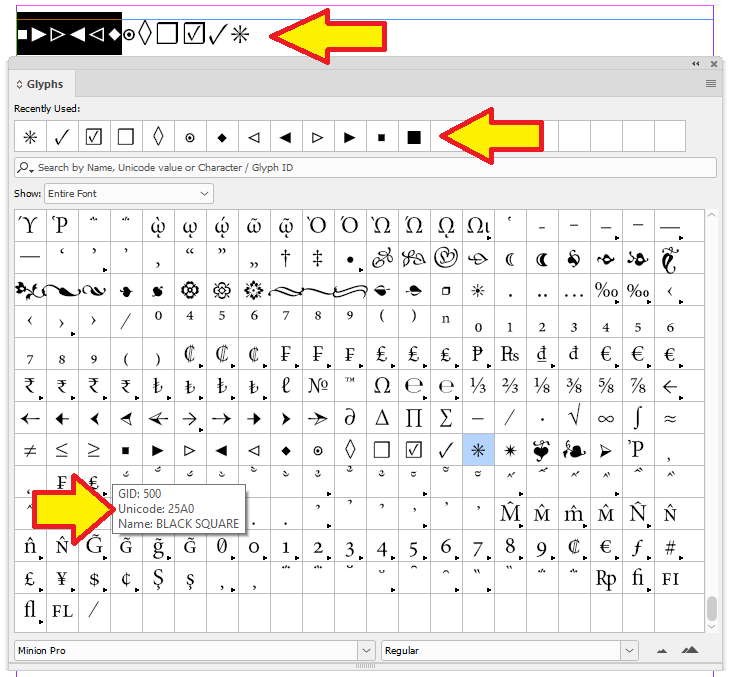
This example looks at removing a range of unicode characters between 25A0 to 25C6.
REGEXV2:[\x{25A0}-\x{25C6}]=;The InDesign Glyphs panel is a handy tool to work out the numbers of unicode characters.
Insert Unicode Characters
| Using unicode characters can be totally dependant whether the character appears in the font you are using. |
Example 1 - Append trademark symbol
Text will appended to the end of everything in this field from another existing field.
REGEXV2:(\bmyTRADEMARK\b)=\1\x{2122}-
(\bmyTRADEMARK\b)find exactly the word myTRADEMARK -
\1places the found word myTRADEMARK -
\x{2122}insert the trademark character
| Field Text | REGEXV2 result |
|---|---|
Trademark symbol in myTraDemarK |
Trademark symbol in myTraDemarK |
Trademark symbol in myTRADEMARK |
Trademark symbol in myTRADEMARK™ |
Trademark symbol in myTrademark |
Trademark symbol in myTrademark |
Example 2 - Append degrees symbol
The degrees symbol ° will be appended to a number representing an angle.
REGEXV2:$=\x{00B0}-
$from the end of the line -
\x{00B0}append the degree symbol
| Field Text | REGEXV2 result |
|---|---|
360 |
360° |
45 |
45° |
90 |
90° |
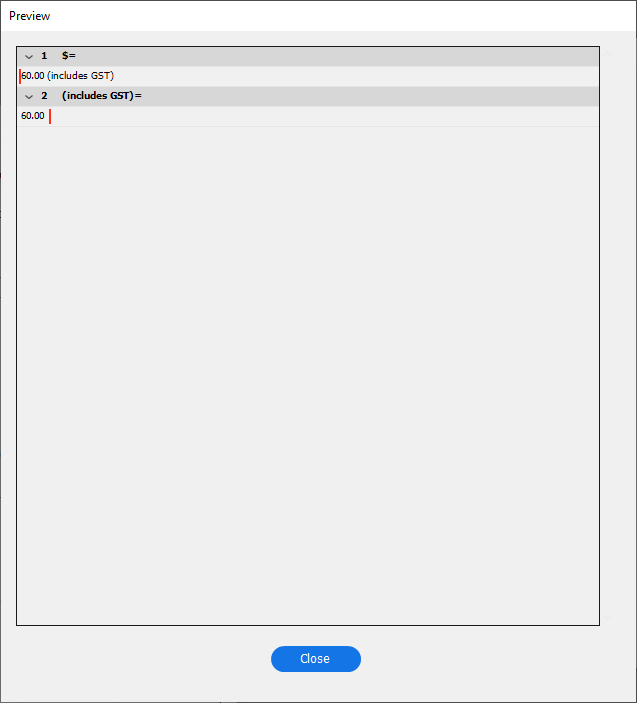
Preview Cleansing Options
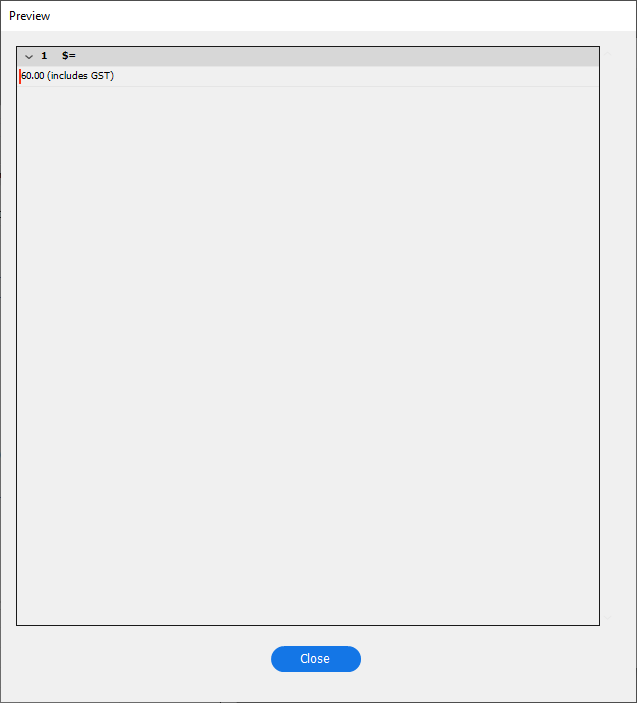
When designing and applying cleansing options, its possible to preview the results before applying them.
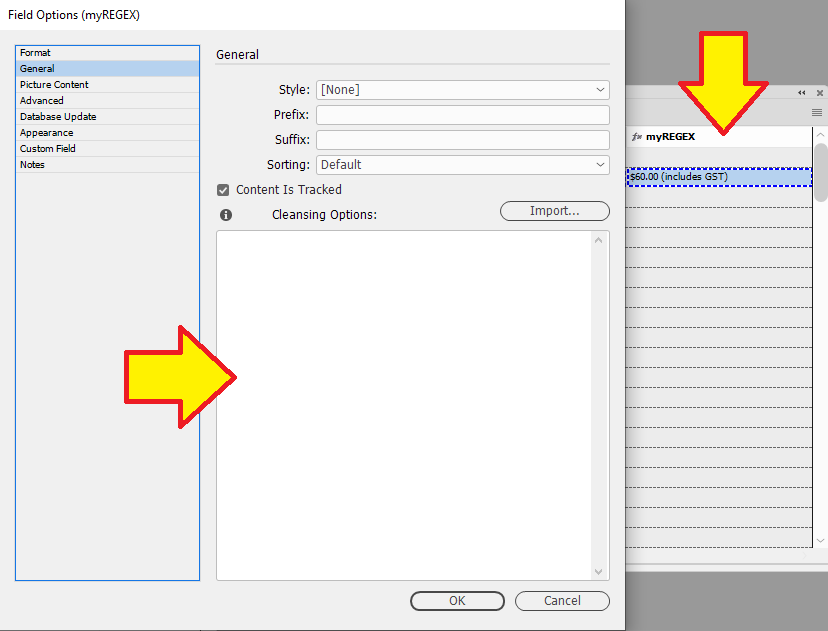
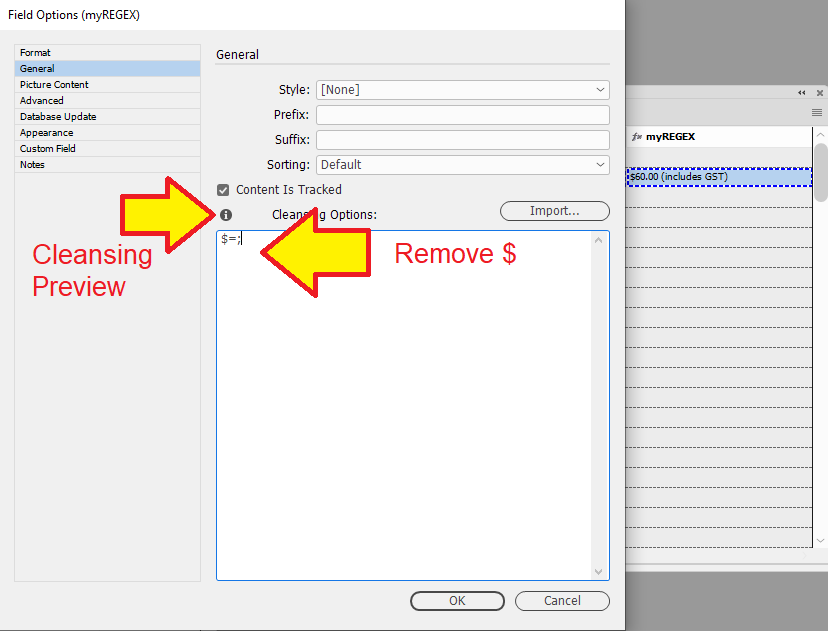
In the "General" tab of "Field Options", click on the to preview cleansing options.
Example
-
Remove
$and(includes GST)from data in the "myREGEX" field.

Computed Fields
What are Computed Fields?
A computed field is a special field that links to an existing data source field to perform a calculation on a document/library on the page.
The advantage of a computed field is you do not need to create a new field in your data source panel.
The disadvantage is they only work with records and do not allow the use of most of the GROUP reference commands.
- Computed Fields Summary
-
-
They are processed and updated just like normal fields.
-
Commands can take content from any field in the record they are associated with.
-
Are linked to existing fields.
-
Can be used on image fields.
-
Applied to records and not groups.
-
Example Usage
You have a PRICE field for a product item in your data source panel. The PRICE field is used in a table in a library/formatting rule. The PRICE does not include a tax of 10%. Through the use of a computed field you can now modify the PRICE to include the tax without modifying the data, or adding a new field to your data.
Where Can I Find Computed Fields?
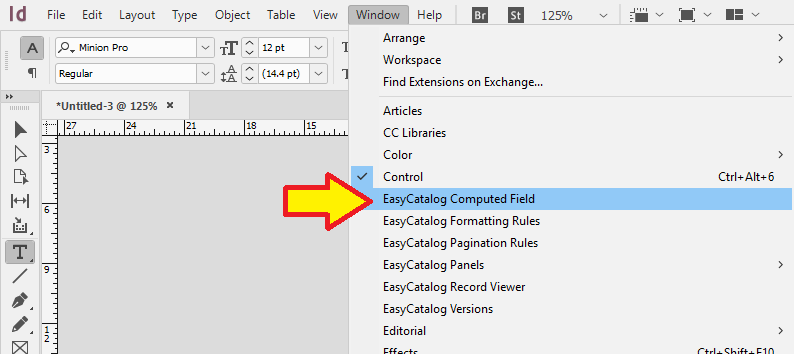
The computed fields dialog can be found in the menu Window → EasyCatalog Computed Fields.
Examples
Example 1 - Remove Dashes And Update Prices
In this example, we have a field called PART_NO1 that contains product part numbers split up with dashes. The goal will be to create a computed field in a table that removes the dashes.
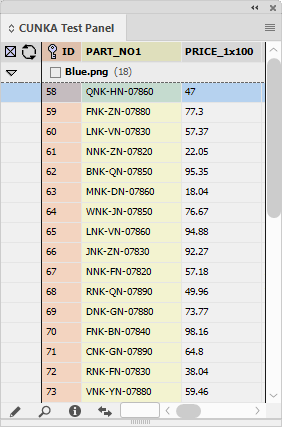
In addition, for each product part number, there is a price in the field PRICE_1x100 that will need to add $10 to without changing the original price. To complete this we will use another computed field.
The first thing created is a 1 row x 2 column table.
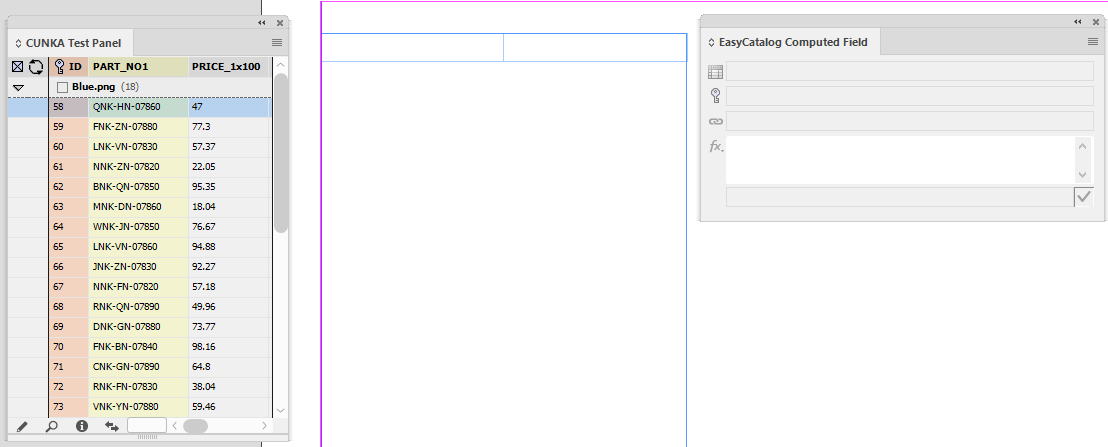
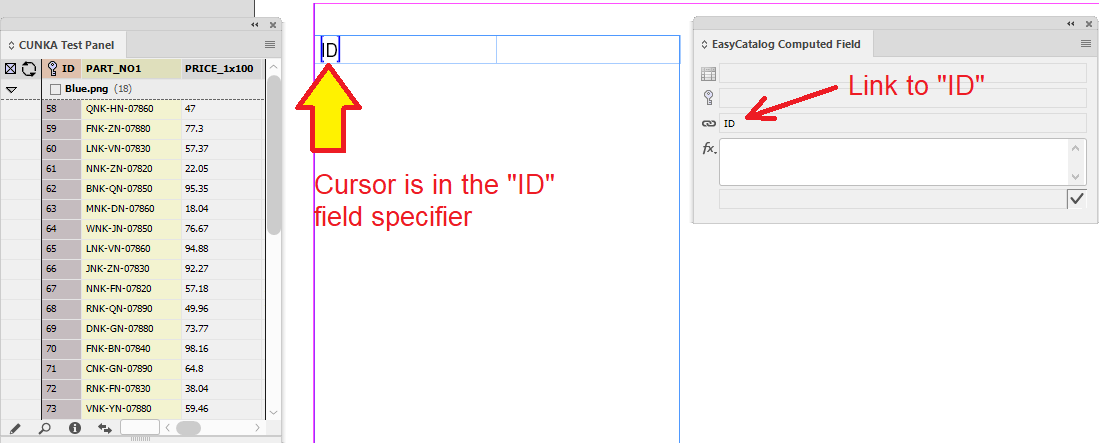
The computed field needs to be linked to an existing field. For this example I’ve chosen the ID field from my data source panel. It is inserted into the first column of the table.
Make sure the cursor is in the ID field specifier on the table. If the cursor is not in the ID field specifier, the EasyCatalog Computed Field dialog box will remain greyed out.
To replace the dashes, we need grab the contents of the PART_NO1 field and apply the REPLACE field command on it.
In the "fx" box of the EasyCatalog Computed Field dialog we put:
REPLACE(FIELDSTR(PART_NO1),'-','')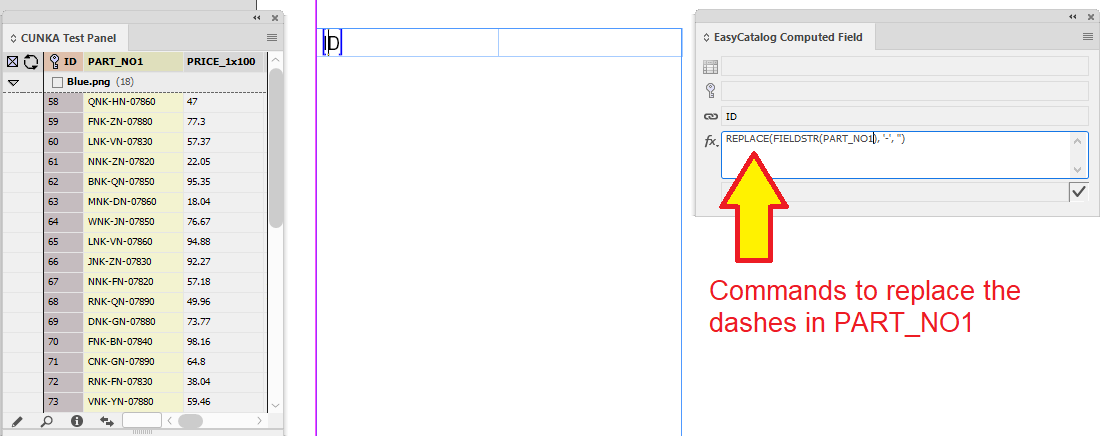
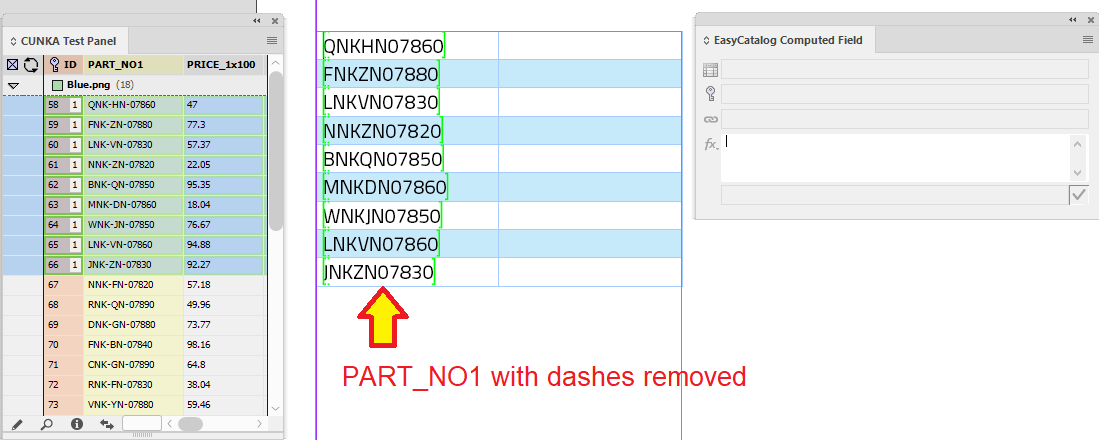
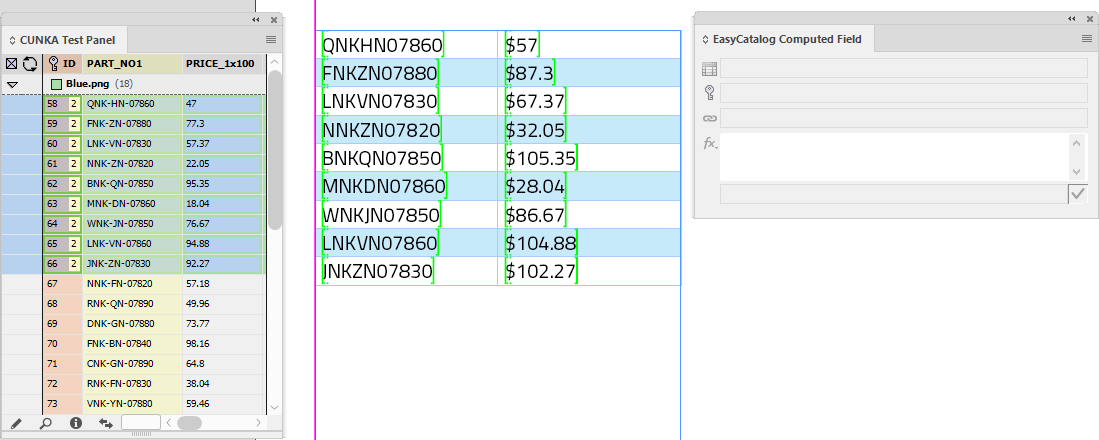
When records are paginated in the table, you can see that the dashes in PART_NO1 are removed.
$SUM(FIELDVAL(PRICE_1x100),10)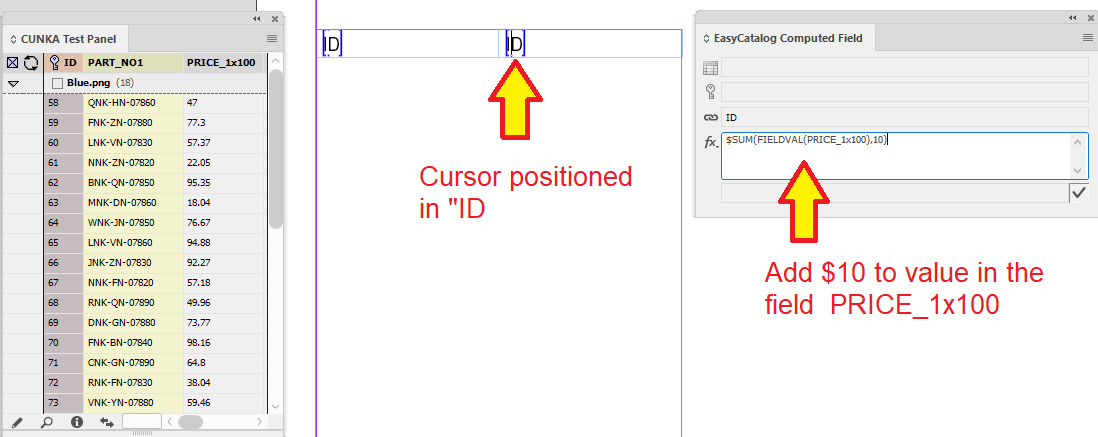

Final result shows all the dashes removed in the part numbers, and all prices have had $10 added to them.
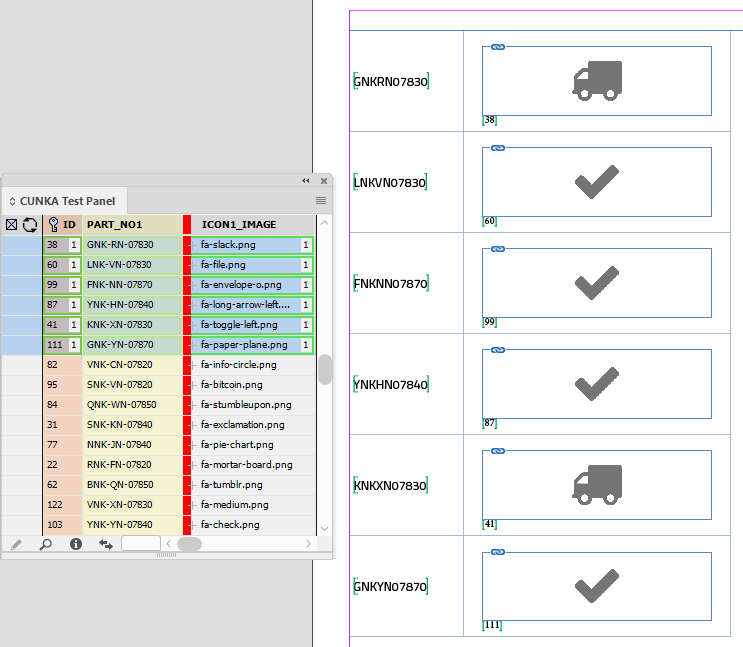
Example 2 - Control What Image is Shown
In this example we will override the image that will be used in the ICON1_IMAGE field for every record by determining if the ID field is greater than 50.
-
ID is 51 or greater, the icon image fa-check.png will be used.
-
ID is 50 or less, the icon image fa-truck.png will be used.
The cursor is placed in the ICON1_IMAGE on the page and the computed field "fx" below is added:
IF(FIELDVAL(ID),'>',50,'fa-check.png','fa-truck.png')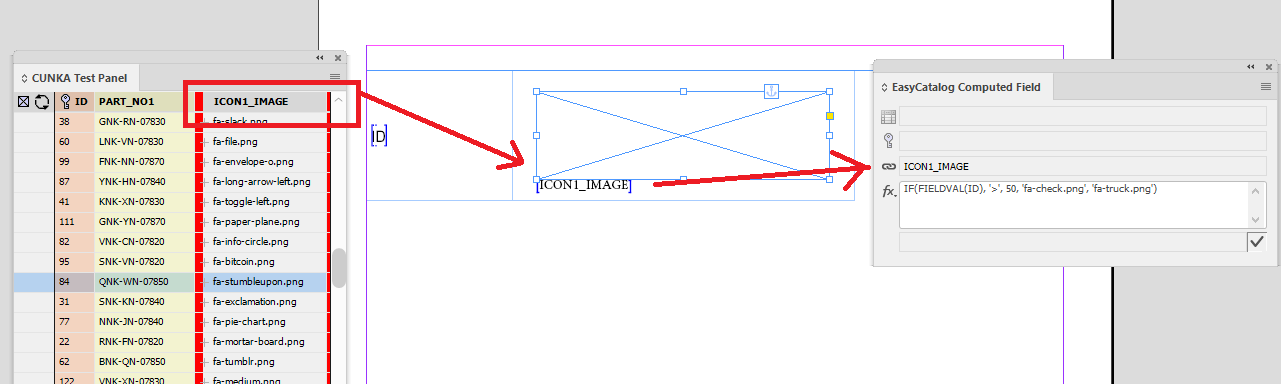
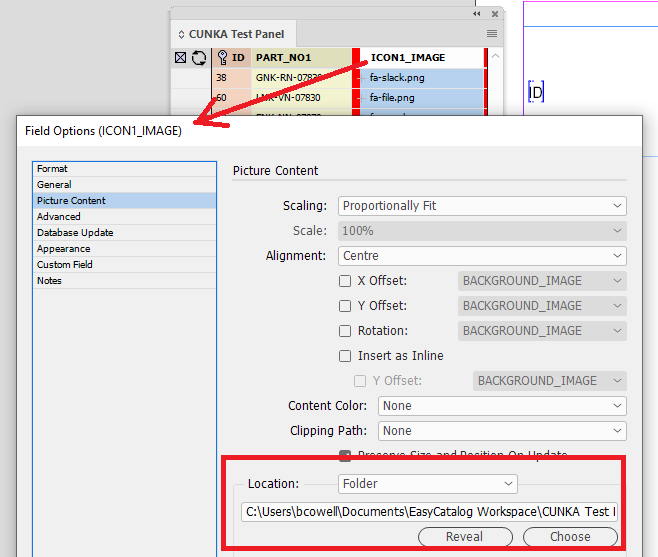
As this result will be determining the image used, its important that the field been linked to (eg ICON1_IMAGE) does have a picture location path set so the computed field can find the image.
The final result.
Computed vs Custom Command Reference
Computed commands use many of the existing Custom commands.
As computed fields are executed on the document page, some of the panel specific commands (eg. GROUPLAST) are not available for use. However, computed fields pick up a few extra commands specific to whats on the document and where its placed. (eg.TAGPAGENUMBER)
Below we display all the commands as a quick reference.
Available Not available
| Command Reference Name | COMPUTED | CUSTOM |
|---|---|---|
Document Decisions While Paginating
EasyCatalog allows you to make decisions on the document while paginating. This flexibility allows you clever dynamic control of your content on how and when things appear on a page.
You need to put instructions into the document in order to do this. The instructions appear in "[[………]]" that are simply double square brackets that indicate where the intructions begin and end.
The instructions are created using a scripting language called LUA. Its easy to learn and you will find our uses here applicable to your projects.
Deciding on applying Column/Frame Breaks
There may occasions when a particular item appears in the document and you want to insert some form of break . Whether thats a page, column or frame break, you can control when that happens.
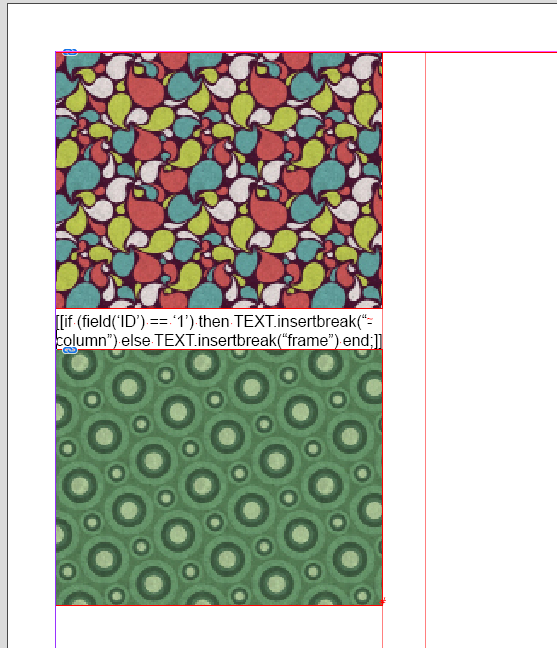
Example
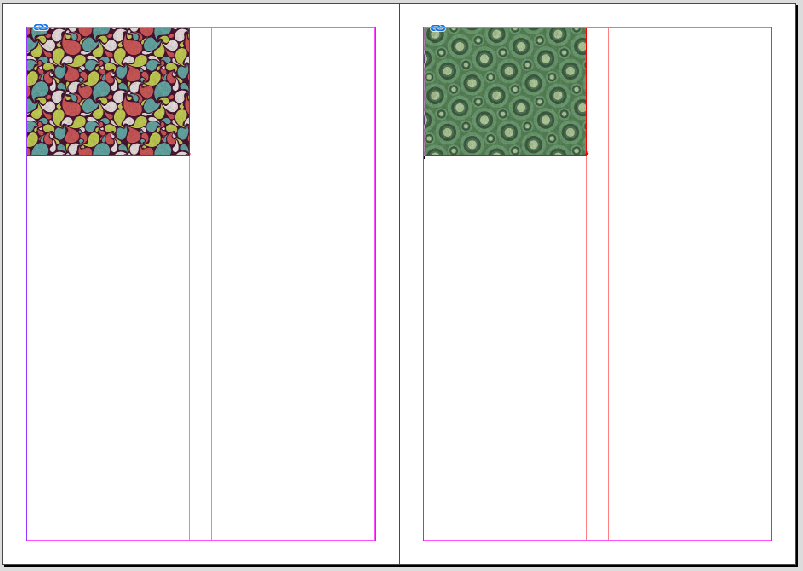
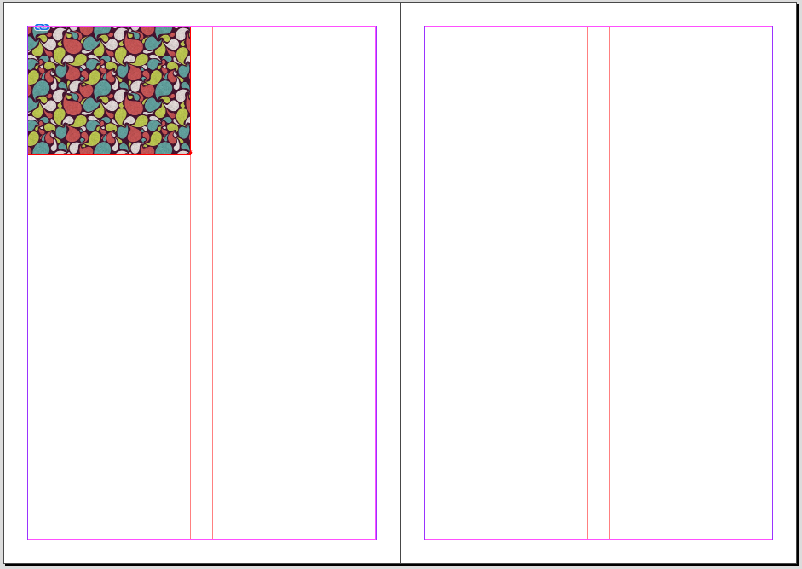
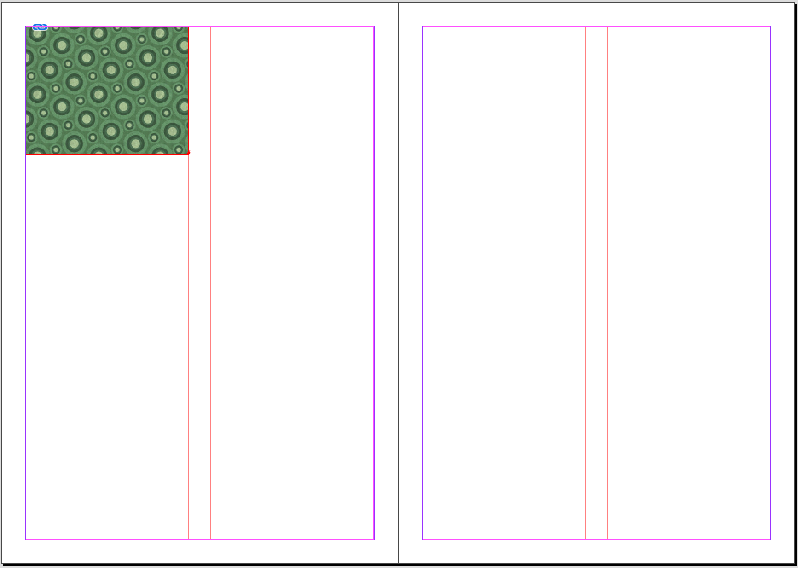
In this example we have 2 images on the page. However, we want to have control over whether the 2nd image will have a column break applied, or a frame break. The decision is made from a field I’m using called 'ID'.
-
If the 'ID' equals 1 then its a column break.
-
Any other number in the field 'ID' its a frame break.
The LUA instruction for inserting page/column/frame is TEXT.insertbreak('…').
eg. Inserting a column break is TEXT.insertbreak('column').
Here is the final LUA instructions we apply into the document.
[[ if(field('ID')=='1') then TEXT.insertbreak("column") else TEXT.insertbreak("frame") end;]]
This document is made up of a 2 page spread that has linked text frames that have 2 columns in them.
Here we have put the 1st image placed in the document.
After the 1st image I’ve inserted the LUA instruction code before the 2nd image. We have been careful to not leave any paragraph return markers in the document.
This screen shot is the zoomed out view of the images and LUA code in the 2 page spread.
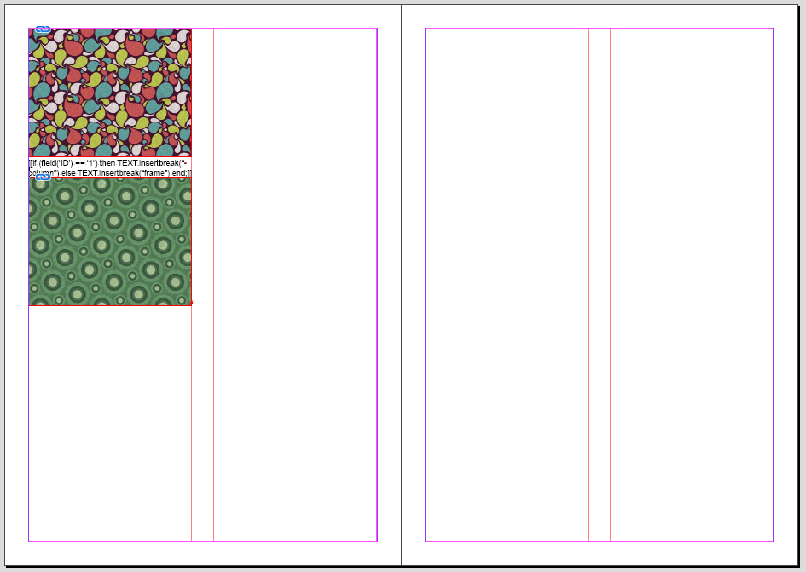
When the field 'ID' equals 1 when paginating, a column break is inserted causing the 2nd image to appear in the next column.
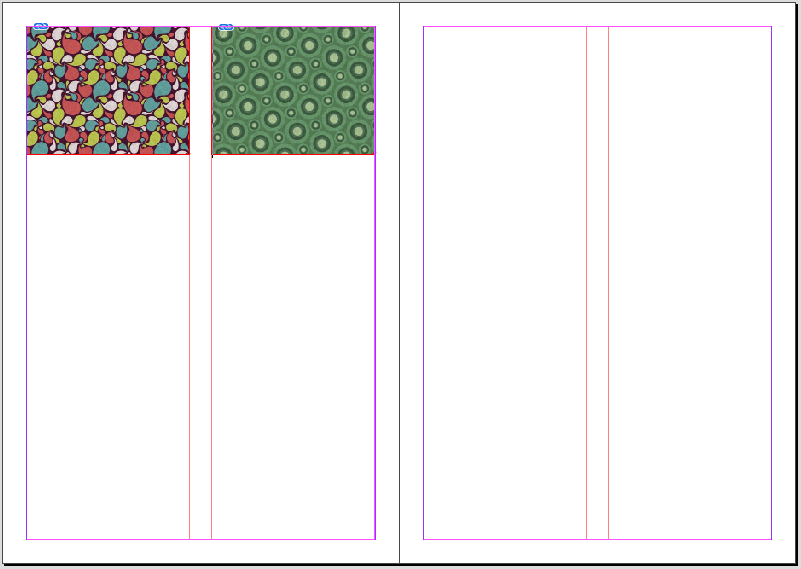
When the field 'ID' does not equal 1 when paginating, a page break is inserted causing the 2nd image to appear in the next column.
Choosing Images On The Page
We can also choose whether we use one image over another depending on the field content.
Example
In this example we can choose 1 of 2 images that can be in the page depending on what the content of the field 'ID' contains.
-
If field 'ID' equals 1, use image 1.
-
Any other number in the field 'ID' use image 2.
To do this, we must insert our images into the LUA instructions.
[[ if(field('ID')=='1') then ]]
[[ else ]]
[[ end;]]
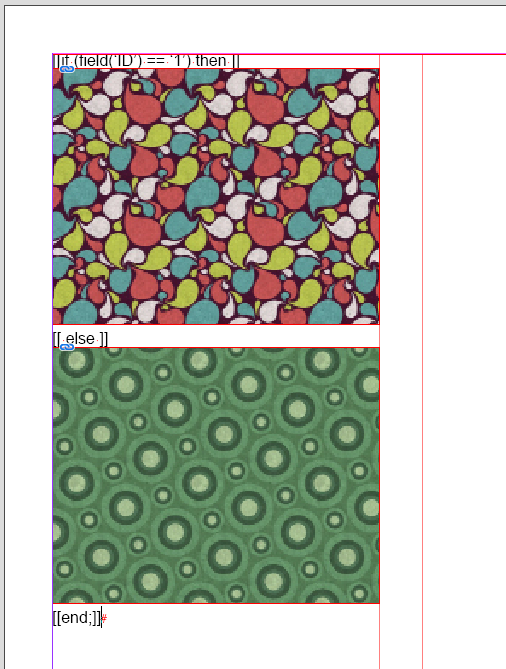
When the field 'ID' equals 1 when paginating, the 1st image remains, and the 2nd image is removed.
When the field 'ID' is any other number but 1, the 2nd image remains, and the 1st image is removed.
|
We could have left the instructions in from the previous example and had many instructions at work. LUA instructions are powerful tools for your use in EasyCatalog! |
[[ if(field('ID')=='1') then TEXT.insertbreak("column") ]]
[[ else TEXT.insertbreak("frame") ]]
[[ end;]]
Pagination
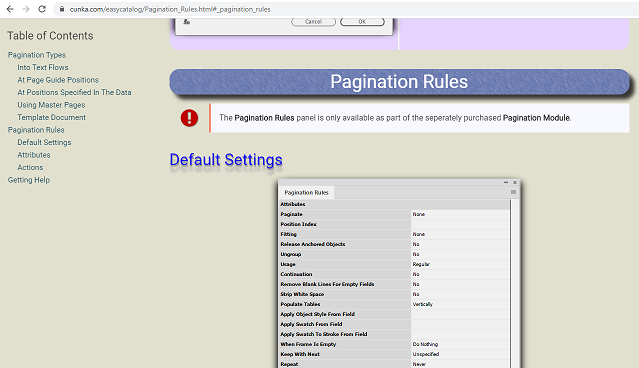
Pagination Types
|
These advanced pagination options are only available with the optional EasyCatalog Pagination module. |
Pagination Rules
| The Pagination Rules panel is only available as part of the EasyCatalog Pagination module which must be purchased separately. |
Using the Pagination Rules panel, it is possible to specify both :
-
Processing instructions
Such as whether to use a Product Style during pagination -
Layout instructions
Such as fitting each box to the depth of the text
Position Index
The Position Index allows you to control which record/sub-group to populate a box for a given Product Style.
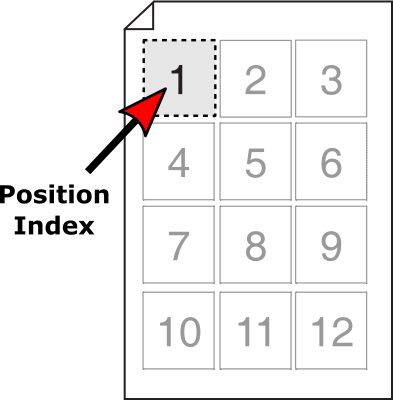
Here is an example where you may want something duplicated on a page. (e.g. barcodes)
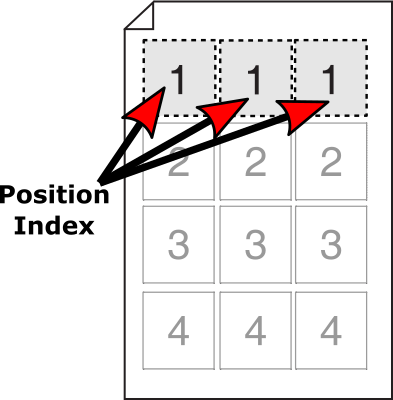
The position index can be applied to any product style boxes on the page in any order.
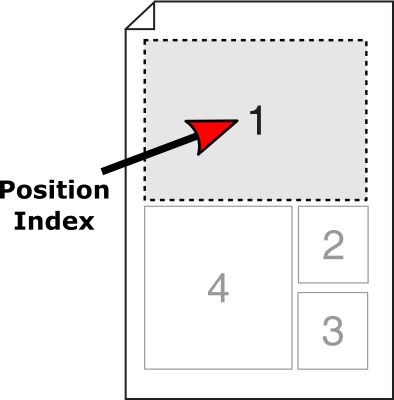
The Position Index can accept a few controlling attributes allowing a more defined selection of the highest value record, the lowest value record, and all records.
The attributes except field names bound by braces. eg.HIGHEST{ your field goes in here}
| Attribute | Description |
|---|---|
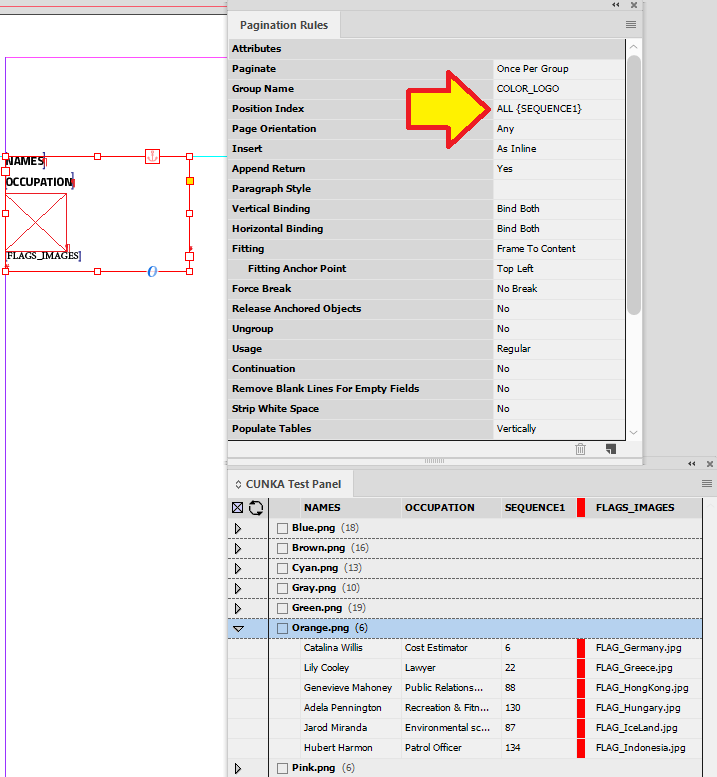
ALL { Field Name } |
The contents of the frame will be repeated once for each paragraph/line in the field’s content. So the limit is not the position number, but the amount in the field’s content. |
HIGHEST { Field Name } |
Can be specified to populate the box with the record containing the |
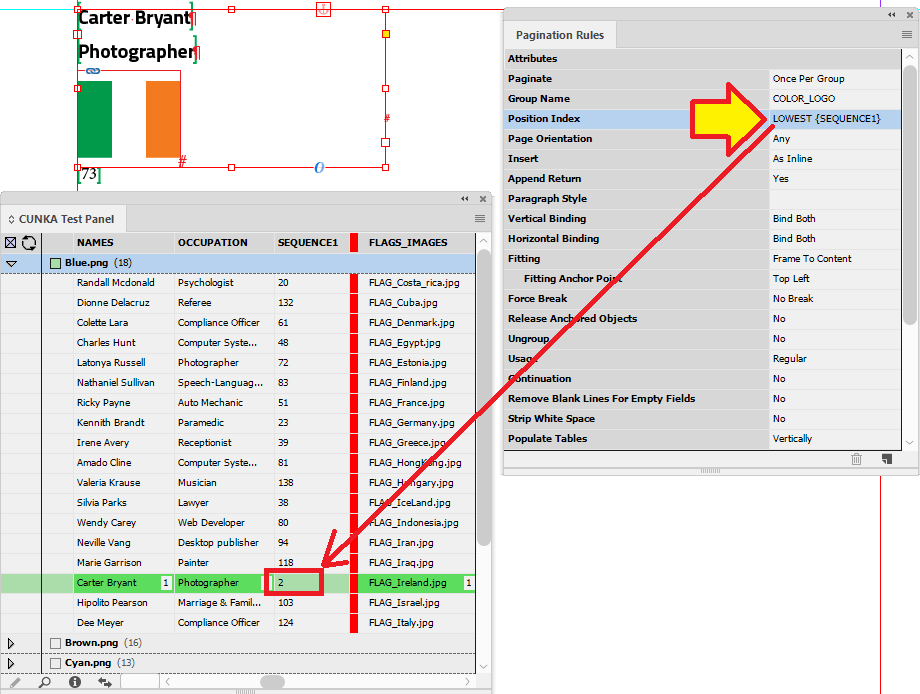
LOWEST { Field Name } |
Can be specified to populate the box with the record containing the |
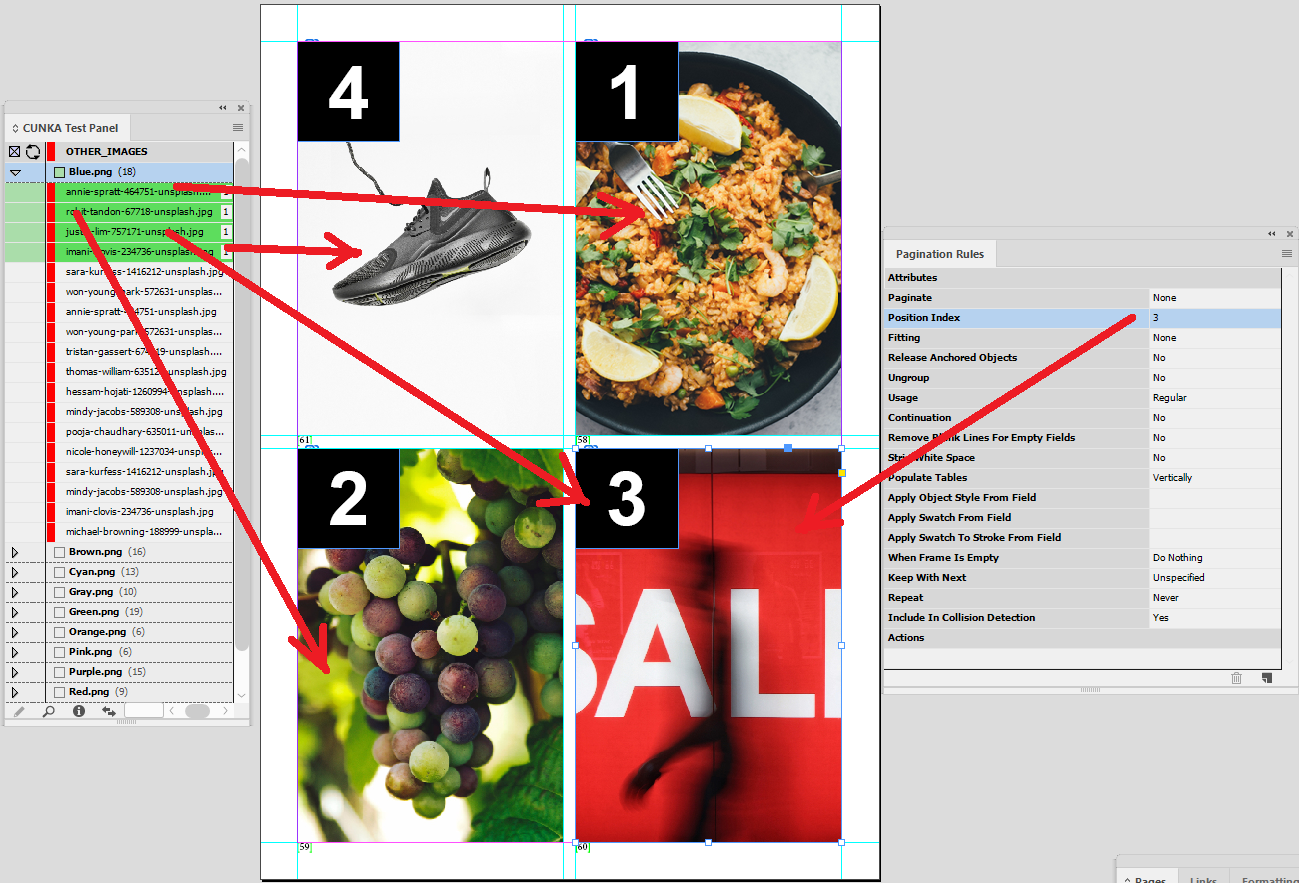
Example - Basic Position Index Numbering
In this example we have set up the page with 4 product styles (image boxes). The number in the black box indicates the number used by the product index in the pagination rule.
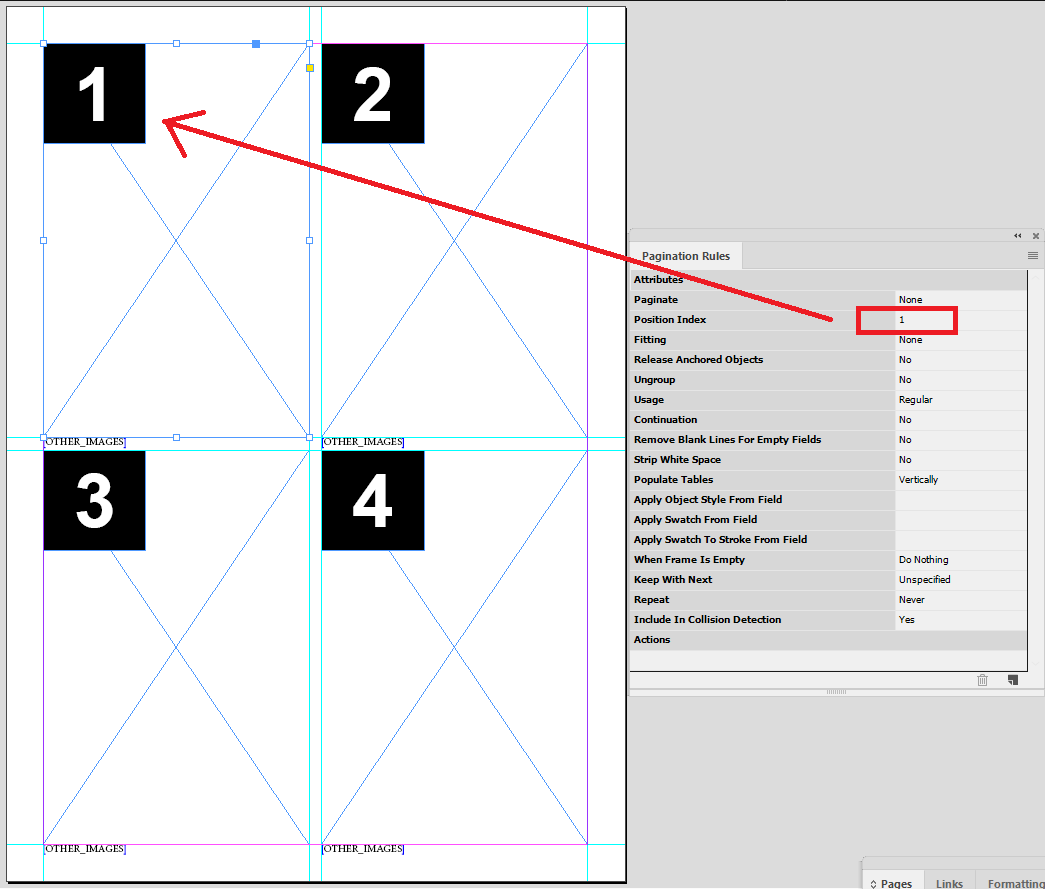
The first 4 records are applied from our data source panel.
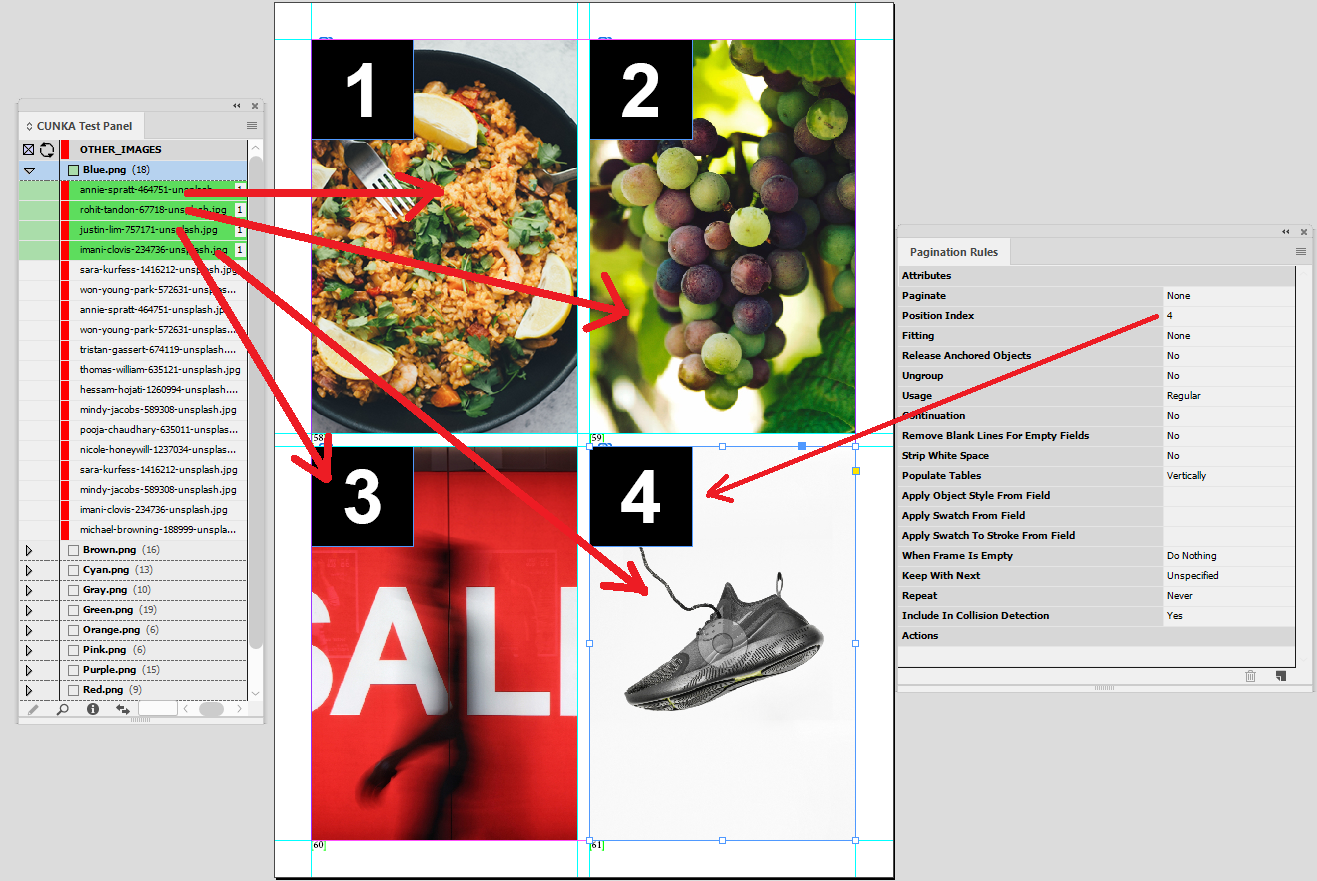
On this page we have changed the product index on the page so the top 2 boxes are product index 1, and the bottom 2 are product index 2.
The result is 2 records applied, and the images are duplicated.
This can be handy if you are looking to create barcode labels.
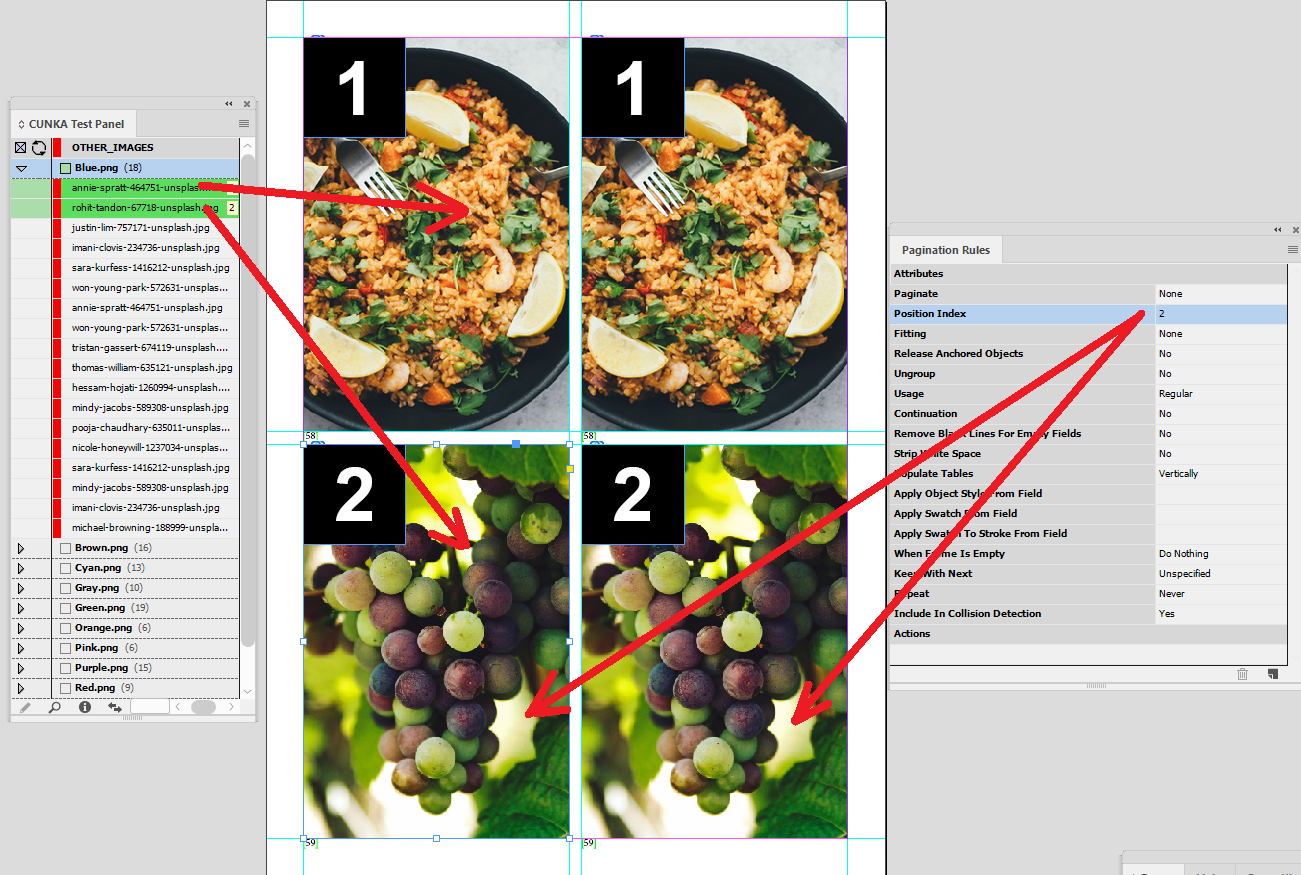
Here is the order of the boxes mixed up. Shows that you dont have to have numbers in the order of 1 to 4.
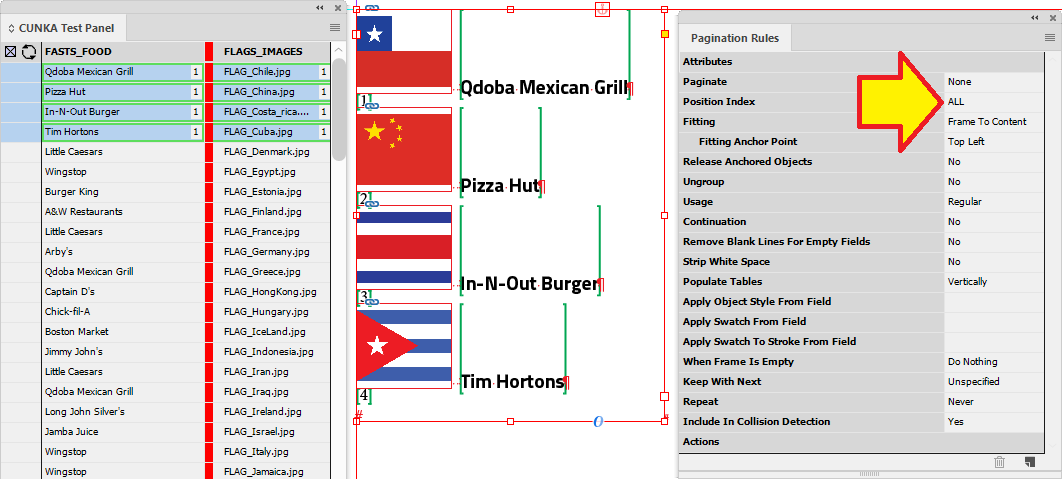
Example - Using ALL in Position Index
In this example we have a text frame that contains an image field and a text field. The position index is set to ALL in the pagination rules.
By selecting ALL, records we select and apply to the frame will be repeated until all are paginaed.
So the frame will resize as content is paginated, we have set the "Fitting" to Frame To Content.
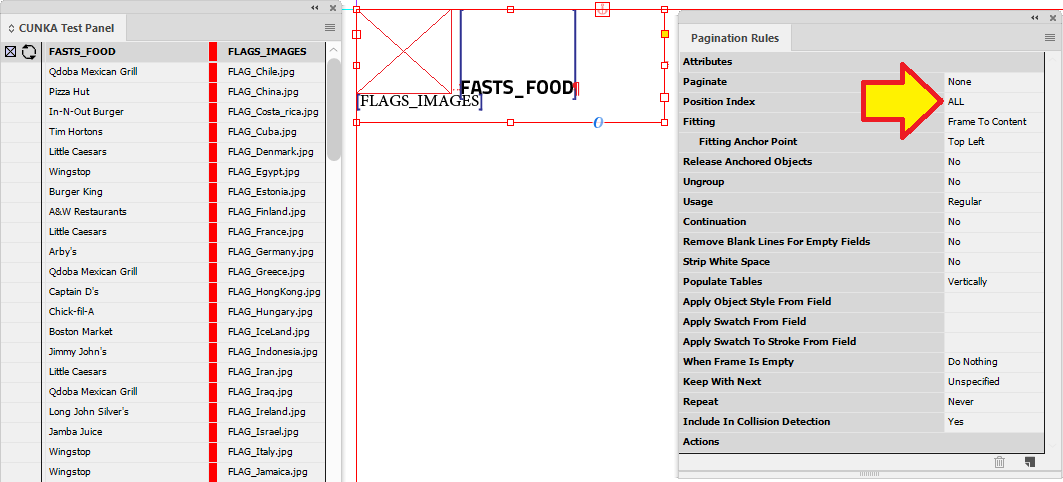
Here 4 records have been applied and you can they have paginated from the 1 to 4 in order.
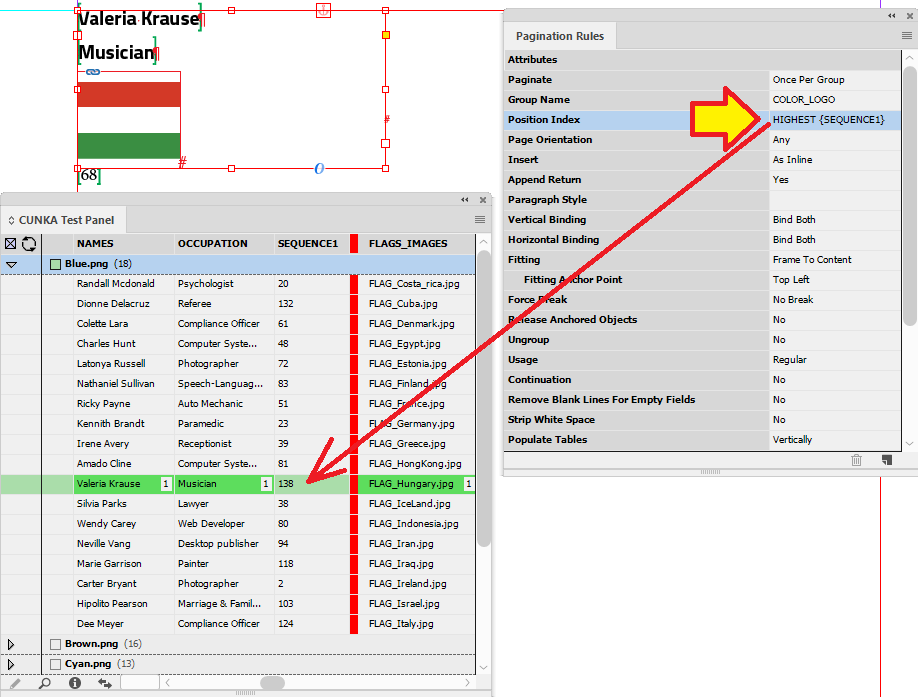
Example - Using HIGHEST{} in Position Index
The position index can be used selectively to chose a particular record. With HIGHEST, it looks for a high numerical value.
The field in my data source panel used for HIGHEST is called SEQUENCE1. eg. HIGHEST{SEQUENCE1}
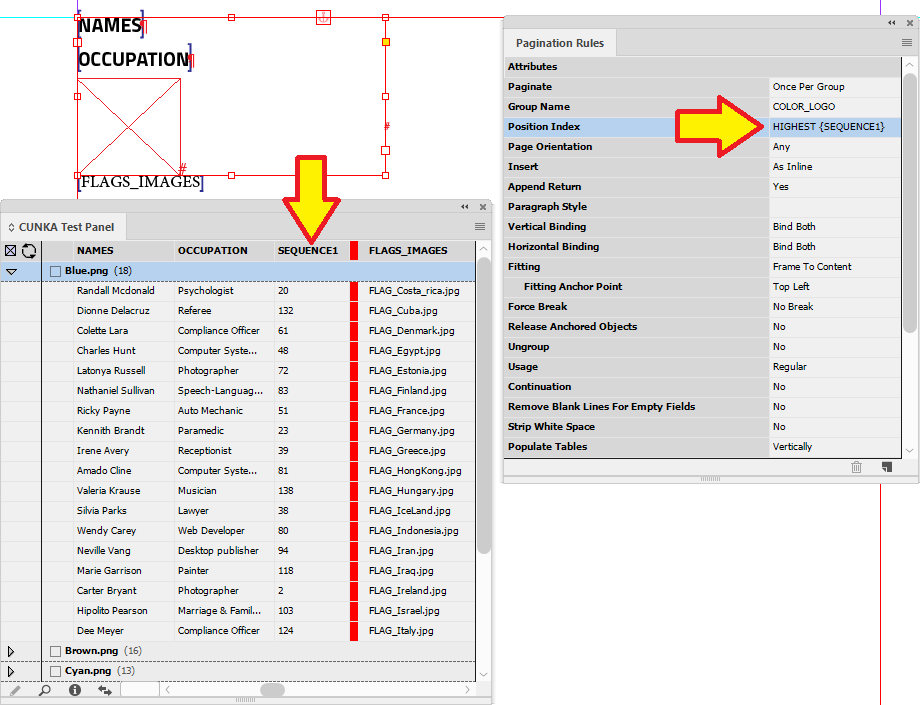
When applied, the position index looks for the highest value in the SEQUENCE1 field and applies it.

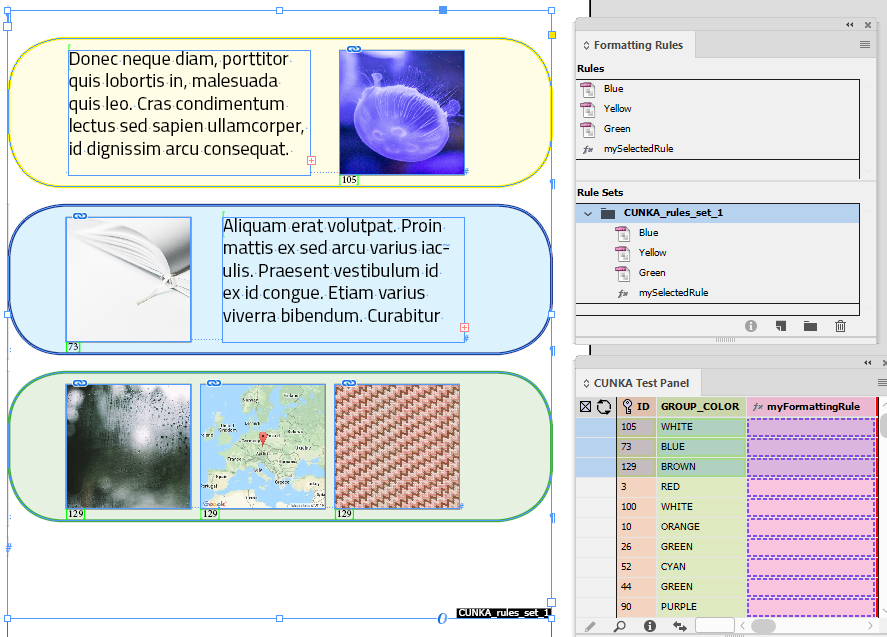
Formatting Rules
What is a function rule?
A function rule is a special type of formatting rule that uses EasyCatalog custom commands to place standard formatting rules. It contains no graphics or text to insert, but simply instructions in what formatting rule to use.
We always refer to a function rule in our documentation as a function formatting rule.
Field Option
A field has the ability to insert a Formatting Rule to be inserted between the field markers your defining through the Field Option parameter. This allows you to include quite complex logic, or layout information, inside of what looks like a regular field.
Example - Using a Function Formatting Rule
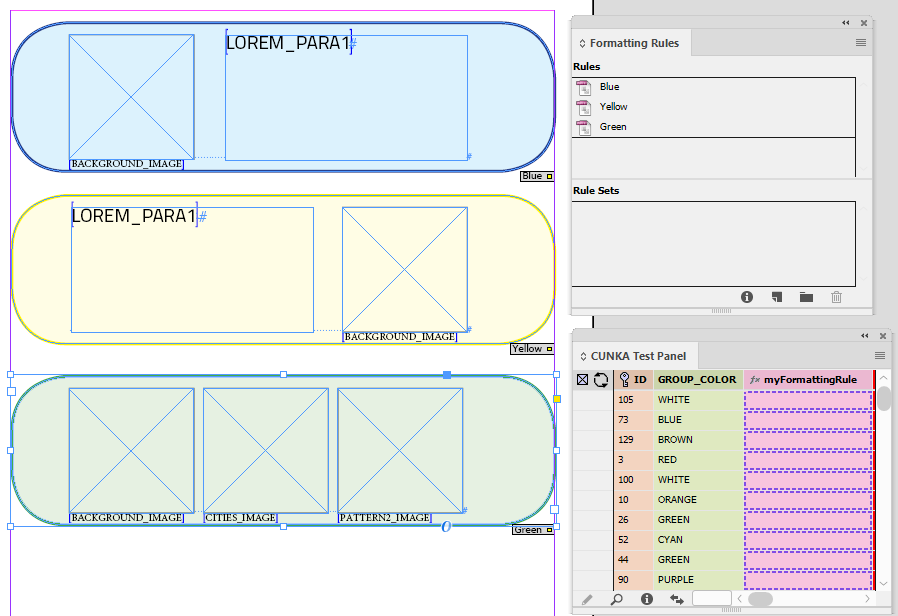
In this example we will set up formatting rules that will be used in a rule set. That rule set will have a function formatting rule that will be used to determine which rule to use. The function formatting rule will then be used in a regular field.
There will be 3 rules set up so we can place a formatting according to a color. The rule to use will be determined by the contents of the field GROUP_COLOR.
- Rules
-
Blue
Yellow
Green
Since we wont have a rule to cover every color we will have a selection for every other color.
The screen shot below shows our 3 rules.
First step is to create a new Function Rule.

This will create a "New Rule".
Just note that the function rule has fx in front of it to identify what type of rule it is.
Now Edit Rule…
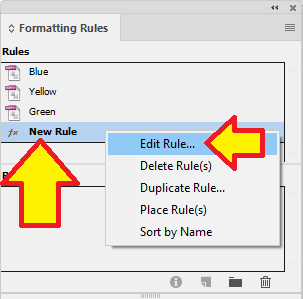
Rename the rule. In this example I’ve renamed it to "mySelectedRule".
Now in the function text box is where the decisions are made.
- Decisions
-
- Blue
-
Use the Blue rule
- White
-
Use the Yellow rule
- Every Other Color
-
Use the Green rule
To achieve this, we have used the CASE custom command on the field GROUP_COLOR.
CASE(FIELDSTR(GROUP_COLOR),BLUE,Blue,WHITE,Yellow,*,Green)
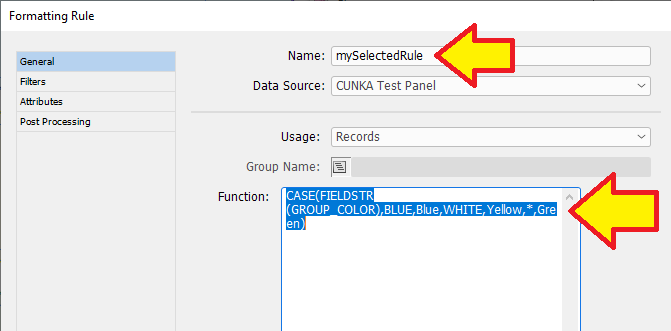
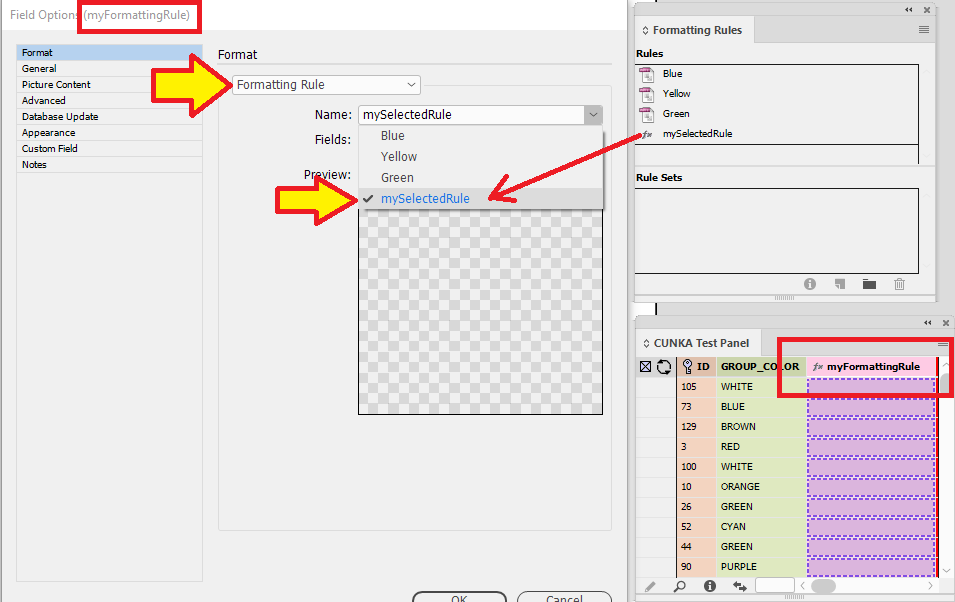
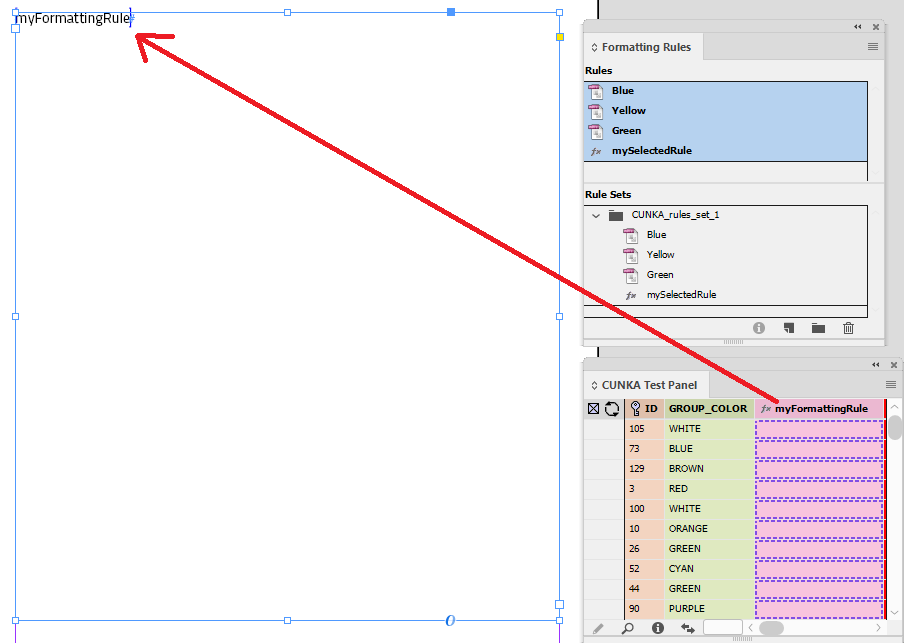
In my panel, there is a field called "myFormattingRule". In the Field options it is set to Formatting Rule, and the Name has been set to "mySelectedRule" (Which is our function formatting rule).
Next we must set up a New Rule Set.
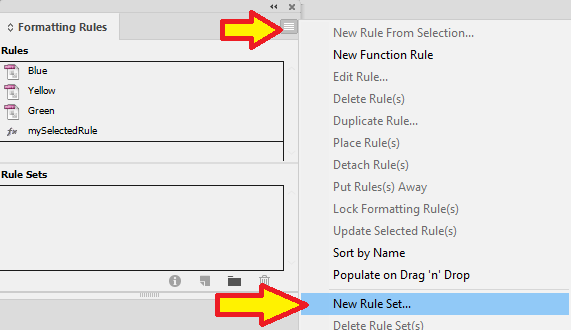
The name of my rule set is "CUNKA_rules_set_1".
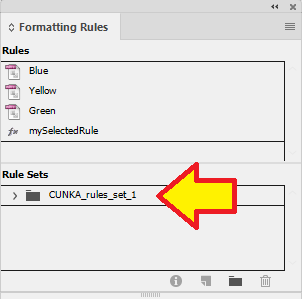
We now select our rules and drag and drop them o to the "CUNKA_rules_set_1" folder.

On our page, we place a text frame and insert the field "myFormattingRule".
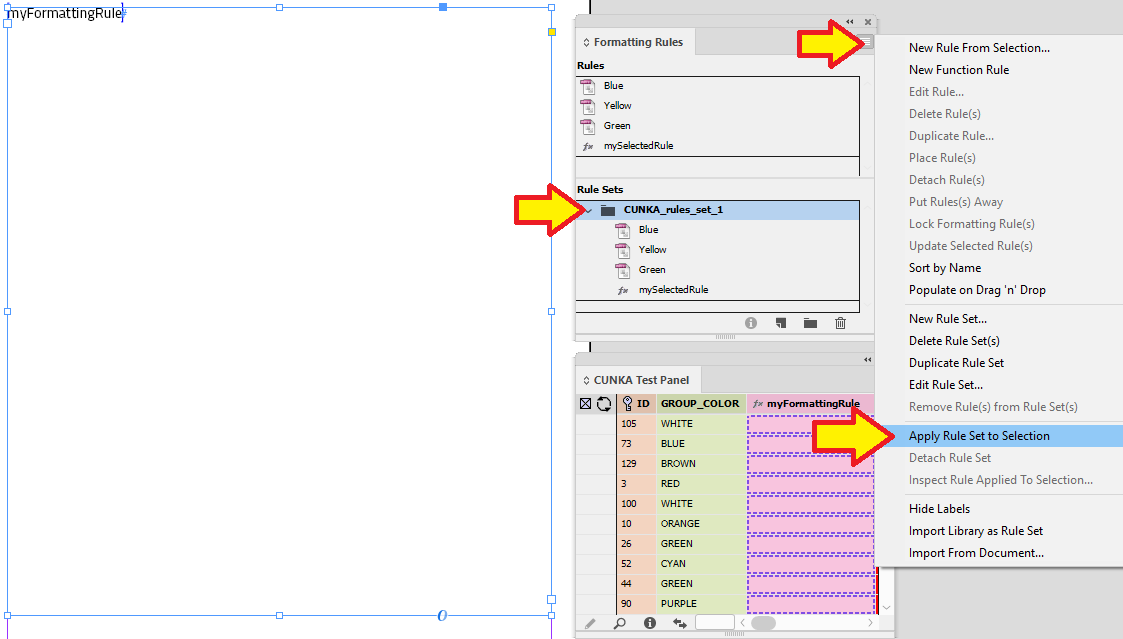
Next with the text frame selected, the "CUNKA_rules_set_1" folder selected, we click on "Apply Rule Set To Selection".
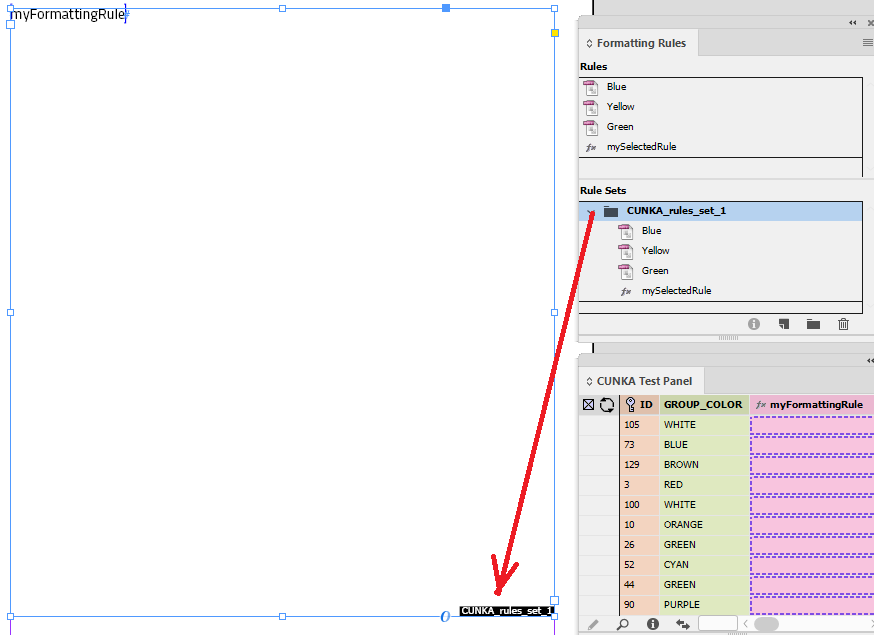
You can see the applied rule set by whats indicated on the bottom of the text frame.
Selecting 3 records, I have dragged and dropped the records into the text frame and the following was paginated.
Insert using a Tag
The enhanced HTML parser will attempt to match formatting rules to tag names.
If a tag matches, the formatting rule will be inserted into the text.
e.g. <CUNKA1>EasyCatalog is great!
If there is a formatting rule called ‘CUNKA1’, it will be inserted before the text ‘EasyCatalog is great!’.
By using a field with the enhanced HTML parser set, its now possible to conditionally choose which formatting rule will be placed into the document.
Example - Formatting Rule Selection
In this example, we have created 2 formatting rules called GOOD and NOT_GOOD. The field "formattingRuleChoice" is set up with the field options check-box settings of "Formatted" & "HTML" checked and the drop down box set to "Enhanced".
We have set the field up to look at the field "GROUP_COLOR" is set to "GREEN". If it is use the "<GOOD>" formatting rule. Otherwise use the "<NOT_GOOD>" formatting rule.
IF(FIELDSTR(GROUP_COLOR),=,'GREEN','<GOOD>','<NOT_GOOD>')
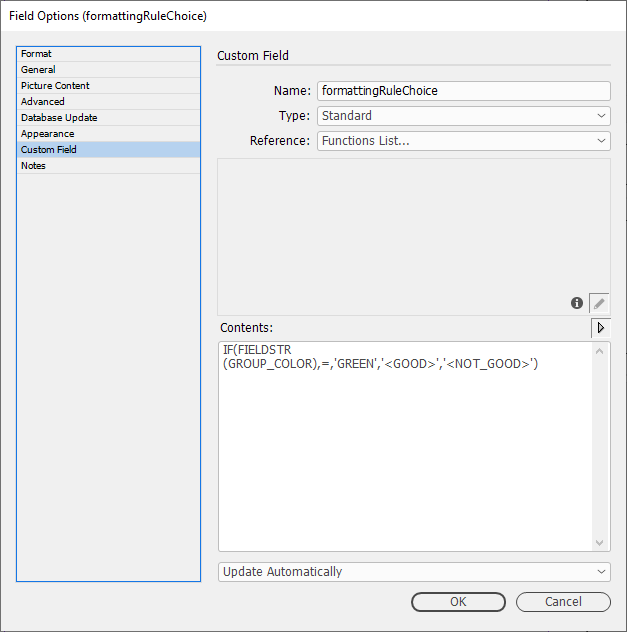
In the document we have placed a text box and within it the field "formattingRuleChoice".

The result of this particular record appears in the document.
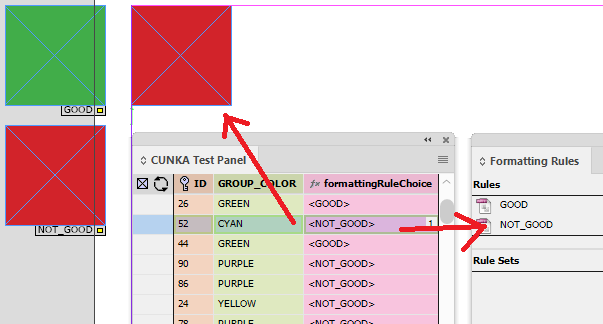
Tagging Manual Content (Tables)
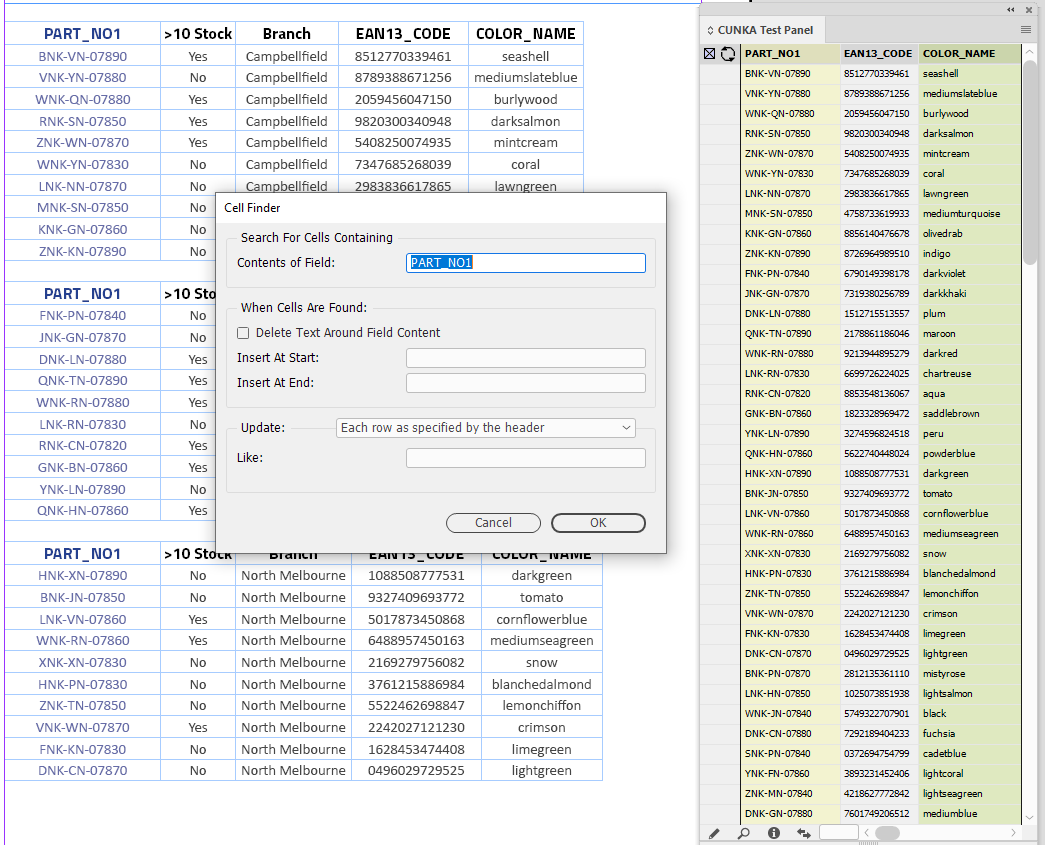
Not all your tables may be generated by EasyCatalog. There will be occasions where data has come into a document, either by another source of automation, or through manual creation. With EasyCatalog, its possible to tag tables so they can be updated and tracked with EasyCatalog. This feature for tagging tables is called Cell Finder.
|
Cell Finder is applied to all tables in the document. EasyCatalog v16.0.0 updated Cell Finder to match keys case insensitive. |
Cell Finder
Setting Up Cell Finder
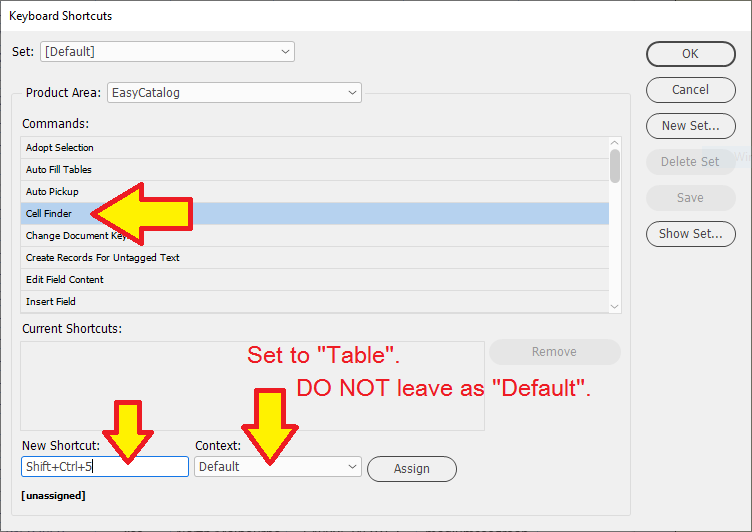
Some features in EasyCatalog must be configured before they can be used. With Cell Finder, it must be set up for operation through a defined keyboard shortcut through the InDesign Keyboard Shortcuts interface.
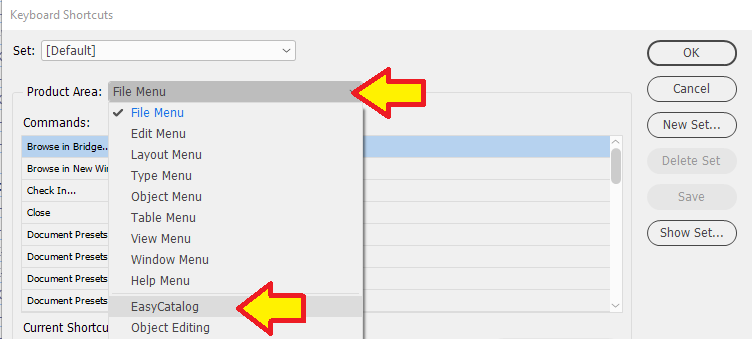
We set Cell Finder up for use on our PCs' with the keyboard shortcut Shift+Ctrl+5.
Select Cell Finder in the Commands and in "New Shortcut:" press Shift+Ctrl+5 all at once.
Make sure the "Context:" is set to Table. If you leave it set to Default it will not work.
Click the Assign button when completed then press OK.
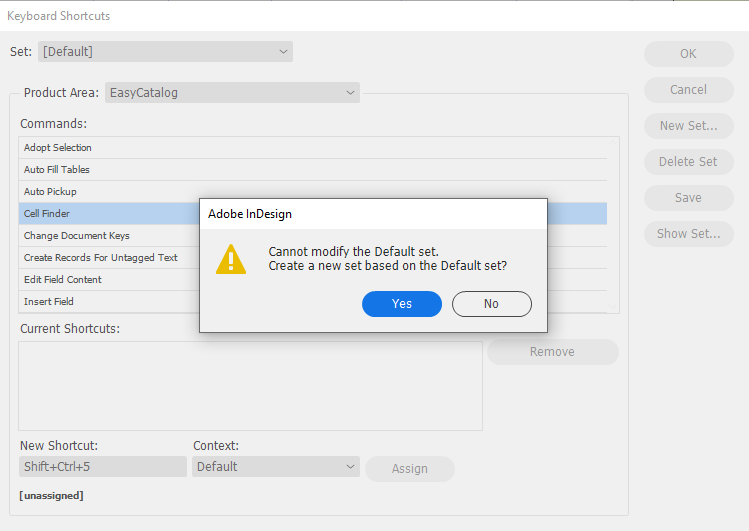
Click on "Yes".
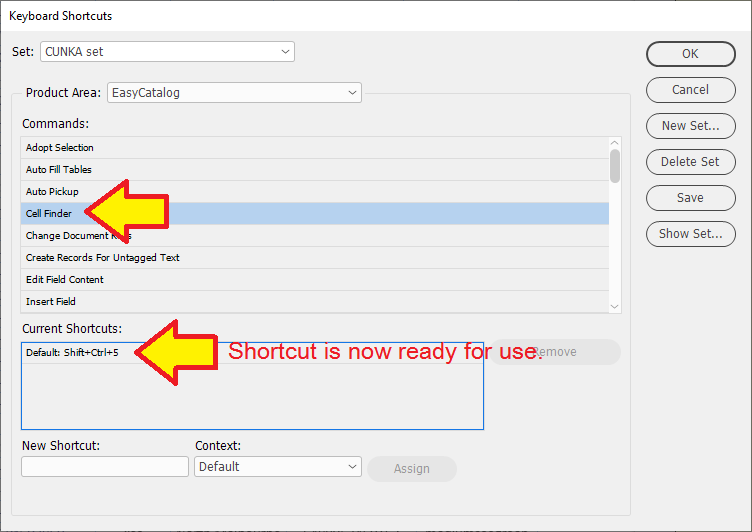
We save the keyboard shortcut set as "CUNKA set".
Press "OK" and the shortcut key is ready to use.
Basic use of Cell Finder
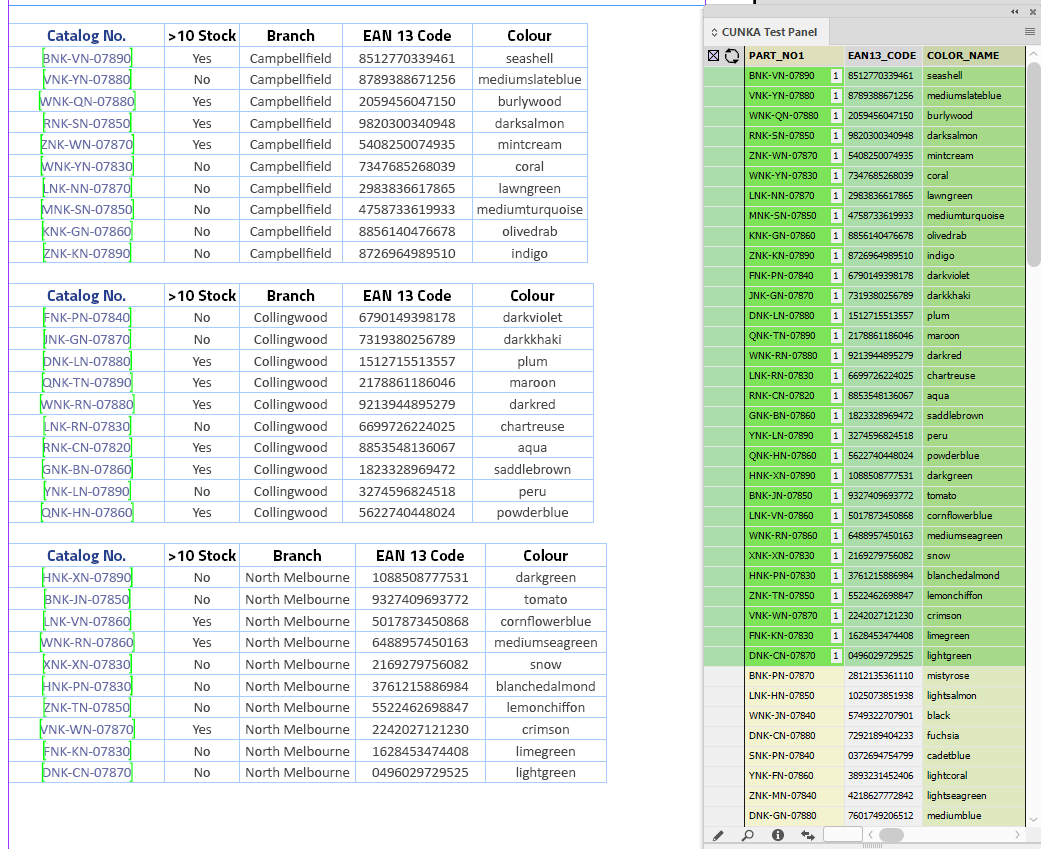
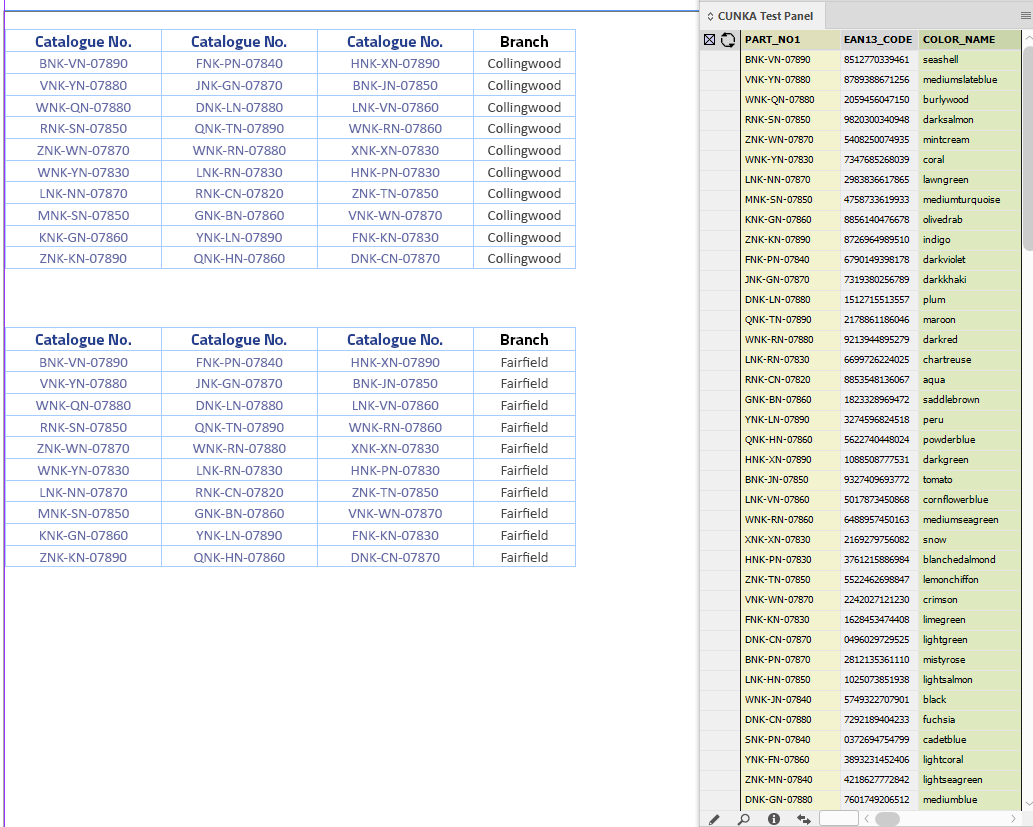
Example - Three tables in the document.
The 3 tables in this document have been placed in from an EXCEL spreadsheet. It is made up of 5 columns of which 3 columns are in our data source panel.
You can see from the table headers against the panel headers:
-
Catalog No. = PART_NO1
-
EAN 13 Code = EAN13_CODE
-
Colour = COLOR_NAME

Pressing the Cell Finder short cut:
-
We ask the "Contents of Field:" to search the tables for columns that contain the content of PART_NO1 from our data source panel.
-
We leave the "Update" as Each row as specified by the header.
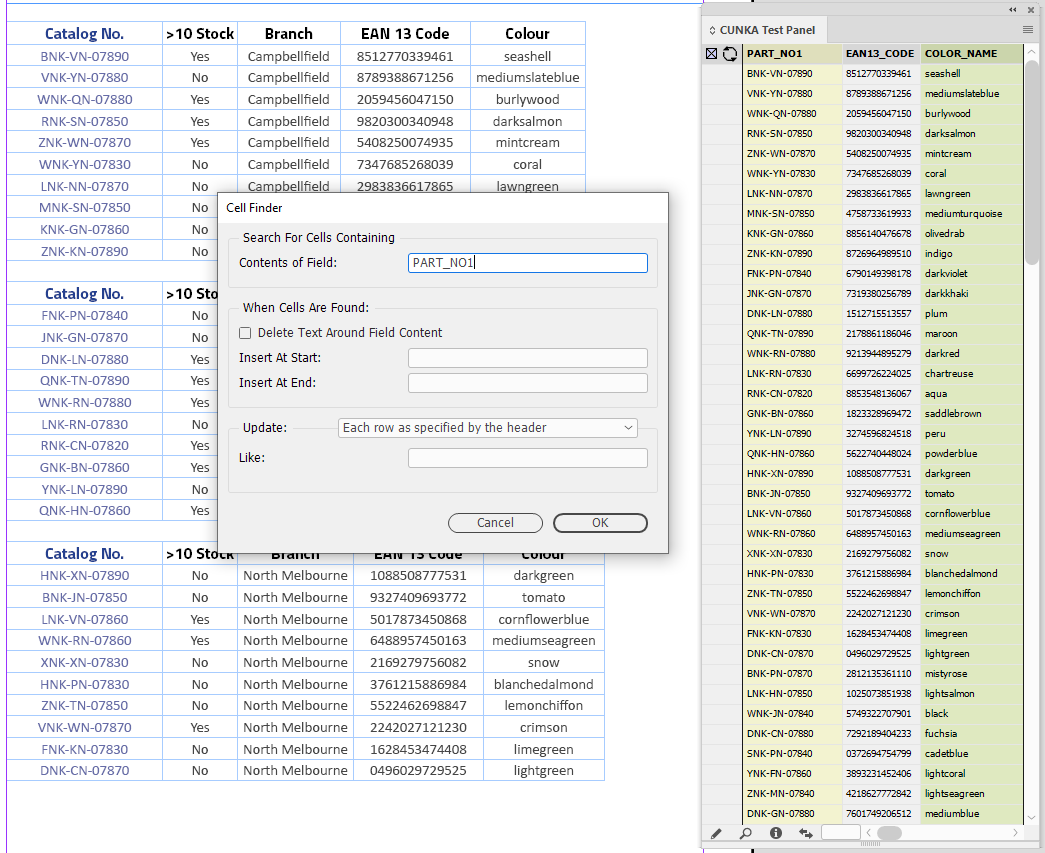
When you use Each row as specified by the header the headers of the table should match the headers in the data source panel. In our instance, because we specified PART_NO1 it did find a tag the content in the Catalog No. columns in the table.
Each Row As Specified By The Header
To use Each row as specified by the header efficiently we will need to do some initial work so EasyCatalog will find it easier to tag not only the PART_NO1 field, but also the EAN13CODE and COLOR_NAME fields.
To do that, we simply rename the table headers so they match that of the data source panel.
When the tags are appled, you can go back and rename the field headers to what they initially were titled.
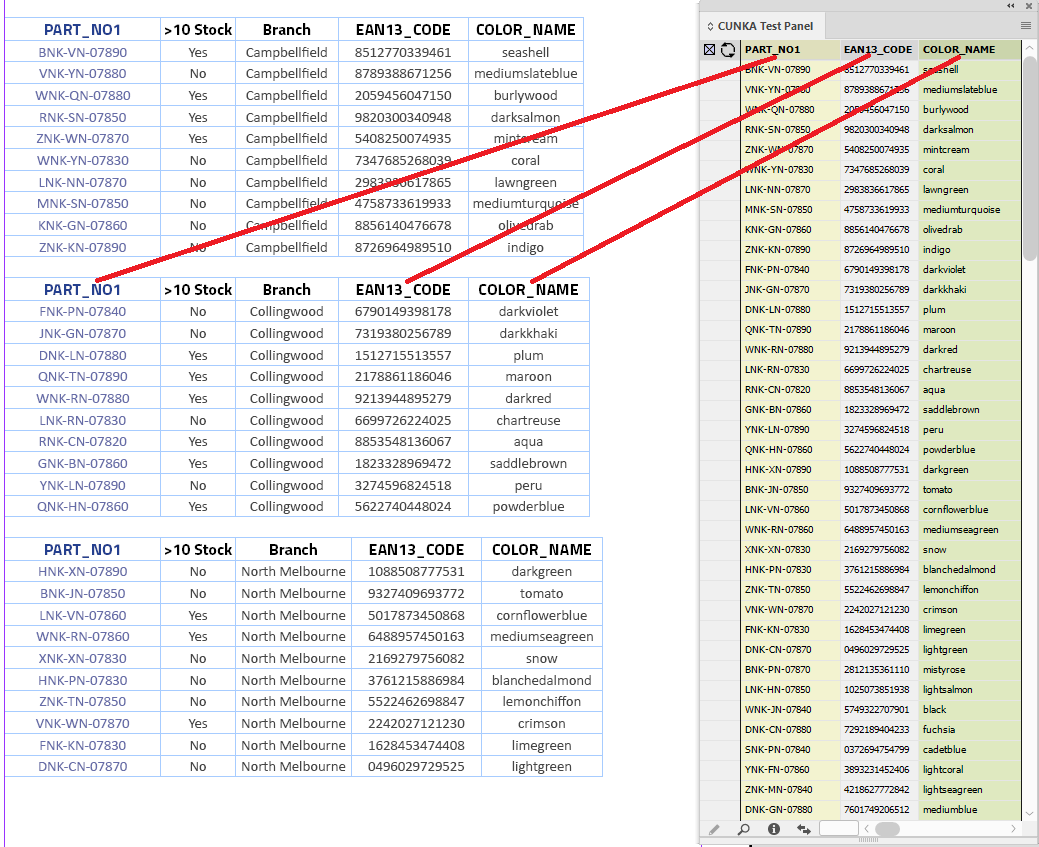
Pressing the Cell Finder short cut:
-
We ask the "Contents of Field:" to search the tables for columns that contain the content of PART_NO1 from our data source panel.
-
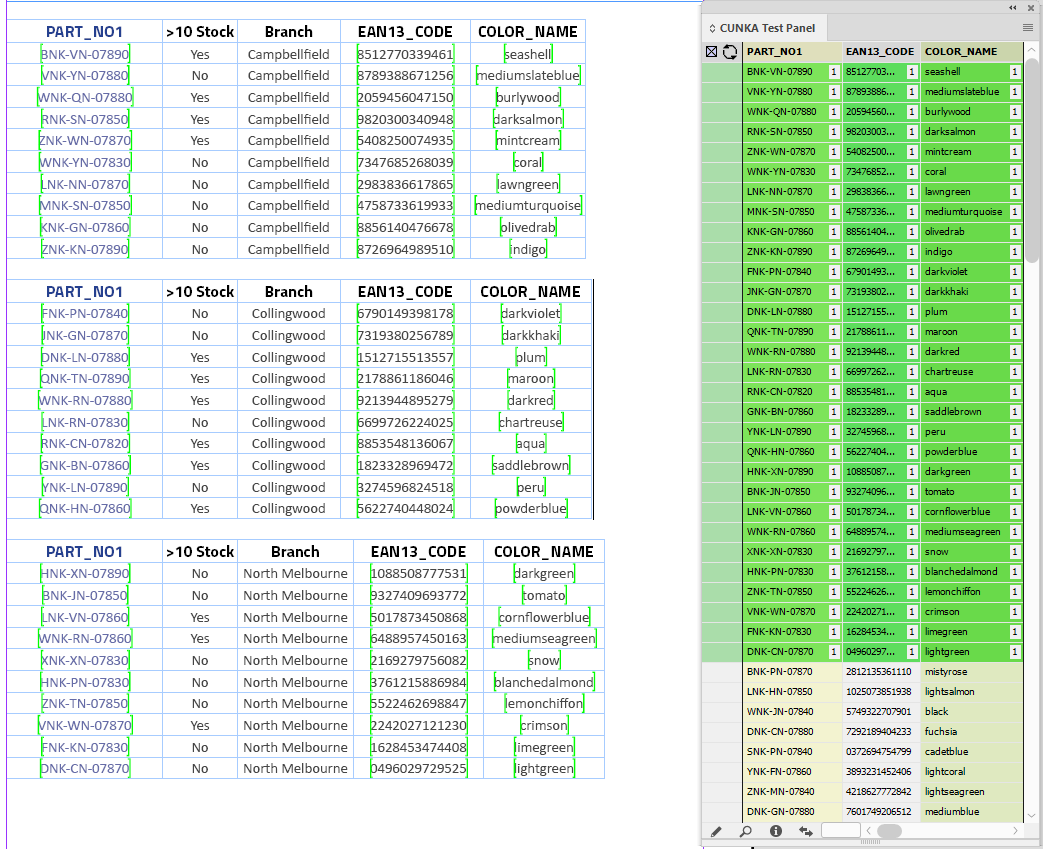
We leave the "Update" as Each row as specified by the header.
EasyCatalog has found all 3 columns and applied tags.
Adjacent Cells
Not all tables are the same. Here we have a series of "Catalogue No." fields in a row.
Pressing the Cell Finder short cut:
-
We ask the "Contents of Field:" to search the tables for columns that contain the content of PART_NO1 from our data source panel.
-
We set the "Update" as Adjacent Cells.
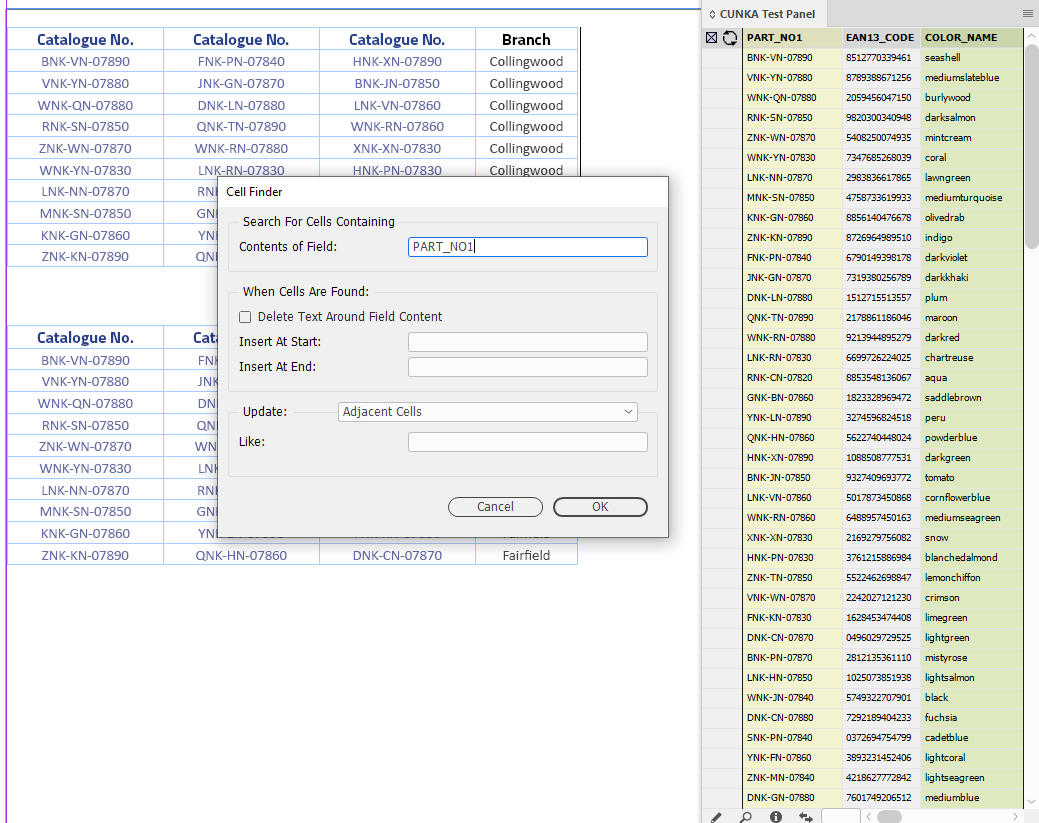
EasyCatalog has matched all fields and applied the PART_NO1 tags.
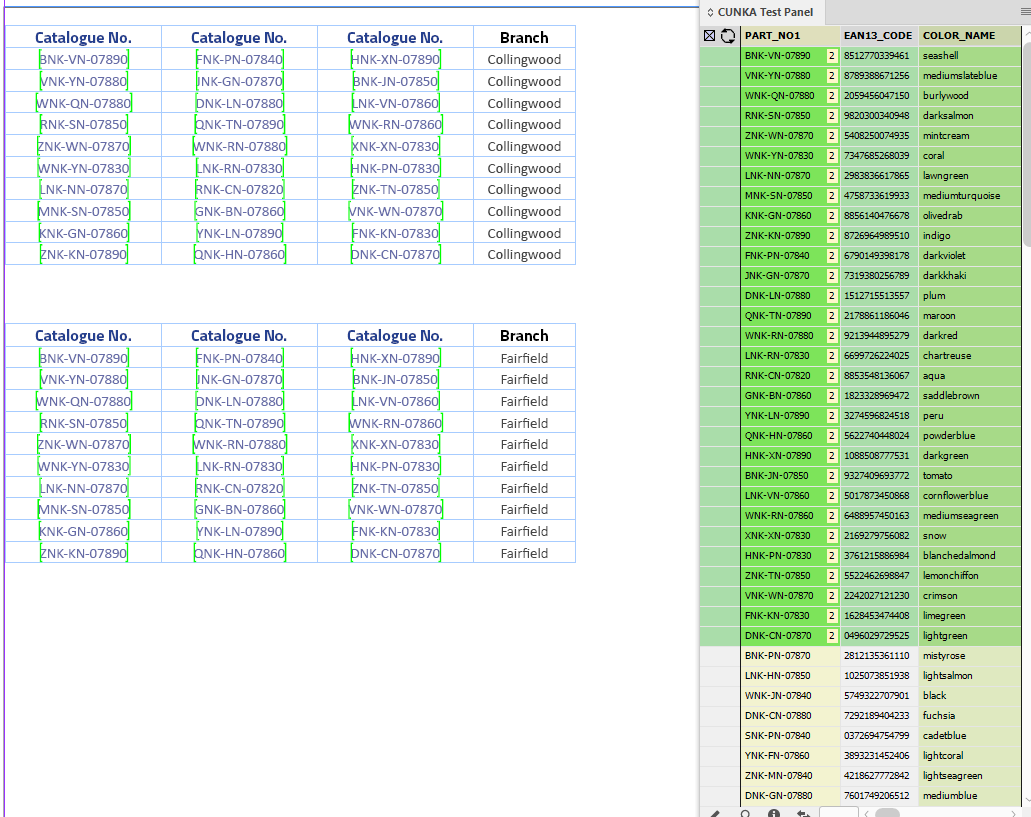
Creating Tables with EasyCatalog
Types of Tables
There are many ways to create tables with EasyCatalog. So many in fact, we have a knowledgebase section dedicated to showing you how to create them.
- Preprocessing Table (Using MUSTACHE)
-
Using the MUSTACHE templating engine to create a HTML table from JSON/hash style code.
- Standard Table
-
Using a standard InDesign table.
- FORMATASTABLE
-
How to use the FORMATASTABLE custom reference command to generate a table.
- Using APPLYXSLT
-
How to use the APPLYXSLT custom reference command to generate a table from XML.
- Using TABLEOF (LUA)
-
Using the TABLEOF command from LUA to build a table from a subset of records.
- HTML formatted field
-
A HTML specific field for creating a table.
- HTML tabular field
-
Using a tabular field set up to create a HTML table.
- Delimited Text (CSV) tabular field
-
Using a tabular field set up to handle delimited text to create a table.
- Data Source tabular field
-
Using a tabular field to generate tables from a data source panel.
- Microsoft EXCEL tabular field
-
Using a tabular field to import EXCEL documents and generate a table.
- XML tabular table
-
Using a tabular field set up to use XML to create a table.
- XML complex table
-
Using XML to create a complex table.
- Matrix Table
-
Creating and using a matrix table.
Reusing or Creating New Tables
Tables can be reused, or created new at pagination time with both requiring different methods of set up.
Go to our Creating Tables with EasyCatalog page and learn more about reusing & creating new tables
Merging Table Cells
Adjacent repeated data in table cells can be cleaned up and presented in a table through the horizontal or vertical merging of cells in EasyCatalog.
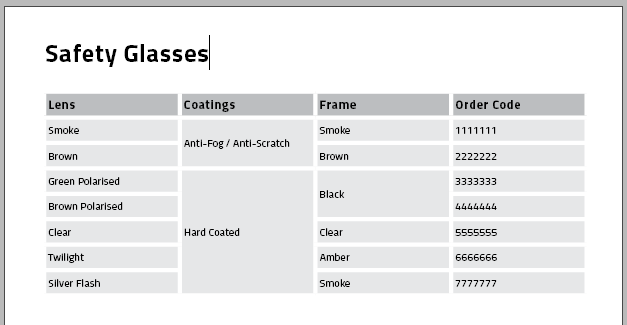
Go to our Creating Tables with EasyCatalog page and learn more about merging table cells.
Quick Selection Table
The Quick Selection Table are handy and visually appealling tables for readers to easily scan, analyze and compare.
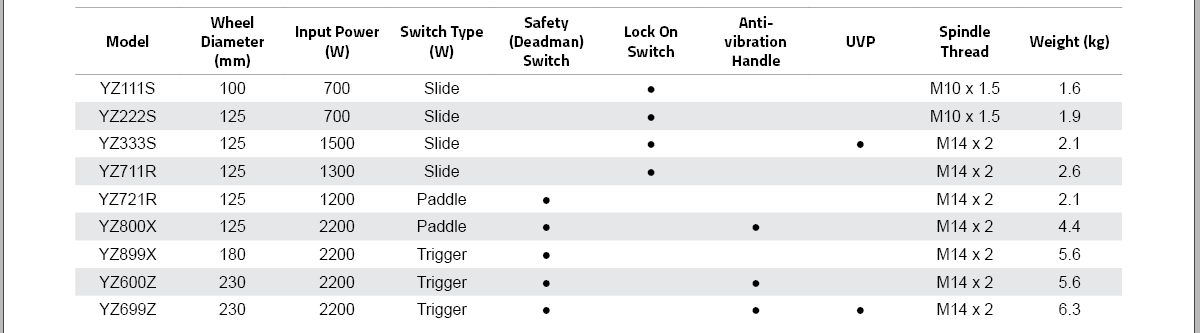
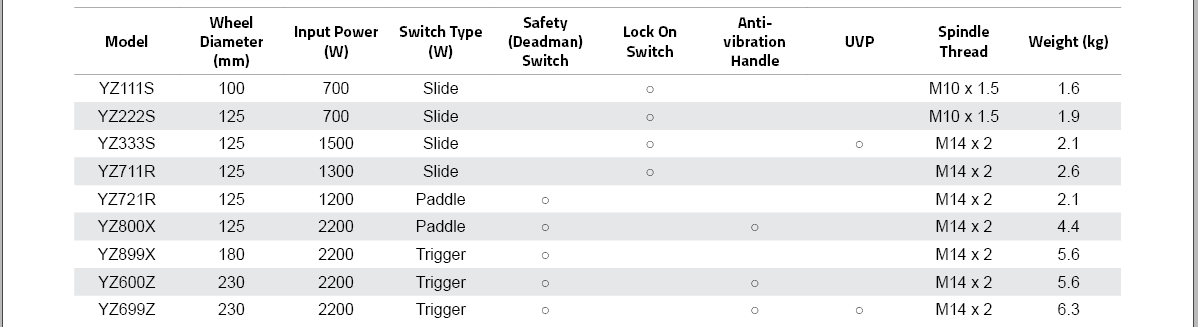
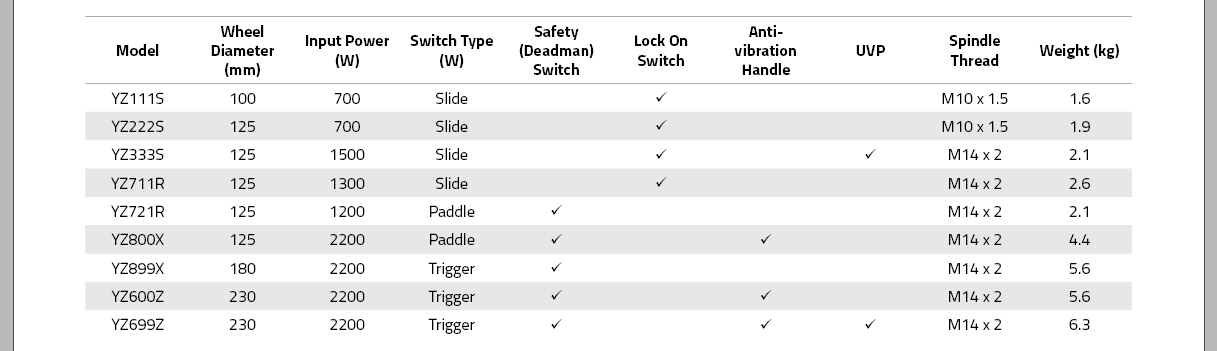
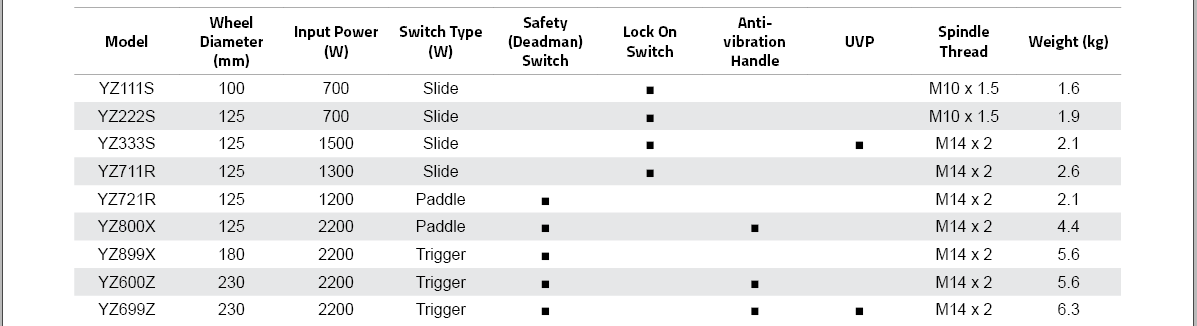
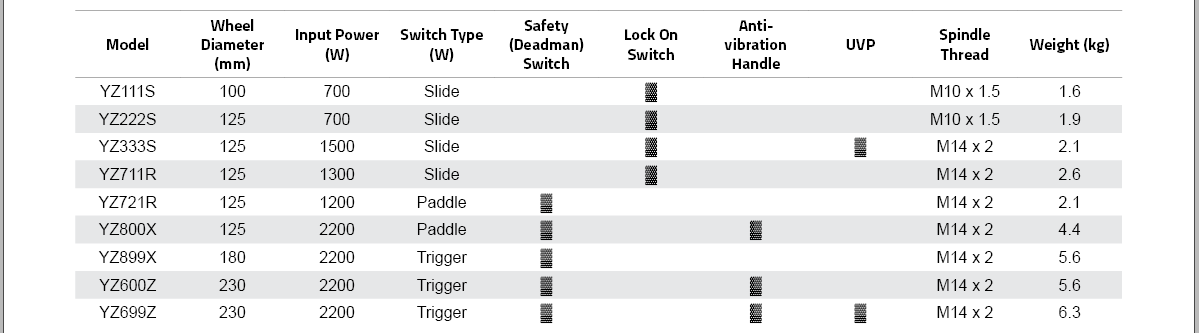
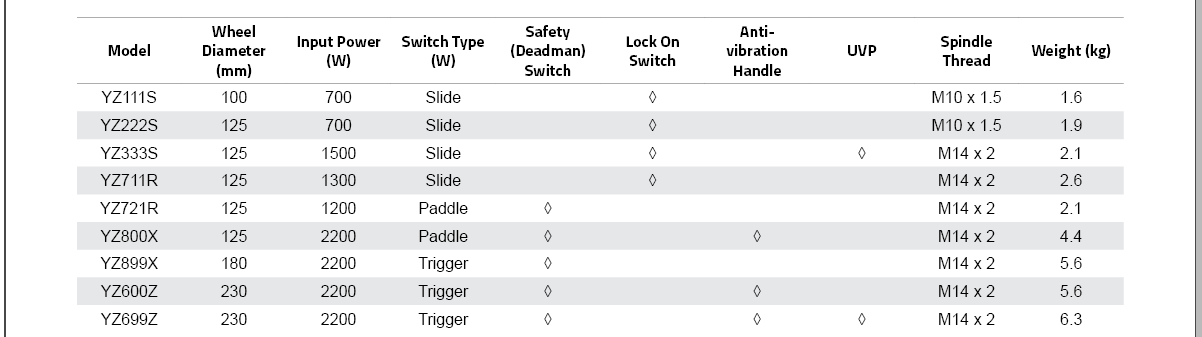
Our examples show how to clean up dense tables and use unicode characters to present the reader with a better viewing experience.
Go to our Creating Tables with EasyCatalog page and learn more about Quick Selection Tables.
QR Codes
Using a Frame (Script Label)
Creating a QR code in a frame with EasyCatalog can be done using InDesigns Script Label.
The Script Label dialog can be shown by going to Window → Utilities → Script Label.
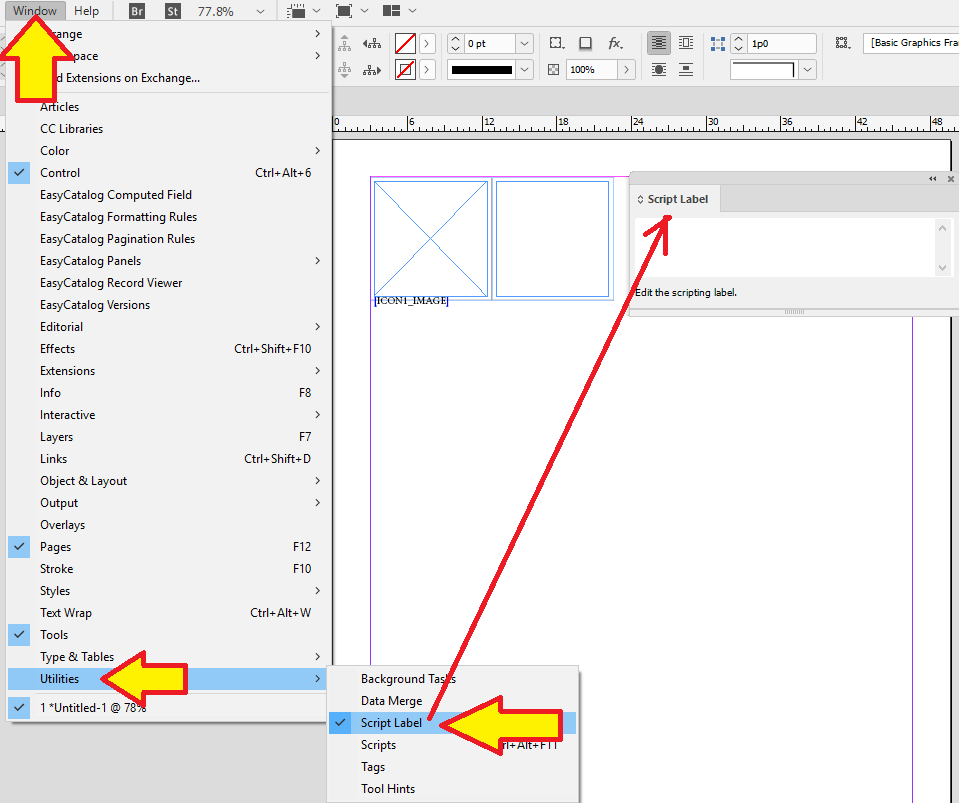
By pasting some simple LUA code into a frames Script Label, a QR code can be created.
The only part of the LUA code you need to understand is where in your data source is the field you want to create a QR code from. The field in my panel is called WEBSITE and it has a full URL path.
url = FIELD.get('WEBSITE'); (1)
frame:qrcodehyperlink(url:content()); (2)
frame:fitcontent(); (3)| 1 | Get the text from the field WEBSITE |
| 2 | On the frame, pass the text and create a QR code. |
| 3 | Fit the QR code into the frame. |
Before pasting in the LUA code, make sure the frame is selected.
In this example I have 2 column by 1 row table. The 1st column has an image box, and the 2nd column a frame for a QR code.
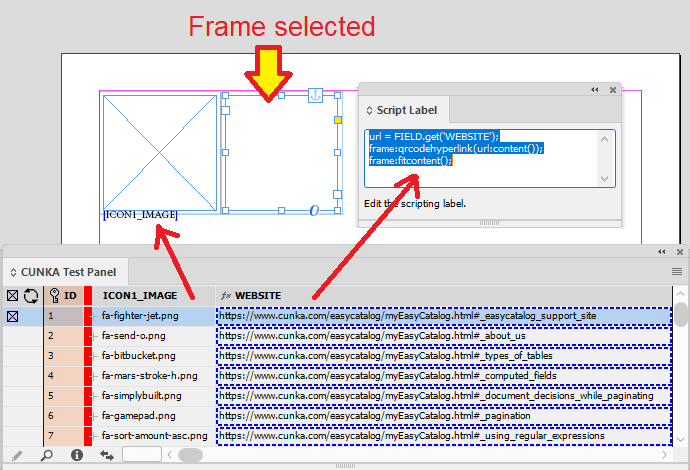
The final result shows many rows all with a different QR code from the field WEBSITE.
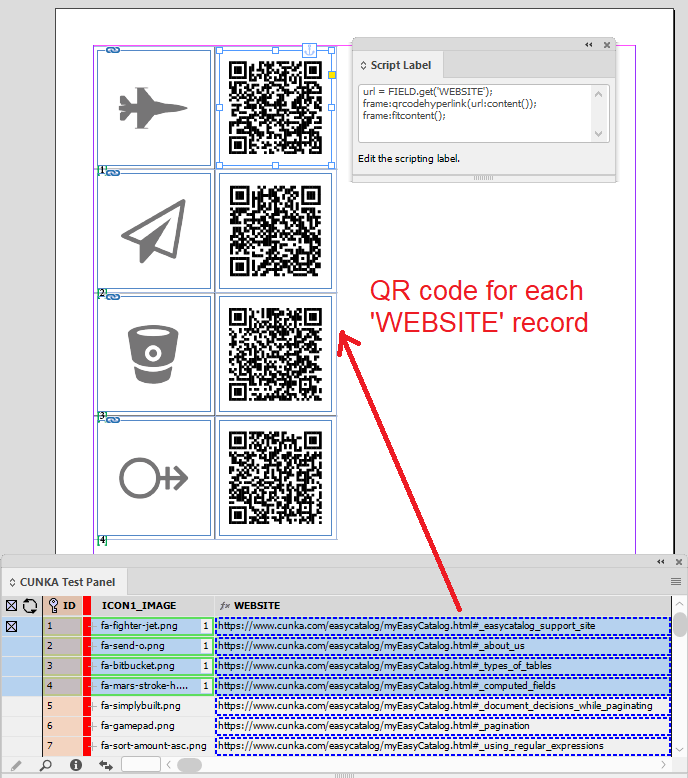
Snippets
A snippet is one of the ways InDesign uses to repurpose graphics and text.
This allows you to save pieces of an existing document(s) as handy objects that can placed in other documents.
With EasyCatalog, you can use snippets as an image that can paginate when used, or simply place previously saved snippet as an image on to a document.
- Snippets in EasyCatalog
-
Used in image fields.
Uses InDesign snippet *.idms file format.
EasyCatalog Snippets
An EasyCatalog snippet can be saved with empty fields of graphics/text with EasyCatalog fields attached. They are paginated when the snippet is placed into the image field of a document.
Example - Snippet with EasyCatalog fields
In this example we will use a snippet that has 3 EasyCatalog fields saved in it.
-
PATTERN1_IMAGE
-
FLAGS_IMAGES
-
ICON1_IMAGE
It is exported from InDesign and saved as MyImages.idms
The snippet is in this example is saved in the Images folder of my current Workspace.
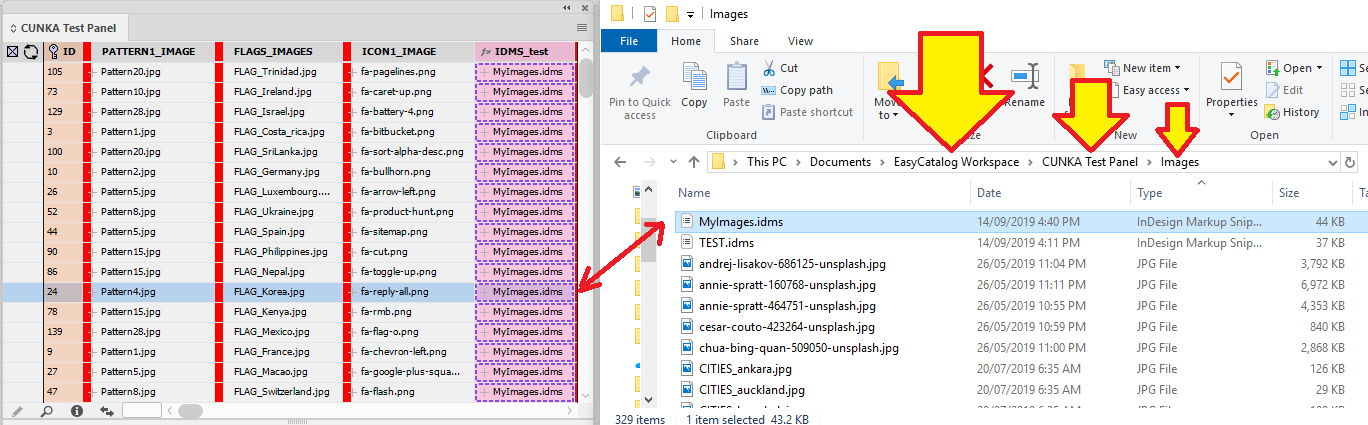
There will be no image preview of the snippet becuase it is saved in the Workspace folder. To fix that we tell EasyCatalog in the image field "Picture Content" options to look for the file extension "idms".
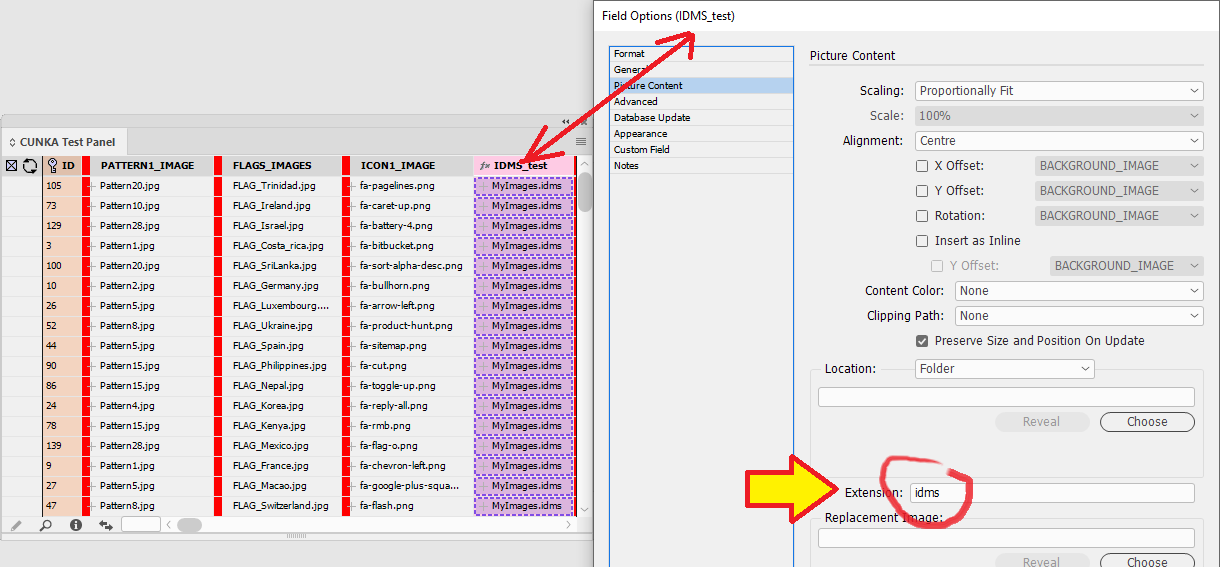
The result is we can now see the preview of the snippet been used.
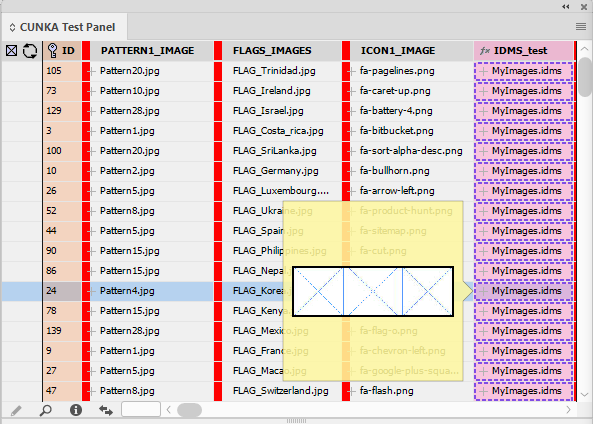
An image box (graphic) is created on the document and the field IDMS_test is applied to it.
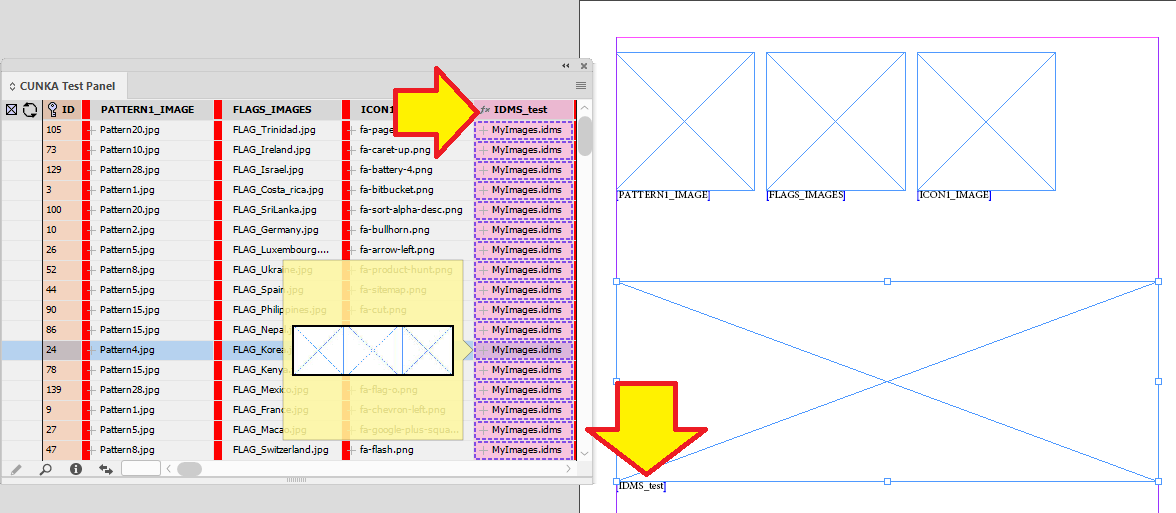
When a record is dragged on to the IDMS_test image box EasyCatalog now paginates for that record and populates with images.
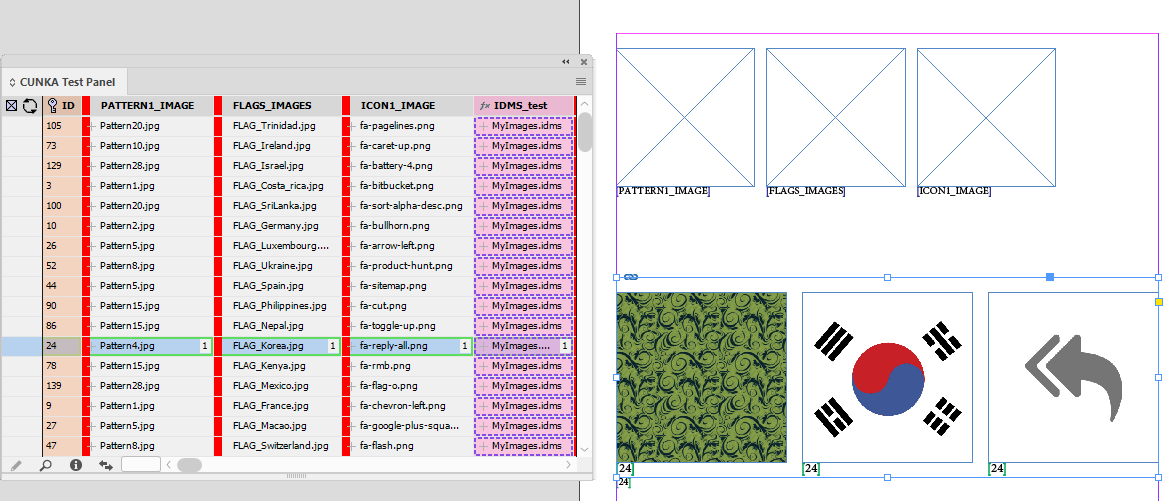
InDesign Snippets
Standard InDesign saved snippets can also be used.
They can be images and text/tables pre-prepared for re-use in the document.
Example - Using a standard Snippet
The following graphic frame and text frame are exported from InDesign as a snippet and saved in this example in the Workspace "Images" folder.
The file name is MySnippet.idms
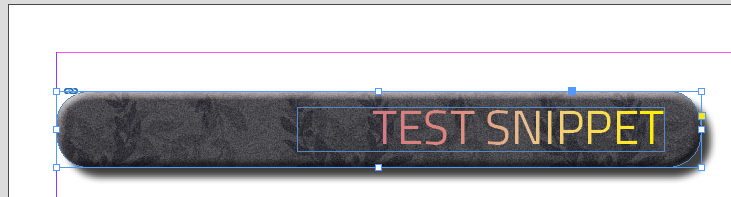
An image box (graphic) is created on the document and the field IDMS_test is applied to it.
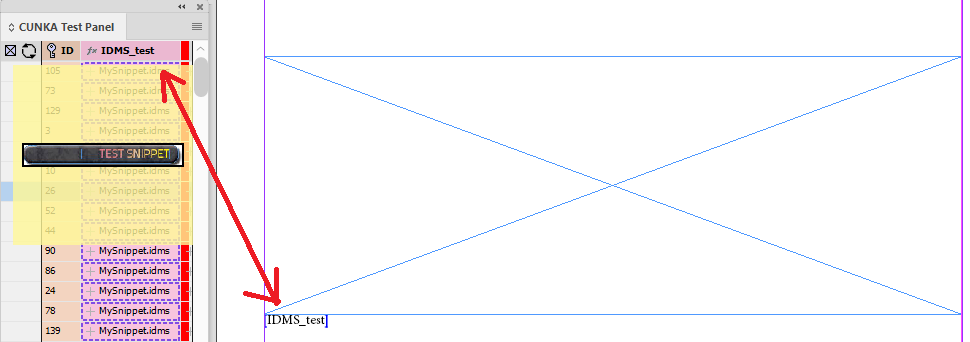
When a record is dragged on to the IDMS_test image box EasyCatalog places the snippet MySnippet.idms.
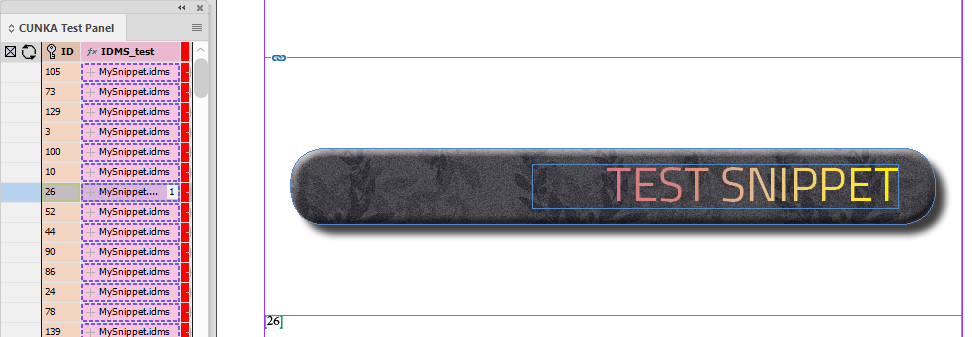
Images UPDATED
Image Strategy for a URL NEW
When EasyCatalog downloads an image from a URL, by default it will build a filename based on the naming format of the URL.
There will be occasions where that will not work and you will need to look at another feature with EasyCatalog.
EasyCatalog provides a feature to specify a file naming/storage strategy.
In the Picture Options of a field , you can append a storage strategy inside of [$ brackets $] at the end of the URL.
When EasyCatalog finds [$ … $] at the end of the URL, instead of building the local storage path based on the URL content, it will use whatever is between the [$ and $].
example: http://yourwebsite-images-api/public/2/FIELDSTR(ImageP)/download[$FIELDSTR(ImageName)$]
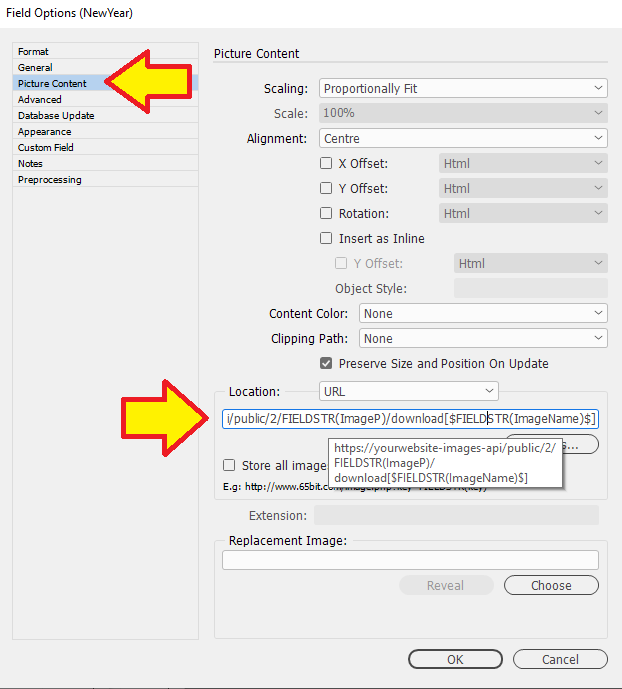
Example - Image URL with query string
Consider this example where the only way to download the image from the server is done via a query string.
https://imagestorage.cunkacloud.net/productimages/99180000-77059-front-view.png?sv=2022-02-02&ss=b&srt=sco&sp=rwdlac&se=2030-02-24T13:35:21Z&sig=AWTTrTvRIpdF1e%2Q%2Idm%2Bn6%3D
Out of the box EasyCatalog will make a mess of this. It will attempt to build a file with the query string.
By using an image strategy we can tell EasyCatalog what we are expecting the image to be named and saved as.
If we have a field with the file name in it (e.g. ImageName) we can still use the image URL string query, and retrieve and name the image as we intended it to be.
We simply append [$FIELDSTR(ImageName)$] to the end of the URL image string query.
https://imagestorage.cunkacloud.net/productimages/99180000-77059-front-view.png?sv=2022-02-02&ss=b&srt=sco&sp=rwdlac&se=2030-02-24T13:35:21Z&sig=AWTTrTvRIpdF1e%2Q%2Idm%2Bn6%3D[$FIELDSTR(ImageName)$]
Macintosh/Windows Image Paths
File paths are represented differently on Macintosh and Windows machines.
This has an impact when working in a cross-platform environment as a picture import path configured on Macintosh would not work on Windows and vice-versa.
To overcome this, a custom field command can be used to determine the platform that EasyCatalog is running on:
IF(ENV(platform),=,Macintosh,'Macintosh HD:Images','C:\Images')
The ENV command takes a single parameter, and returns environmental information about EasyCatalog. In this case, the ‘platform’ option has been specified and the command will return either ‘Macintosh’ or ‘Windows’. Based on the result of this we then either construct a Macintosh or Windows-type path.
Example - Brian’s Windows PC Setting
This example takes you through how the custom command works on my Windows PC.
The custom command is located in the "Location" path.
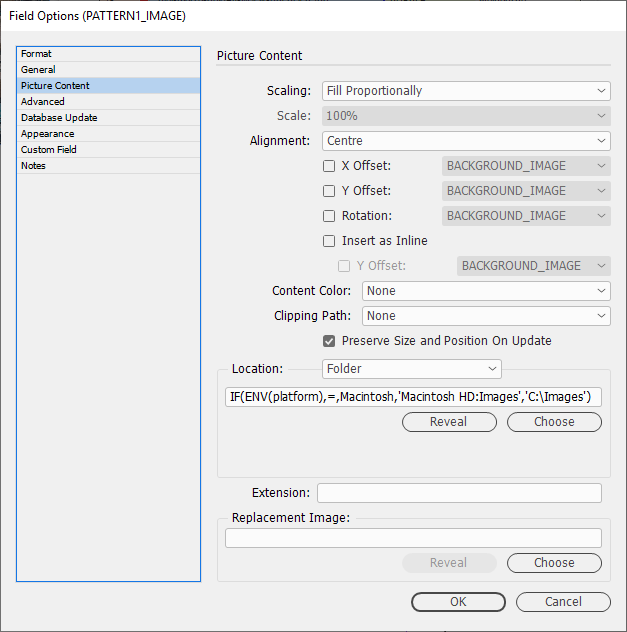
In the "C" drive on my computer there is an "Images" folder that contains the images.
The screen shot below shows the images have been discovered with the help of the ENV custom command.
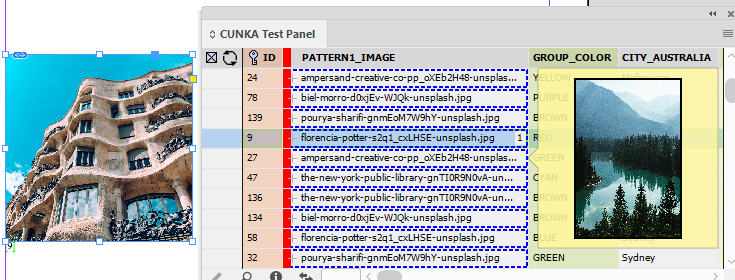
Handling File Types
Image file type handling can be configured in the Extension parameter on the Field Options → Picture Content tab.
- The "Extension" parameter
-
-
Define what file type is in use, if image files have no extension.
-
Indicate a preferred file type order. Seperated by ";".
-
Is not case sensitive. JPG and jpg are the same.
-
Example - Images with no file extension
Its possible that your data source panel may only have the name of the image and know nothing about the file type.
eg. Picture1
Through the "Extension" parameter, you can indicate to EasyCatalog what image file types you will handling. If they were just JPGs', you would put JPG or jpg in the "Extension" box.
|
If the data source indicates an image file with a file type extension, that image file will always be used. eg.Picture1.jpg |
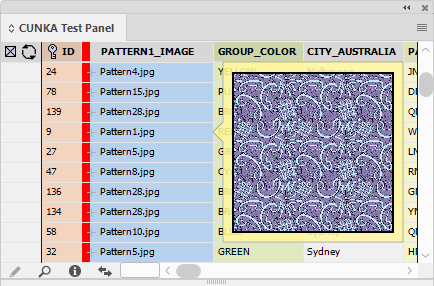
Example - Same image in multiple file formats
There may be times when you will have the same picture saved in a variety of image formats.
eg. Picture1.jpg , Picture1.png , Picture1.psd
In this example we will look at a data source panel where only the image names have been specified.
Each image is available in 3 image file formats.
-
jpg
-
png
-
psd
The first step is define the sequence we would like them to be in. So if we always want to use a JPG we put that first. If for some reason a JPG is not available we will indicate to use a PNG. If they are both not there use the PSD.
If none of them were there, we would indicate in the "Replacement Image" parameter what image to use.
The "Extension" parameter has now jpg;png;psd entered into it.
Here is what my document and panel looks like. Along the top I have what the 3 file types look like. So they look different on the page, I’ve change there appearance, but they are always image Pattern1.
To the left of the data source panel you will see a graphics box we will put the image into. The panel also displays what image is currently loaded into Pattern1. In this case its the JPG image.

Screen shot shows the "Pattern1.jpg" image placed on the document.

The Pattern1.jpg image is now missing. So the PNG image Pattern1.png is used.

Both the Pattern1.jpg and Pattern1.png images are missing. The Pattern1.psd image is now used.
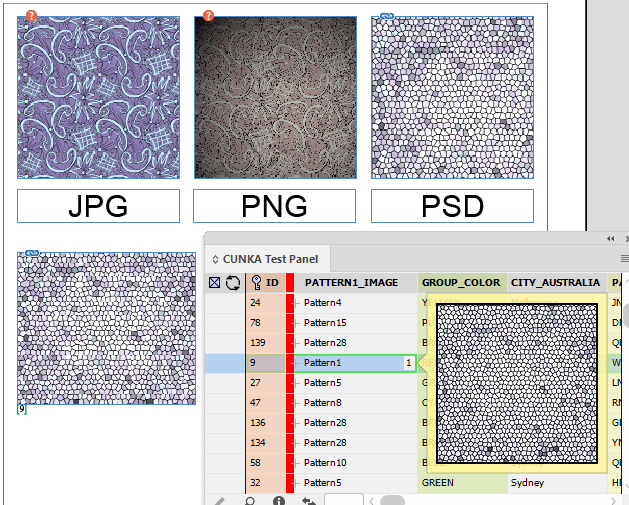
Workspace Folder
Within the EasyCatalog Workspace folder of your data source panel, there is an Images folder. This folder is automatically added whenever you create a data source panel.
You can either link to images in another folder, or put all your images in the Workspace Images folder. This can be very handy and it keeps all your images in one spot.
When using the Workspace Images folder, you may find you do not get a preview of the image in the data source panel. To handle this, all you have to do is add file extension(s) to the "Picture Content" Extension box. eg. JPG;PNG;IDMS
Example - JPG images in Images folder
In this example we have placed all the images (JPG) into the "CUNKA Test Panel" Workspace Images folder.
When we try to preview any of the images we get the file name only.

Here are the images in the Workspace Images folder.
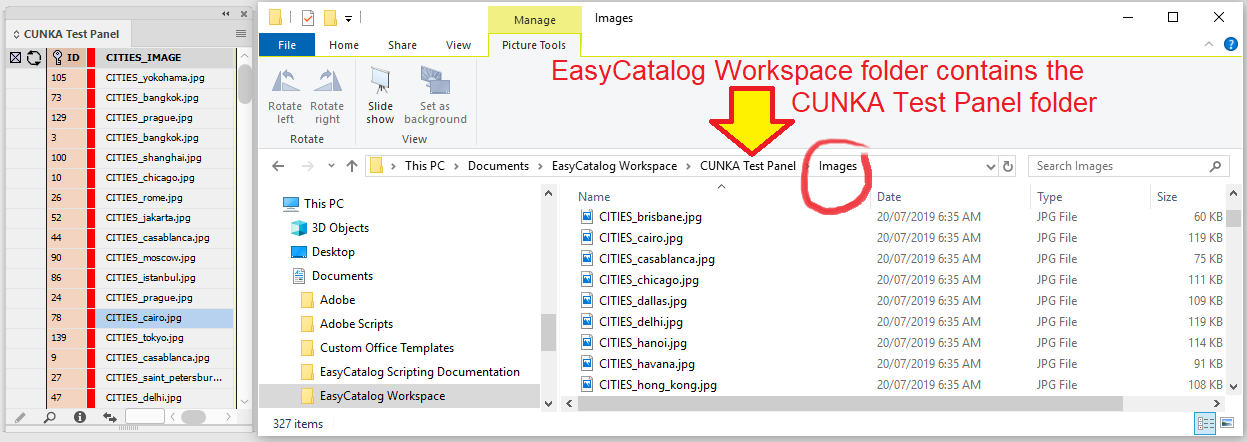
No "Location" folder has been entered.
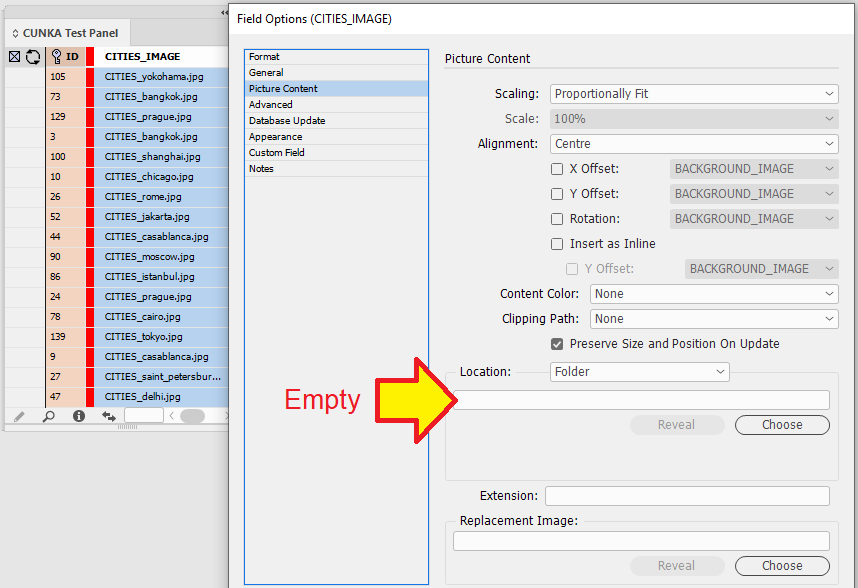
The files are all JPGs. In the "Extension" we added JPG;
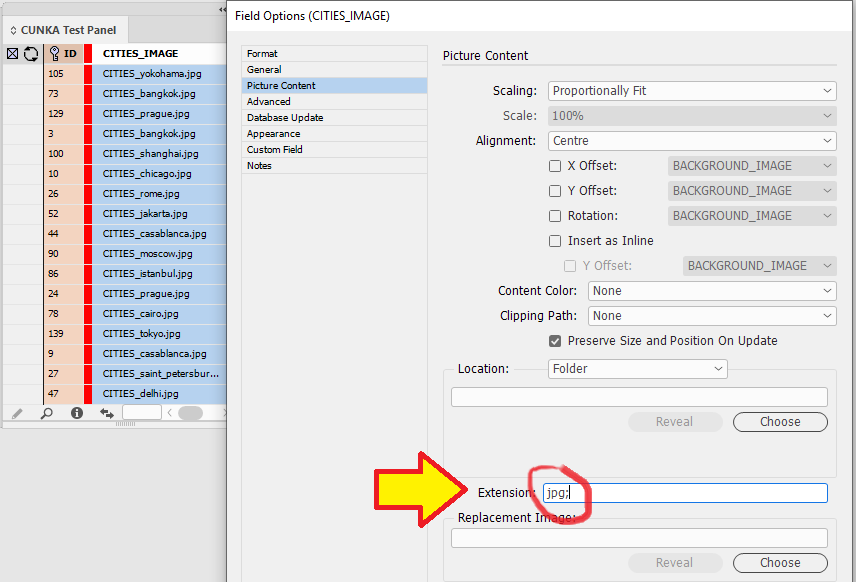
Now when we hover over any of the images for this field, we will get an image preview.
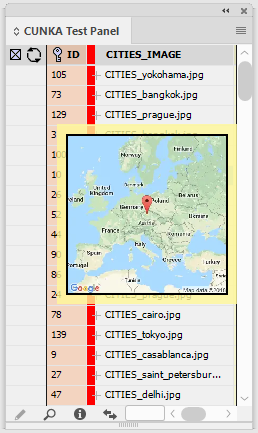
Multiple Images In a Field
Multiple images can be stored in a single image field in EasyCatalog.
The images are required to be separated by a carriage return in the source data.
When hovering over an image field containing multiple images, all images will be previewed. The image to use when importing this field can be selected by clicking on the preview. The selected image will have a black border.
| This functionality is not supported when importing images from URLs. |
Example - Using Multiple Images
In this example we have 5 images in a single image field called Images seperated by carriage returns.
rohit-tandon-67718-unsplash.jpg
pooja-chaudhary-635011-unsplash.jpg
tristan-gassert-674119-unsplash.jpg
mindy-jacobs-589308-unsplash.jpg
ferdinand-stohr-203711-unsplash.jpg
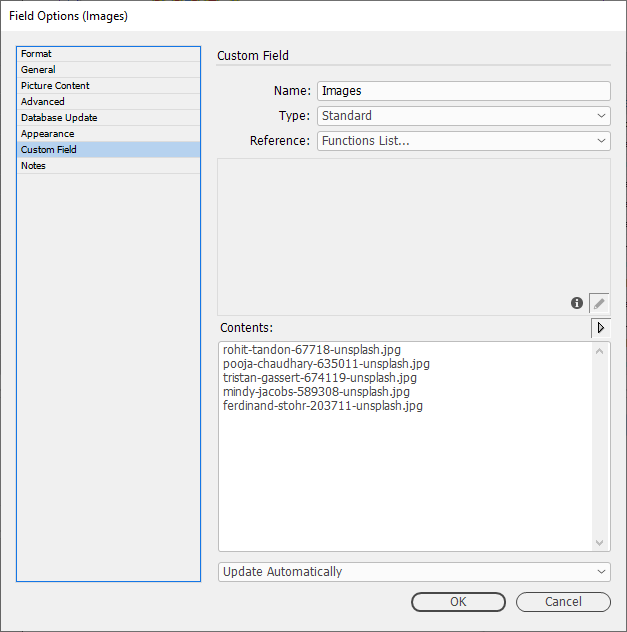
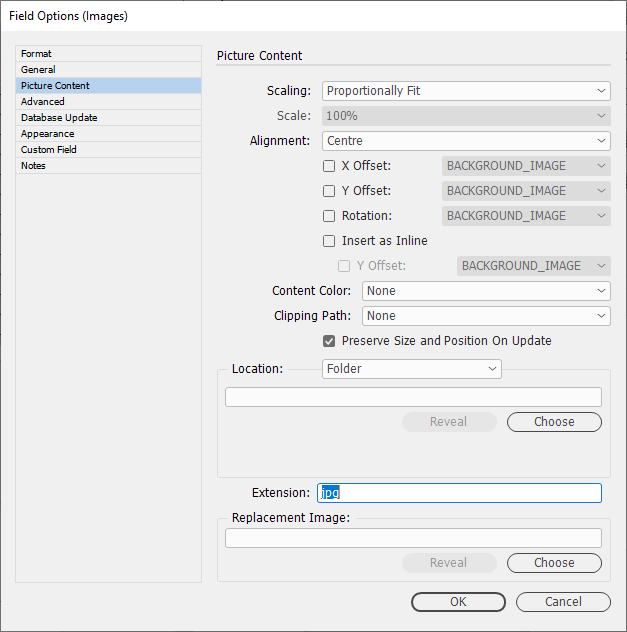
Hovering over the Image field we see the preview of all 5 images.
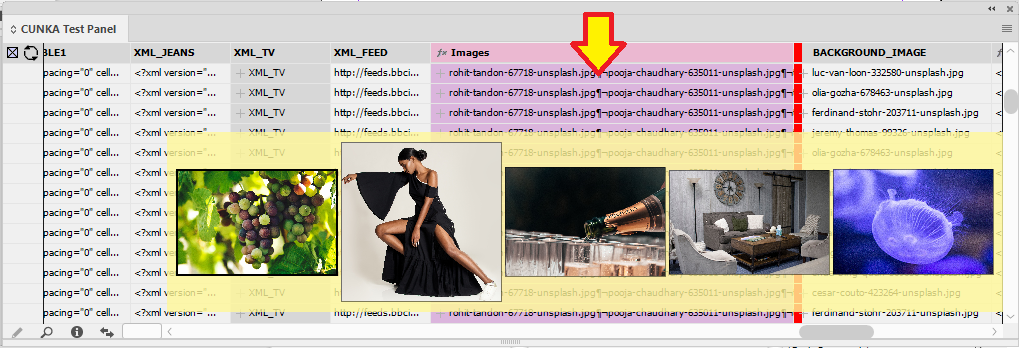
To determine which image will be used, simply click on one of the previewed images. A heavy black border will then show which image has been selected.
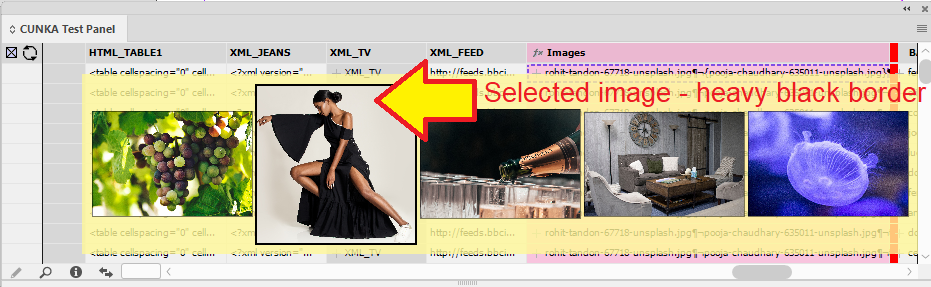
Images In Frames
The following examples look at how the Pagination Rules setting of Fitting affects the field specific Picture Content settings of Scaling & Alignment.
This table represents the original image and the 2 InDesign graphic frames it will be applied too.
Original Image |
Frame 1 |
Frame 2 |
|---|---|---|

|

|

|
"Fitting" : None
-
Scaling : None
-
Alignment : Centre
The graphic frames and image do not change size.
Looks at the “Alignment” setting and applies an image to the frame. This may result in whitespace or cropping of the image dependent on the shape of the graphics frame.
Original Image |
Frame 1 |
Frame 2 |
|---|---|---|
|
|

|

|
"Fitting" : Frame To Content
-
Scaling : None
-
Alignment : Centre
The graphic frame changes size to that of the image.
If the “Scaling” in the Picture Content is set to “None”, the graphic frame will always resize to the image size.
However, the use of the Fill Frame “Scaling” setting will not change the frame size at all, while settings like Proportionally Fit will.
With “Scaling” set to Proportionally Fit, the frame will resize by the longest length.
e.g. If the height is longer than the width, the height will be resized.
Original Image |
Frame 1 |
Frame 2 |
|---|---|---|
|
|

|

|
"Fitting" : Content To Frame
-
Scaling : None
-
Alignment : Centre
The graphic frame never changes size.
The image is always placed according to the setting of “Scaling”.
If the “Scaling” is set to none, the original image is placed in. This may result in cropping of the image if the frame is smaller then the original image size, or whitespace around an image that is smaller then frame its applied to.
We usually like the “Scaling” setting of Proportionally Fit with Content To Frame.
Original Image |
Frame 1 |
Frame 2 |
|---|---|---|
|
|

|

|
"Fitting" : Frame Height To Content Height
-
Scaling : None
-
Alignment : Centre
The graphic frame height size will change, the width size however will not.
The “Fitting” setting in the Pagination Rule Frame Height To Content Height is handy when you are constrained with frame widths, but not frame depths. Situations where you have columns on a document are one example for usage.
The frame will always resize the height to the image content if the “Scaling” is set to “None”.
Original Image |
Frame 1 |
Frame 2 |
|---|---|---|
|
|

|

|
"Fitting" : Frame Height To Content Height And Width
-
Scaling : None
-
Alignment : Centre
The graphic frame changes size.
The image is always placed by the setting of the “Scaling”. If the “Scaling” is set to None, the original image is placed in. This may result in the image been cropped if the frame is smaller then the original image, or whitespace around an image that is smaller then frame its applied to.
A “Scaling” setting of Proportionally Fit with Frame To Content (Height & Width) is different than the Pagination Rule Frame To Content. The frame does not change size, but simply proportionally fits the image into the frame.
Original Image |
Frame 1 |
Frame 2 |
|---|---|---|
|
|

|

|
"Scaling" : Proportionally Fit
-
Fitting : None
-
Alignment : Centre
The graphic frame size does not change.
Depending on the frame size compared to the actual image size, the image will be resized proportionally to fit into the frame. Also dependant on what is set in the “Alignment”, there may be whitespace around the image.
Original Image |
Frame 1 |
Frame 2 |
|---|---|---|
|
|

|

|
"Scaling" : Fill Frame
-
Fitting : None
-
Alignment : Centre
The graphic frame size does not change.
The frame will always be filled to its extents with the applied image. If the image size is vastly different to the frame size, the result may be distorted. This may be however what you are seeking to do.
Original Image |
Frame 1 |
Frame 2 |
|---|---|---|
|
|

|

|
"Scaling" : Fill Proportionally
-
Fitting : None
-
Alignment : Centre
The graphic frame size does not change.
The frame will always be filled in proportionally to its extents with the applied image. Depending on the frame size compared to the image size, and the “Alignment” setting, not all of the image may appear in the frame.
The second image in the table has a "zoom" type effect going on as it tries to fit all of the image into the frame.
Original Image |
Frame 1 |
Frame 2 |
|---|---|---|
|
|

|

|
"Scaling" : Fixed Scale
-
Scale : 50%
-
Fitting : None
-
Alignment : Centre
The graphic frame size does not change.
With “Scaling” set to Fixed Scale, the image is resized to the “Scale” % value first. The result is then applied to the frame depending on the “Alignment” setting. The image may or may not fit into the frame.
Original Image |
Frame 1 |
Frame 2 |
|---|---|---|
|
|

|

|
"Scaling" : Field Specified
-
Field 1 set to 100
-
Field 2 set to 50
-
Fitting : None
-
Alignment : Centre
The graphic frame size does not change.
With “Scaling” set to Field Specified, the image is looking for two EasyCatalog fields that contain both the height & width to apply.
Original Image |
Frame 1 |
Frame 2 |
|---|---|---|
|
|

|

|
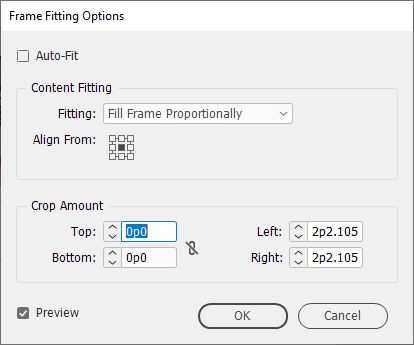


Workspace Folder
On installation of the EasyCatalog software, it creates an EasyCatalog Workspace folder.
By default, the EasyCatalog Workspace folder will be configured to be:
- Macintosh
-
Documents:EasyCatalog Workspace
- Windows
-
My Documents/EasyCatalog Workspace
The EasyCatalog Workspace folder contains a folder for each data source you create.
Within a created data source folder, EasyCatalog creates 6 default folders
-
Assets
Contains snippet files. (If full file paths are not supplied for the snippet file) -
Configurations
Contains user created / saved configuration files. (eg. Grouping, cleansing options, custom fields…) -
Data
Contains the information files used by EasyCatalog for the data source. (eg Fields.xml) -
Image
Contains image files. (If full file paths are not supplied for the image file. An image extension (eg. JPG;PNG) must be supplied for an image preview) -
Scripts
Contains any user created Javascript / LUA scripts. (eg. Event Scripts, CALLSCRIPT / GROUPSCRIPT custom field references…. ) -
XSLT
Contains XSL / XSLT files used for XML transformations.

HTML
Tags
- <font>
-
The <font> tag is deprecated and not supported in HTML5. -
tag accepts color values in addition to a swatch name. Enhanced HTML parser only.
-
<font color="c100m0y0k0"> Testing font color attribute in the 'font' tag</font>

<font color="Cunka_Yellow"> Testing font color attribute in the 'font' tag</font>
- <b> or <i>
-
-
support for specifying which font face should be used when applying bold and italics:
e.g. <b boldface = “SemiBold” plainface = “Regular”>
-
- <p>
-
-
accepts the “class” attribute and maps the name to an InDesign paragraph style name.
-
accepts the “shade” (highlight) attribute. This takes a swatch name, a CMYK or RGB value. Enhanced HTML parser only.
-
Example 1 : Shade color set to use the "Cunka_Yellow" swatch.
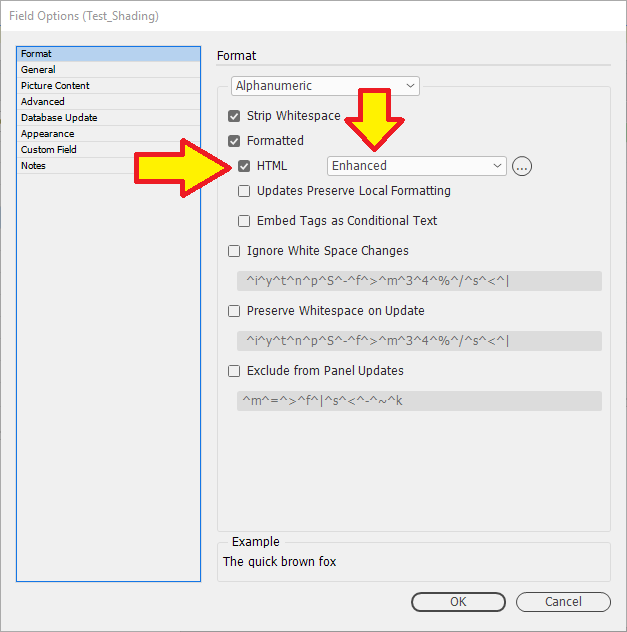
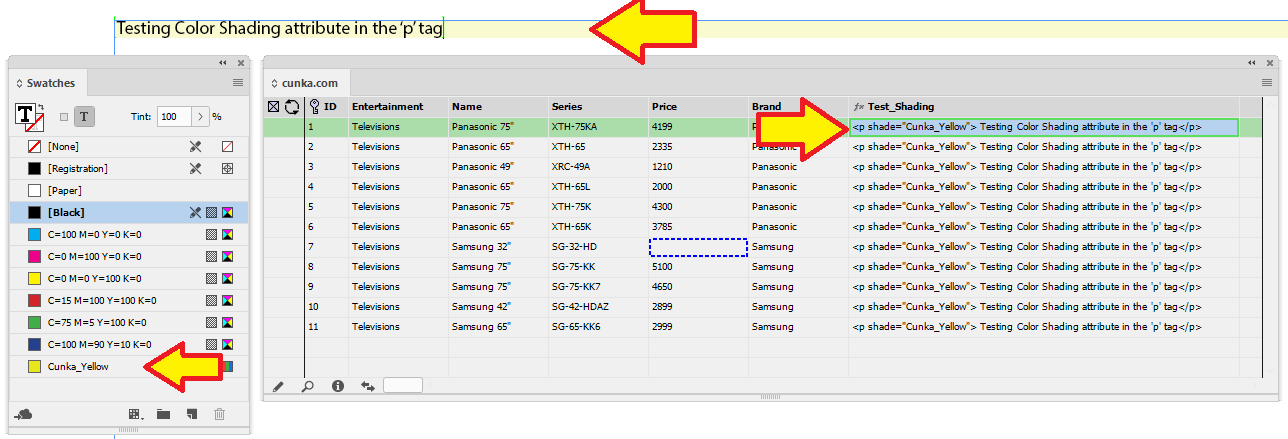
-
Example 2 : Shade color set to use the CMYK color "100,0,0,0".
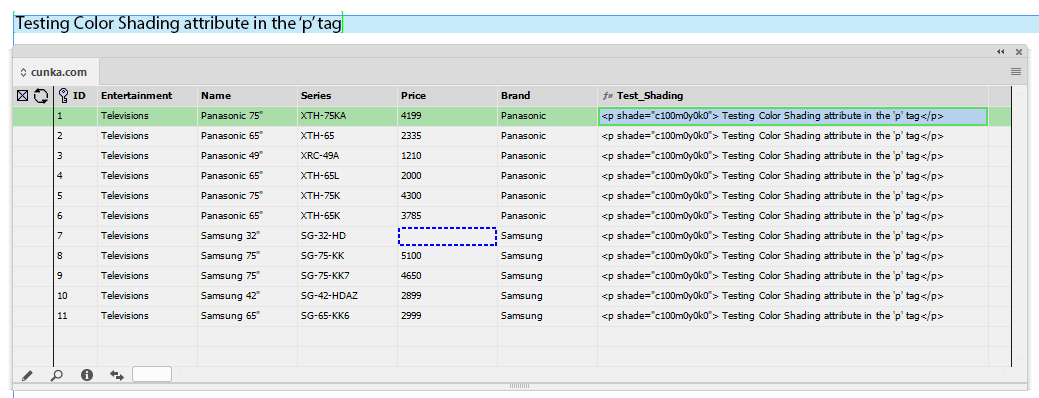
-
-
- <small>
-
-
applies small caps character attribute.
-
- <img>
-
-
accepts the “style” attribute to apply an InDesign object style.
eg. <IMG src = “xxxxx” width=”2cm” height = “3cm” style = “Object Style 1”/> -
accepts width or height attributes. If either measurement is missing the other will be calculated based on the proportions of the image.
-
- <table>
-
-
the ‘width’ property, which can be in any unit-of-measure supported by InDesign, or ‘auto’ to automatically horizontally resize the table to be the width of the column it is placed in, or a percentage of the containing text box’s width.
-
the ‘class’ and ‘style’ property, which can be used to apply an InDesign table style.
-
| <th> and <td> tags and attributes | |
|---|---|
<th> |
Rows are created as InDesign table header rows. |
<td> |
Rows are created as InDesign body table rows. |
class/style |
The name of an InDesign cell style |
width |
Width of the table column. Keywords can also be used to specify one of EasyCatalog’s column properties: FIXED, VARIABLE, FITTOTEXT |
height |
The height of the table row. The height can be specified using any of InDesign’s supported measurement units. |
vmerge |
Specifies an EasyCatalog vertical merging attribute. Can be one of CONTENTMATCH, POPULATEDCONTENTMATCH |
hmerge |
Specifies an EasyCatalog horizontal merging attribute. Can be one of CONTENTMATCH, POPULATEDCONTENTMATCH |
delete |
Specifies an EasyCatalog row deletion property, can be one of NEVER, IFEMPTY |
colspan/ |
Standard HTML row and column spans. |
- <br>
-
-
tag will insert a soft return rather than a hard return.
-
- HTML entity
-
-
If a HTML entity cannot be found in the current font, alternative fonts will be searched for the glyph.
-
accepts soft return entity.
-
- HTML tabular fields
-
-
support the "class" attribute.
-
- InDesign Style group support
-
-
levels are separated by colon.
-
As spaces aren’t allowed in tag names, EasyCatalog replaces "-" with a space before searching for a style.
e.g. < EasyCatalog :cunka-style> will search for a style called ‘cunka style’ in the ‘EasyCatalog‘ style folder.
-
Tables
Cells
- Apply Cell Style
-
Through the
Apply Cell Stylefeature inCell Options, an InDesign cell style can be applied from an EasyCatalog field.The
Apply Cell stylefeature can alternatively override the Indesign cell style use in favor of using a swatch instead. To override the cell style, the value must be prefixed with "SWATCH:"EXAMPLE : Table row has 2 columns. The cell in the first column is using the field "myCell" to apply an InDesign cell style. The cell in the second column is using a field called "mySwatch" to apply a Swatch to the cell.
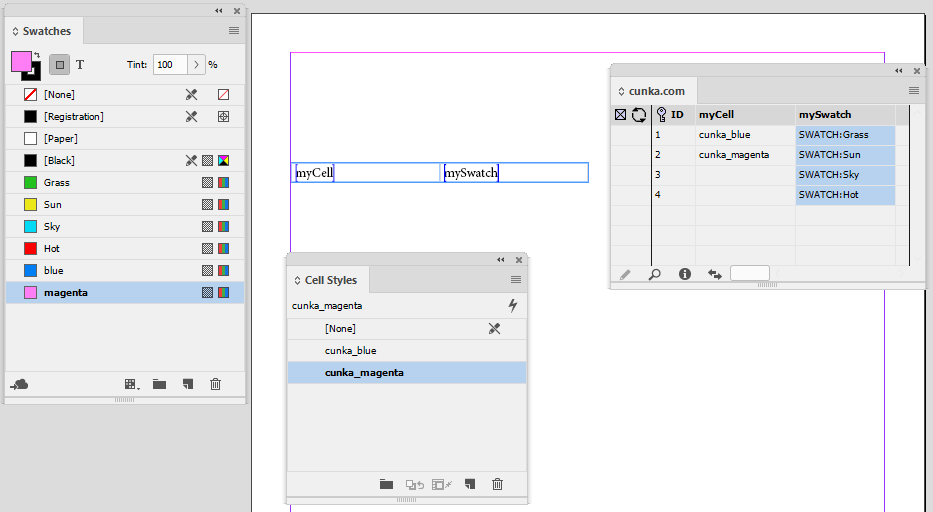
The field mySwatch has the Prefixof SWATCH: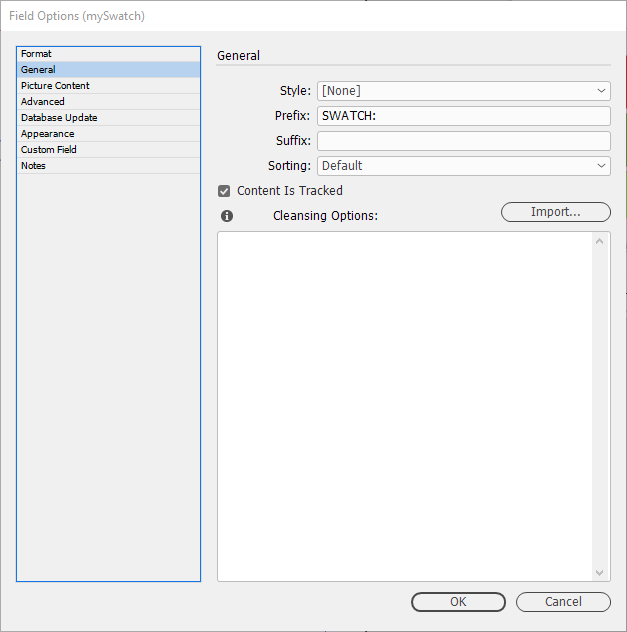
The
Apply Cell Stylefor the first cell is set to "myCell". The second cell is set to "mySwatch".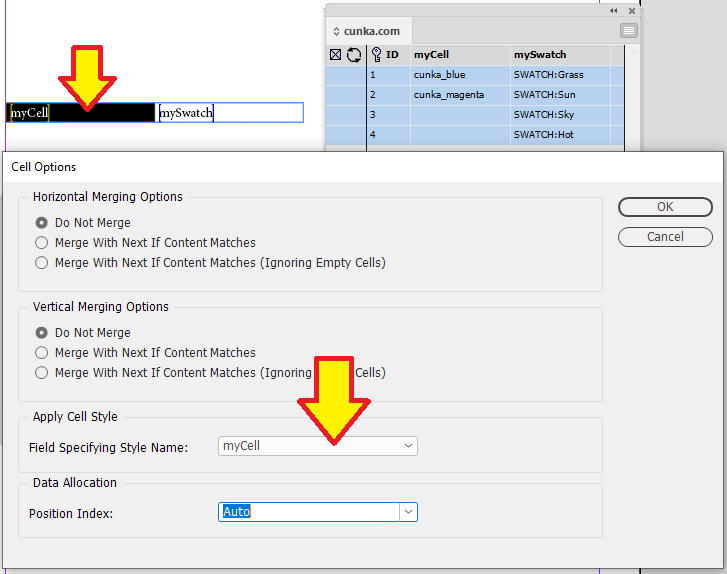
Final result.
The first column is made of cells that have an InDesign Cell Style applied.
The second column has cells with Swatches applied.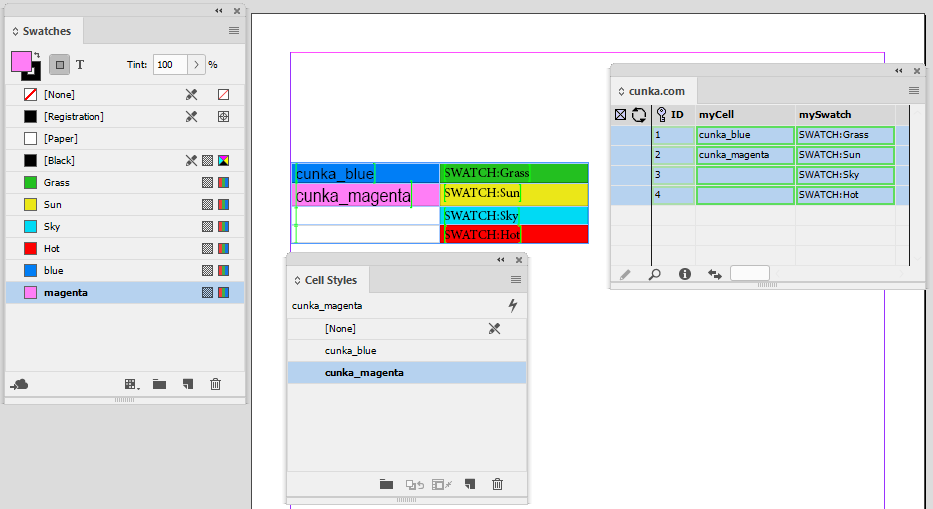
- Cell Rotation
-
Cells can be rotated by applying the rotation tag. eg. <td rotation="90">
Enhanced HTML parser only.EXAMPLE : The field "myHTML" has a table made up of 4 cells. Cell2 is rotated 90 degrees, Cell4 is rotated 270 degrees. <table> <tbody> <tr> <td>Cell1</td> <td rotation="90">Cell2</td> </tr> <tr> <td>Cell3</td> <td rotation="270">Cell4</td> </tr> </tbody> </table>
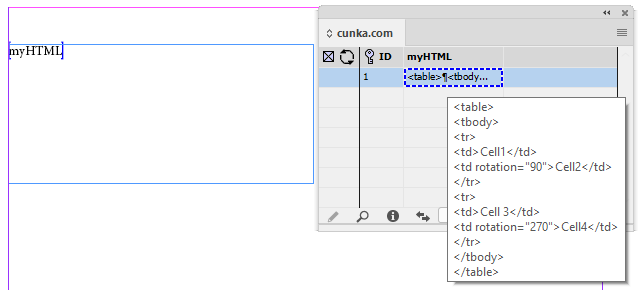
The field myHTML is set up to use the Enhancedparser.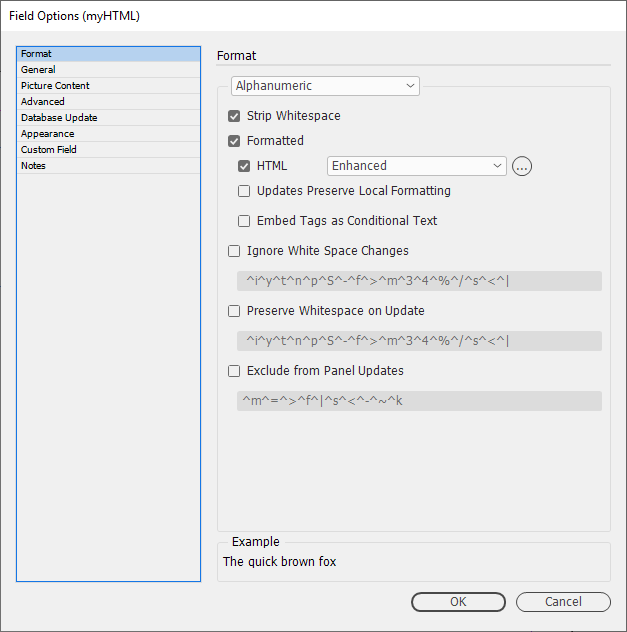
Final result.
After manually adjusting the heights of the cells, Cell2 is rotated 90 degrees, and Cell4 is rotated 270 degrees.
Cell Stroke Swatches NEW
Stroke Swatches can be applied using field content named in the table “Apply Cell Style” field.
Stroke Swatch commands:
-
TOPSWATCH
-
BOTTOMSWATCH
-
LEFTSWATCH
-
RIGHTSWATCH
Example 1
This example shows a 1 cell table, where each stroke will be applied a different swatch color.
The swatch colors are named AAA, DDD, JJJ, RRR.
To use the stroke swatch commands together, they are seperated by a comma.
TOPSWATCH:RRR,BOTTOMSWATCH:DDD,LEFTSWATCH:AAA,RIGHTSWATCH:JJJ
The field Cunka_Cell_Swatch is used in the table cell "Applied Cell Style" parameter.
The swatch stroke command with the required swatches are set up in the field Cunka_Cell_Swatch.
Final result showing the swatches AAA, DDD, JJJ, RRR applied.
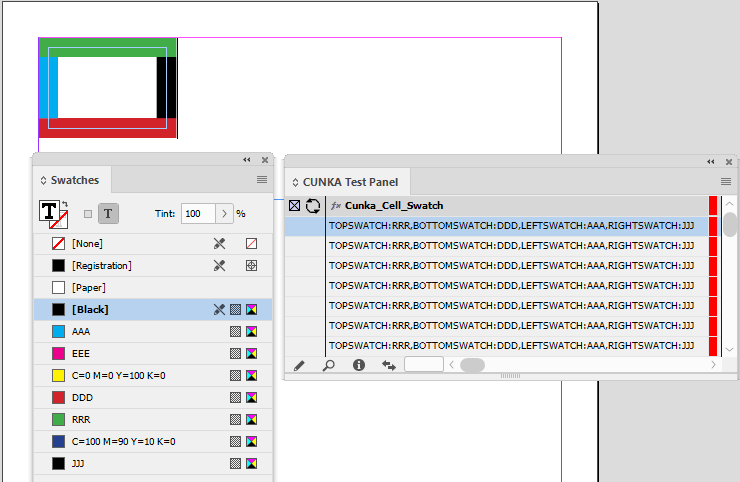
Example 2
This example extends on from example 1. Not only will we be able to style the TOPSWATCH, BOTTOMSWATCH, LEFTSWATCH & RIGHTSWATCH borders, we will also apply a cell style.
In this example we have created a cell style called CUNKA. To apply it, we simply put it in front of the TOPSWATCH, BOTTOMSWATCH, LEFTSWATCH & RIGHTSWATCH.
CUNKA,TOPSWATCH:RRR,BOTTOMSWATCH:DDD,LEFTSWATCH:AAA,RIGHTSWATCH:JJJ
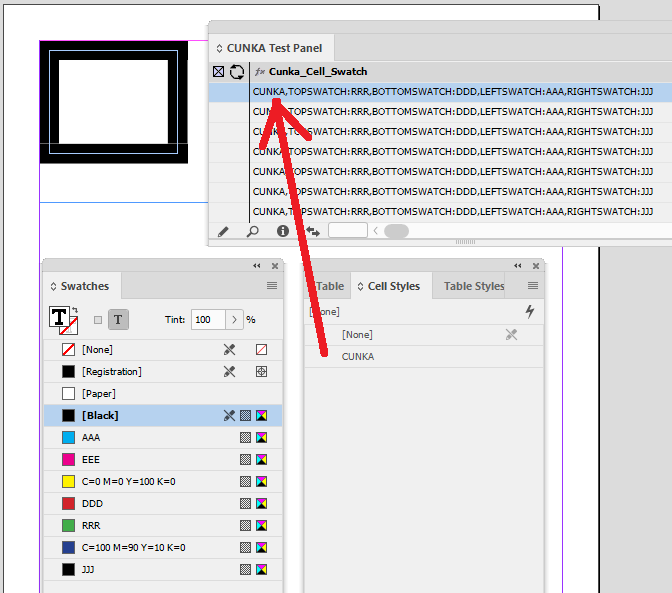
Final result shows the cell style CUNKA applied. (Blue background)
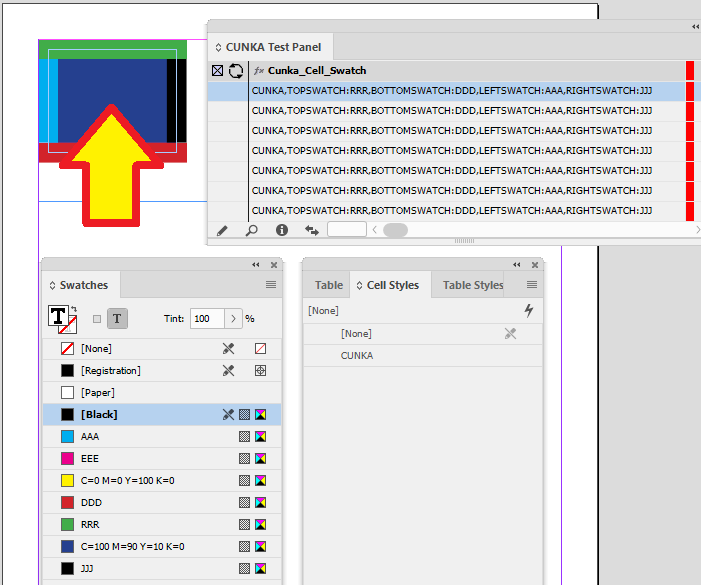
Indexes & SubIndexes
Custom Field Reference
| Custom Field Reference listed here is from EasyCatalog version 16.2.0.20230109(26720) |
AND
Description
Takes two or more arguments and performs a logical 'AND' operation testing for true or false conditions.
-
Returns TRUE if all arguments are TRUE.
-
Returns FALSE if any argument is FALSE.
Parameters
AND(argument1, argument2, . . . .)
Example
The AND formula says "If Available is equal to yes, and InStock is greater then 10, then the Status field will be true. If Available is anything else but yes, then Status will be false. If InStock is 10 or less, then Status will be false".
AND(IF (FIELDSTR(Available), '=', Yes), IF (FIELDSTR(InStock), '>', 10))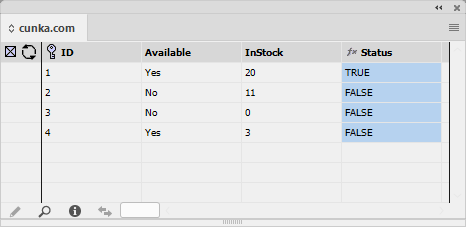
APPLYXSLT
Description
Apply an XSL transformation to the contents of a field containing XML.
The XSLT file is referenced from the data sources XSLT folder located in the EasyCatalog Workspace.
| Requires the XML data provider module. |
Parameters
APPLYXSLT(field name, xslt file name)
Example
APPLYXSLT(XML_stuff,'chips.xsl')The XSL file called "chips.xsl" must be located in the XSLT folder of the Data Source you will be using. Your Data Source should be located in the "EasyCatalog Workspace" folder. In this example my Data Source is called "cunka.com".
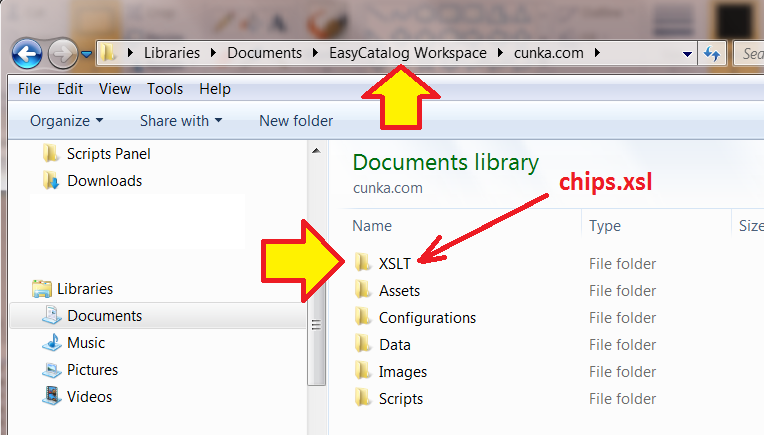
You can see the contents of the field "XML_stuff". This is the XML data to be transformed.
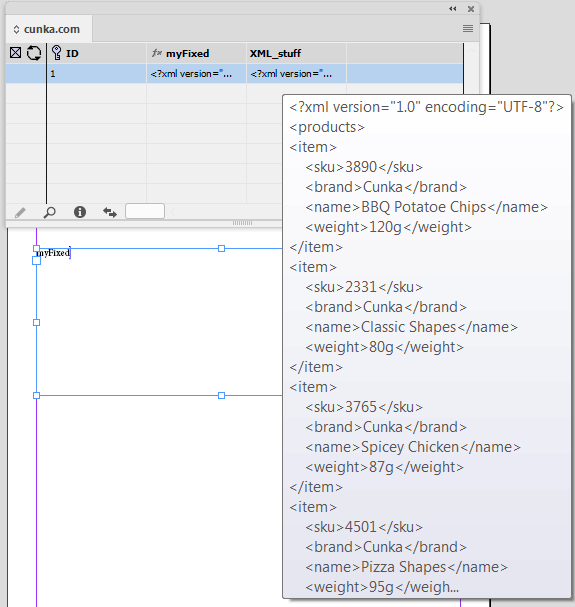
You can see the contents of the field "myFixed". Which has taken the file "chips.xsl" and applied a transformation to the data in the field "XML_stuff". The result is stored in the field "myFixed".
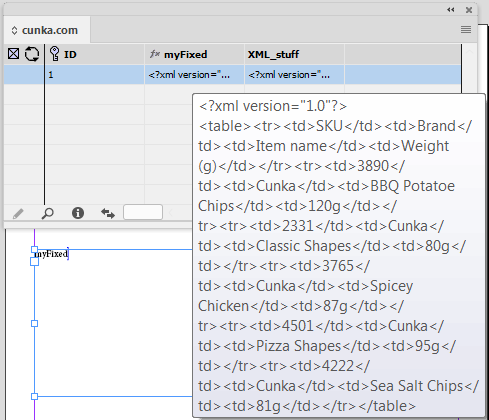
Here is the final result and how it appears on the page.
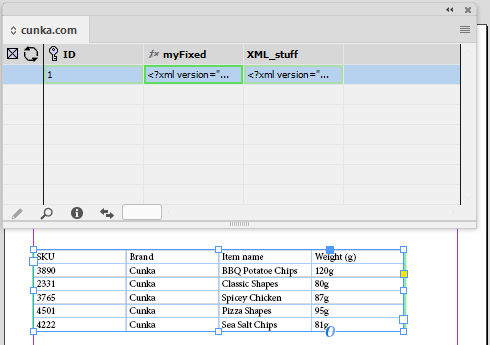
The XML source data in the example field "XML_stuff".
<?xml version="1.0" encoding="UTF-8"?>
<products>
<item>
    <sku>3890</sku>
    <brand>Cunka</brand>
    <name>BBQ Potatoe Chips</name>
    <weight>120g</weight>
</item>
<item>
    <sku>2331</sku>
    <brand>Cunka</brand>
    <name>Classic Shapes</name>
    <weight>80g</weight>
</item>
<item>
    <sku>3765</sku>
    <brand>Cunka</brand>
    <name>Spicey Chicken</name>
    <weight>87g</weight>
</item>
<item>
    <sku>4501</sku>
    <brand>Cunka</brand>
    <name>Pizza Shapes</name>
    <weight>95g</weight>
</item>
<item>
    <sku>4222</sku>
    <brand>Cunka</brand>
    <name>Sea Salt Chips</name>
    <weight>81g</weight>
</item>
</products>
The "chips.xsl" transformation source code.
<xsl:stylesheet version="1.0" xmlns:xsl="http://www.w3.org/1999/XSL/Transform">
<xsl:template match="/">
  <table>
      <tr>
        <td>SKU</td>
        <td>Brand</td>
        <td>Item name</td>
        <td>Weight (g)</td>
      </tr>
    <xsl:for-each select="//item">
      <tr>
        <td><xsl:value-of select="sku"/></td>
        <td><xsl:value-of select="brand"/></td>
        <td><xsl:value-of select="name"/></td>
        <td><xsl:value-of select="weight"/></td>
      </tr>
    </xsl:for-each>
  </table>
</xsl:template>
</xsl:stylesheet>
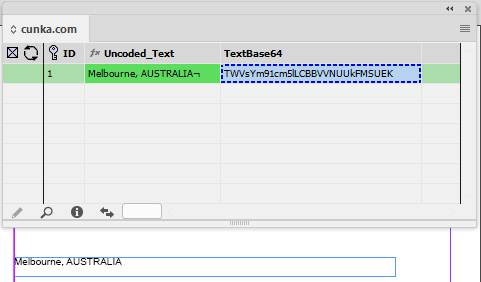
CALLSCRIPT
Description
You can add additional processing power to EasyCatalog by calling InDesign ExtendScript scripts from the Data Source 'Scripts' folder.
| CALLSCRIPT fields are not updated until another field is updated. |
Scripts are passed the records field data that can be easily referenced to by myRecord["YOUR FIELD NAME GOES HERE"]. The script can refer to record data as myRecord["fieldname"]. The result returned can be a new calculated value, or a mix of existing record data.
Parameters
CALLSCRIPT(file name)
Example
CALLSCRIPT(Layouts.jsx)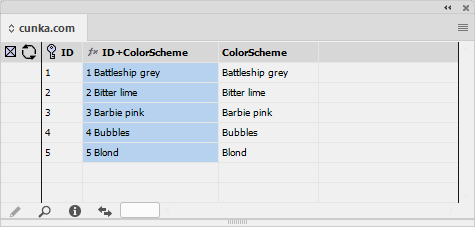
The 'Layouts.jsx" Javascript source code. EasyCatalog passes a record to the script always called "myRecord". You can easily get the contents of a record by knowing its field name. This example simply takes the "ID" and "ColorScheme" fields and concatenates them together in the "ID+ColorScheme" field shown in the screen shot above.
/*
   Layouts.jsx
   Put this script into the "Scripts" folder of the datasource

   by Brian Cowell
   contact@cunka.com

*/

// field names from EasyCatalog are passed to the script
// via myRecord["YOUR FIELD NAME GOES HERE"]

myRecord["ID"]+" "+myRecord["ColorScheme"];

// the result is returned to the field that called the script
Example
This example is a more advanced use of "CALLSCRIPT" where we know the color scheme that will be used, but really need the hexadecimal color value.
The color names and hexidecimal values are held in the scripts array. EasyCatalog passes the records data and the script picks out the color scheme field, then compares that name to names that exist in the array.
It then returns the hexadecimal for the color.
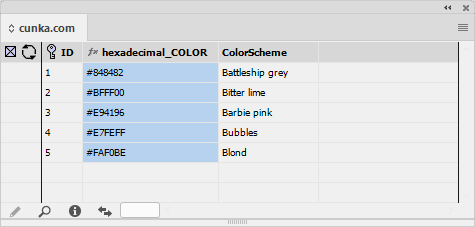
The 'Layouts.jsx" Javascript source code.
/*
   Layouts.jsx

   Put this script into the "Scripts" folder of the datasource

   by Brian Cowell  contact@cunka.com

   Color list from : https://en.wikipedia.org/wiki/List_of_colors:_A%E2%80%93F
*/

// color schemes are stored in an array. Name and hexidecimal value
var colorSchemes = [
    {colorName:"Battleship grey",hexValue:"#848482"},
    {colorName:"Bitter lime",hexValue:"#BFFF00"},
    {colorName:"Barbie pink",hexValue:"#E94196"},
    {colorName:"Bubbles",hexValue:"#E7FEFF"},
    {colorName:"Blond",hexValue:"#FAF0BE"},
    {colorName:"Black bean",hexValue:"#3D0C02"}
];

// default color will be "Black bean" if the color is not found
var hexColor=colorSchemes[5].hexValue;

// loop through all the color schemes
for (i in colorSchemes) {
    // get the color name from the field "ColorScheme" and compare it
    if (myRecord["ColorScheme"]==colorSchemes[i].colorName){
        // store the hexidecimal value if the color name is found
        hexColor=colorSchemes[i].hexValue;
        }
}

//return the hexidecimal value back to the field that called the script
hexColor;CASE
Description
Finds the given key in a list of key/value pairs and returns the matching value. If a value can not be found, the returned value is empty.
If the last pairing of a CASE command starts with * then this is used for any non-matches. In other words, it becomes the default value.
Software/hardware programmers will identify CASE functionality as that of "switch/case" command as used in languages like Javascript, Java, C++, PHP etc.
Parameters
CASE(text,key,value . . . ., . . . .)
Example 1
CASE(FIELDSTR(Code),99,Items are on HOLD,K,Available as a KIT only,A,Accessory item,I,Indent item,C,Call for information)This example takes existing codes from the field "Code" and uses CASE to look them up (eg. K code is "Available as a KIT only") and returns the text into the field "Code Description".
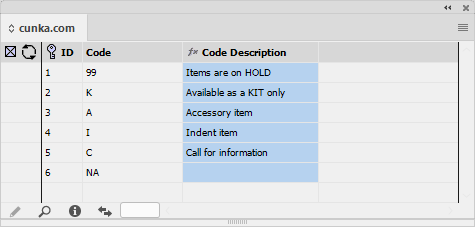
Example 2
CASE(FIELDSTR(Code),99,Items are on HOLD,K,Available as a KIT only,A,Accessory item,I,Indent item,C,Call for information,*,Not what we expected)Same as Example 1, except it includes a default value if it can not match to anything. By using "*" as the last condition, a value can be applied to cases that do no match.
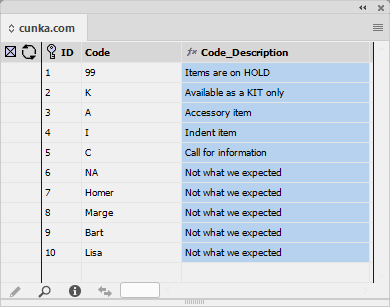
CHAR
Description
Converts a number to the corresponding character.
-
Decimal values.
-
Hexadecimal values can be specified but must be prefixed with %.
Parameters
CHAR(numeric value of character)
Example
CHAR(FIELDSTR(HexaDecimal))The hexadecimal value is quite easy and more intuitive for InDesign users to work with. The InDesign Glyphs panel shows the "Unicode" (hexadecimal value) which allows you to see what exact character you would like to get. Simply put the % sign in front of the unicode number and use it in CHAR().
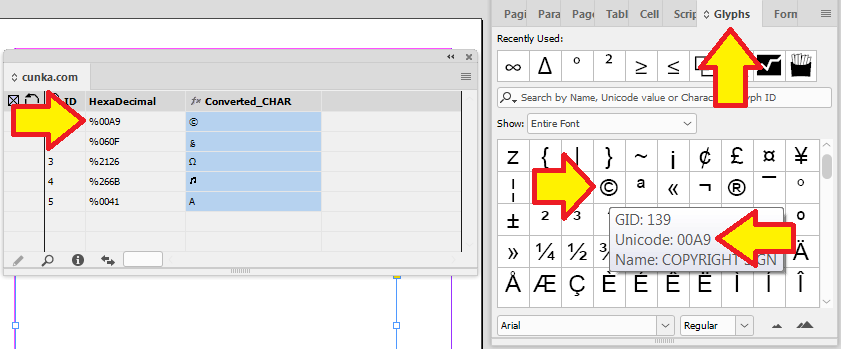
CODE128
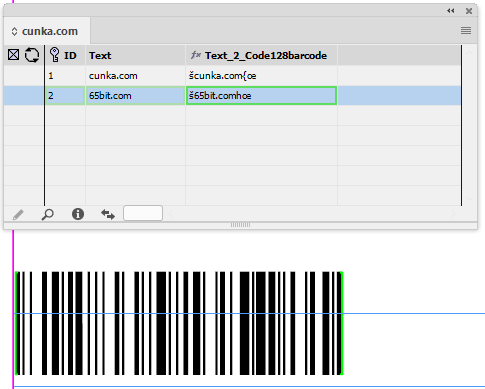
COMPARESTR
Description
Compares the string contents of a field with a value (or another field) and returns a matching result.
For more complex comparisons consider using the IF statement.
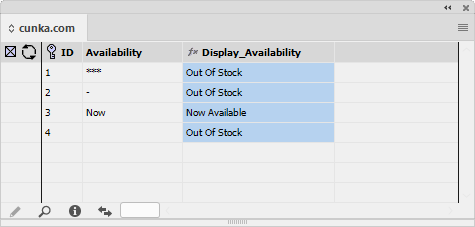
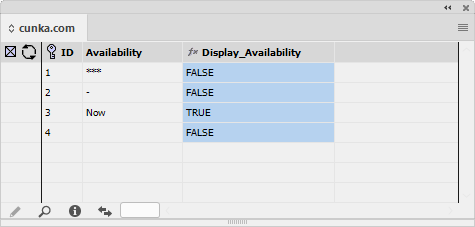
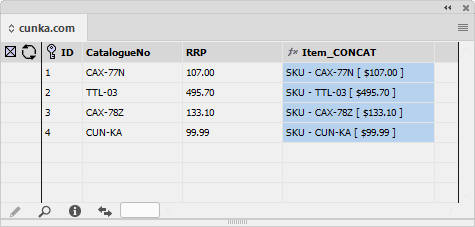
CREATERANGES
Parameters
CREATERANGES(separator,valid values (in order),single sep, range sep, values)
Example
CREATERANGES(',','S,M,L,XL,XXL,XXXL',' / ',' -- ',FIELDSTR(SIZES))Sometimes there are many values available for an item. In this example we are talking about sizes of jeans. Now we could list all the available sizes of the jeans (field "Size"), but rather then list them all, we can also take the sizes and break them down into a range.
You can see the ranges are now listed with the "--" seperator in the "Size Ranges" field. We have also dropped the use of the "," seperator in favour of the " / " seperator for non ranges.
DECTOFRAC
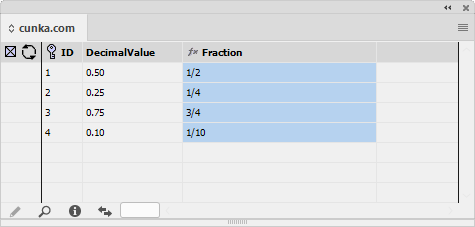

DEPENDSON
Description
Creates an explict dependency on another field being up-to-date.
EasyCatalog internally creates a dependancy tree before executing any if its commands. There are very rare occasions where it may not return the value you were expecting as it executed the commands in the wrong order. This is where DEPENDSON helps. It will explicitly create a dependancy to control the order of execution.
For example, you may have a command that takes the value of a custom field and that fields runs an external Lua script that then goes on to reference other fields.
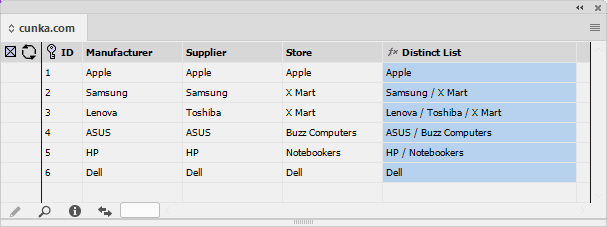
DIV
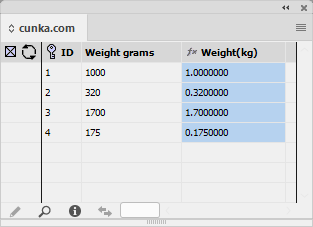
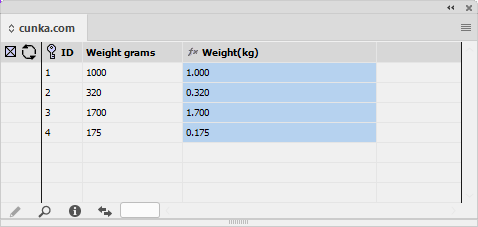
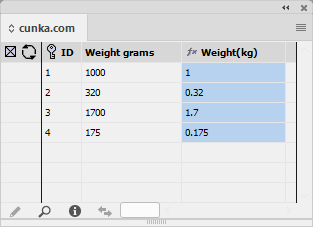
DOCUMENTIMPORTPAGE
DOESFIELDEXIST
Description
Returns TRUE if the specified field exists
| Its quite possible if you are visually looking at the data source panel and you can not see a field reported back as existing (TRUE), that the field will be actually hidden. |
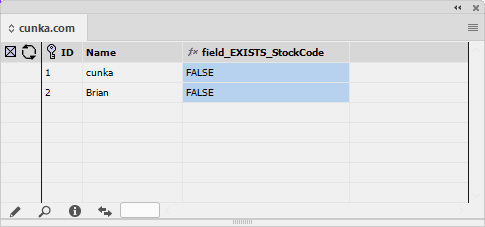
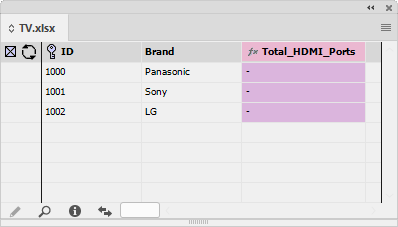

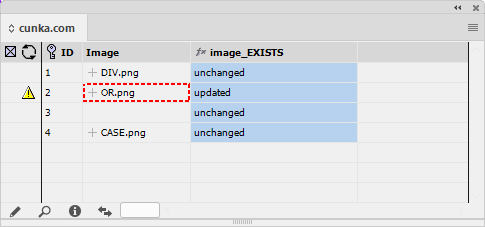
EAN13
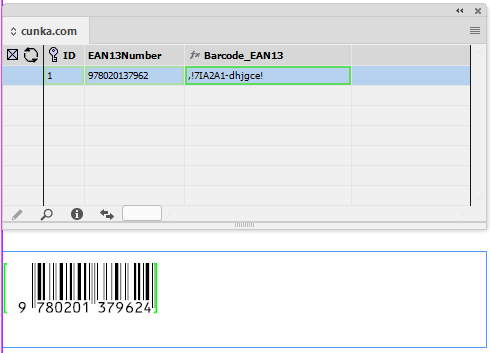
EAN8
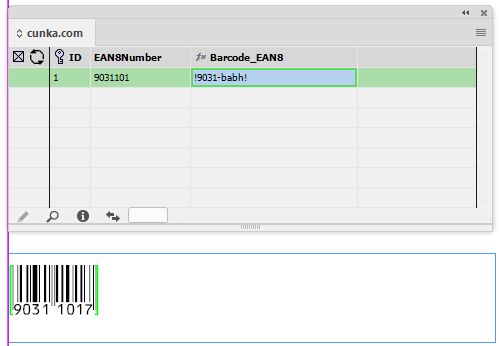
ENV
Returns environment information for the given string name.
| Name | Value |
|---|---|
datasourcename |
The name of the current data source |
version |
The version number of EasyCatalog |
buildno |
The build number of EasyCatalog |
date |
The current date. Has an optional second parameter to specify the ‘nth’ day from today. eg. ENV(date,1) |
username |
The name of the user logged in to the machine. |
osversion |
The version number of the operating system |
platform |
The platform being used (Macintosh/Windows) |
decimalpt |
The character being used as the decimal separator |
thousandssep |
The character being used as the thousands separator |
applicationname |
InDesign, InCopy or InDesign Server |
applicationversion |
applicationversion |
workspacefolder |
The location of the EasyCatalog workspace folder. |
Parameters
ENV(Name)
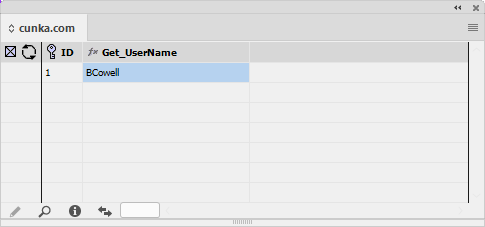
EVALUATEXPATH
Evaluate an XPath expression on a fields content, which should contain an XML fragment.
| Requires the XML data provider module. |
Parameters
EVALUATEXPATH(field name, xpath, (optional) separator)
Example
EVALUATEXPATH(XML,'/products/item/name/text()',' / ')The field name 'XML' contains a block of XML data. The field 'XML_Evaluated_XPATH' is been asked to go and extract all the 'name' fields out of the XML data, and concatenate them using the '/' as a seperator.
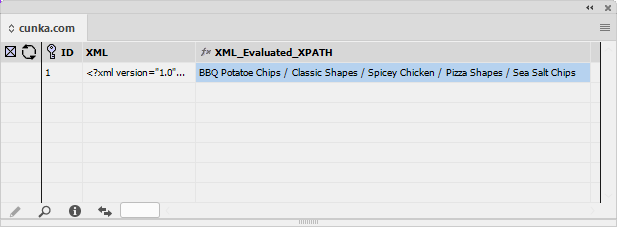
<?xml version="1.0" encoding="UTF-8"?>
<products>
<item>
    <sku>3890</sku>
    <brand>Cunka</brand>
    <name>BBQ Potatoe Chips</name>
    <weight>120g</weight>
</item>
<item>
    <sku>2331</sku>
    <brand>Cunka</brand>
    <name>Classic Shapes</name>
    <weight>80g</weight>
</item>
<item>
    <sku>3765</sku>
    <brand>Cunka</brand>
    <name>Spicey Chicken</name>
    <weight>87g</weight>
</item>
<item>
    <sku>4501</sku>
    <brand>Cunka</brand>
    <name>Pizza Shapes</name>
    <weight>95g</weight>
</item>
<item>
    <sku>4222</sku>
    <brand>Cunka</brand>
    <name>Sea Salt Chips</name>
    <weight>81g</weight>
</item>
</products>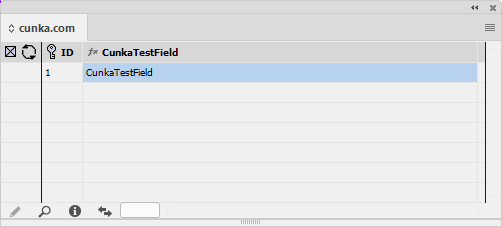
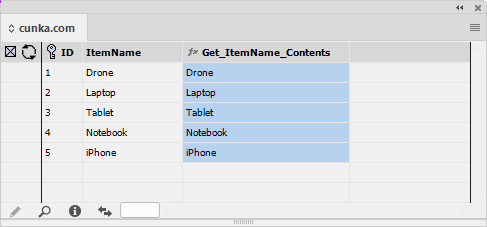
FIELDVAL
Returns the numerical contents of a field. This function will only return a value for numeric fields
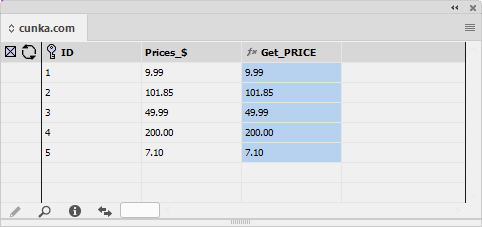
FILESIZE
Returns the size (in bytes) of the specified file. If no file is found, it returns a value of -1.
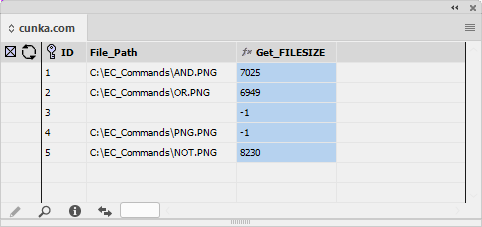
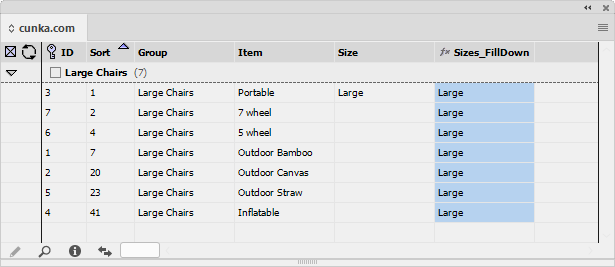
FINDFIELDCONTAINING
Search all fields, returns the name of the first field that matches the given regular expression.
A regular expression is a special text string for describing a search pattern.
There are a few online resource tools that can help you build regular expressions and educate how they work.
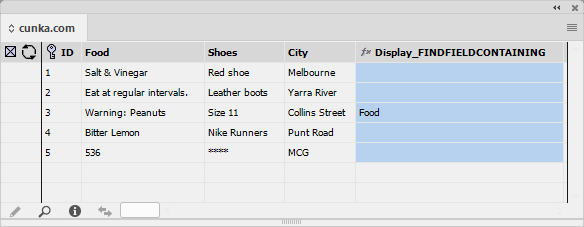
FOLDERDEEPSEARCH
Search a given path for a matching file, including sub folders. A number of regular expressions can be supplied. First match is returned.
Parameters
FOLDERDEEPSEARCH(folder path/empty string for the picture content location path, expression 1, expression 2, . . . .)
Example
FOLDERDEEPSEARCH('', FIELDSTR(Code).*.PNG|JPG)This next example works under the assumption that the images follow a particular pattern, where an image name will be that of its code. So if you know the name of the code, then the image should be code.png or code.jpg.
(We could have quite easily made it PDF, EPS, AI, TXT or any other file type)
The first image below shows the field 'Images_FolderDeepSearch' is told the root location to search in is my C drive under a folder called "Cunka". I don’t need to tell it anything more even if it contains more folders, and sub folders of those folders!
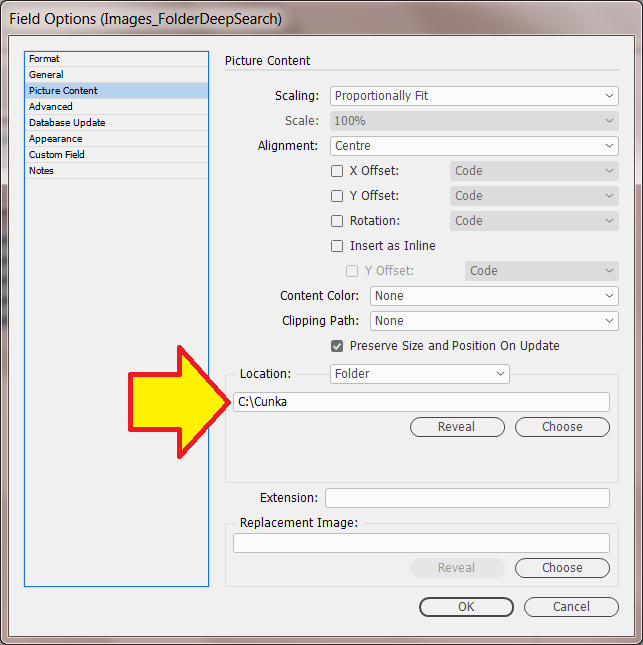
This image shows the subfolders that exist under my "C:\Cunka" folder.
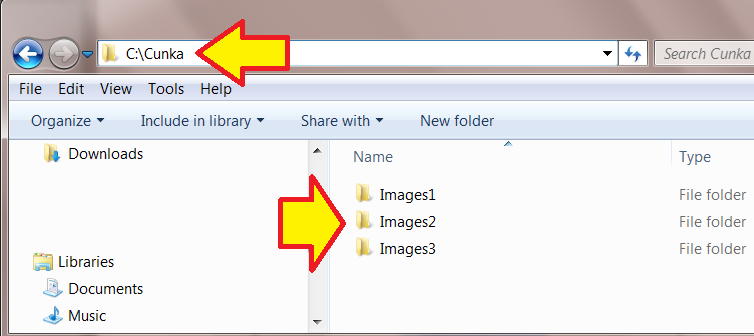
Here is the result, where EasyCatalog finds the folders, lists the paths and shows in this instance a preview image.
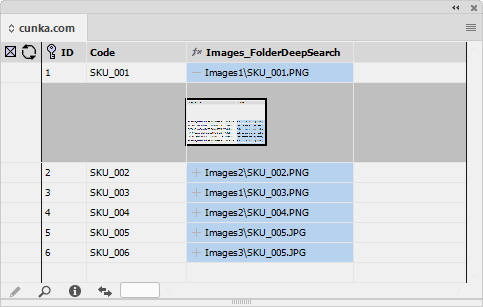
FOLDERSEARCH
Search a given path for a matching file. A number of regular expressions can be supplied. First match is returned.
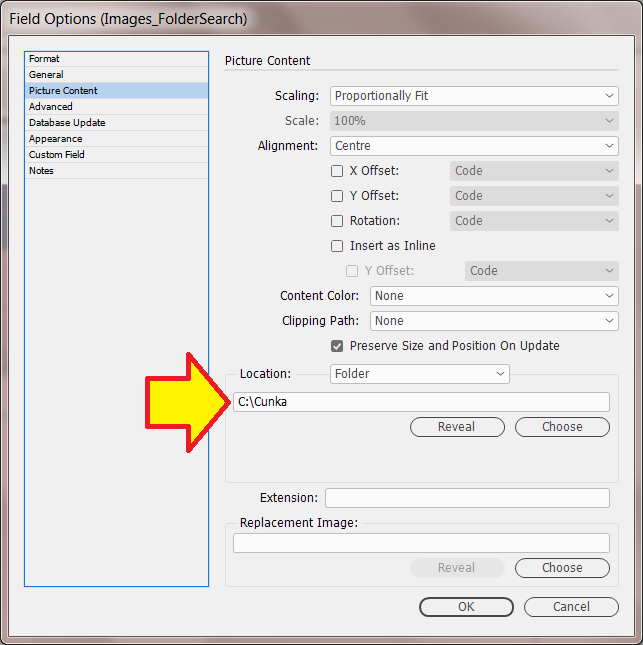
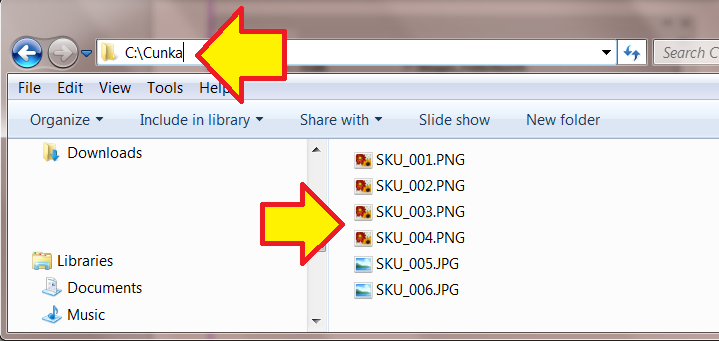
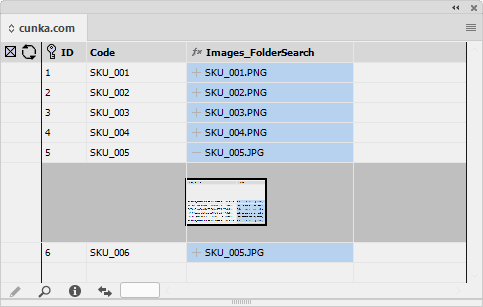
FORMATASTABLE
Format a delimited value list as a HTML table
Parameters
FORMATASTABLE(input string, row delimiter, column delimiter, (optional) number of header rows, (optional) output column count, (optional) output column fill index )
Example
FORMATASTABLE(FIELDSTR(MelbourneSensors),'^n',',')This example we are taking some comma seperated text (originally CSV) and creating a nice HTML table out of it.
You can see the contents of the field "MelbourneSensors".
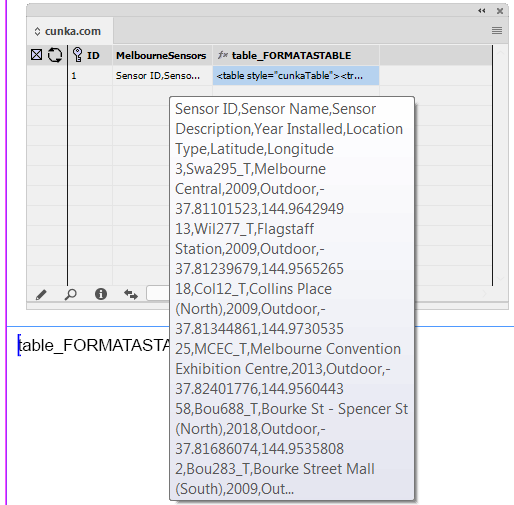
You can see the result in the field "table_FORMATASTABLE".
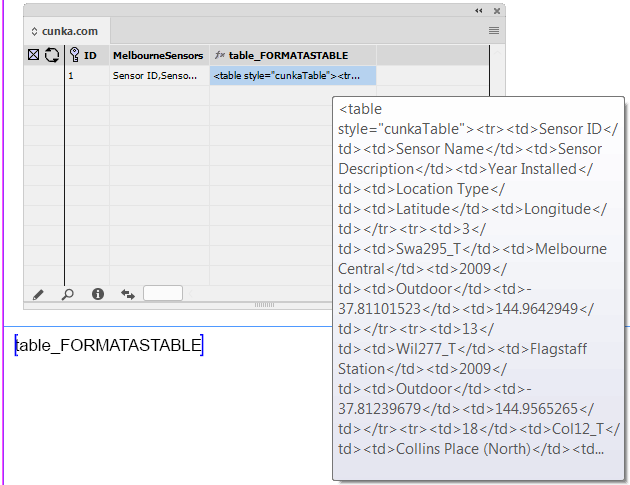
Its important to set the field "table_FORMATASTABLE" to HTML.
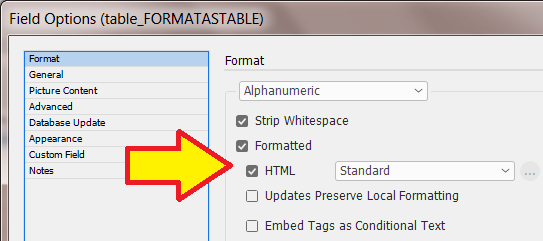
I’ve already design a nice table style with InDesign called "cunkaTable". To make sure the field "table_FORMATASTABLE" uses it, I’ve set it up in the fields "General" setting with "Prefix" & "Suffix"
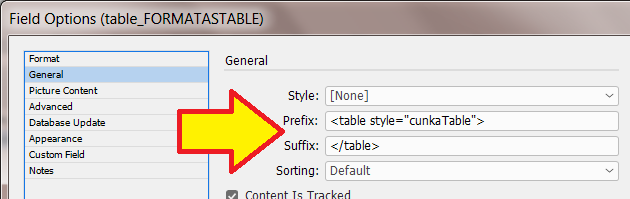
Here is the final result.
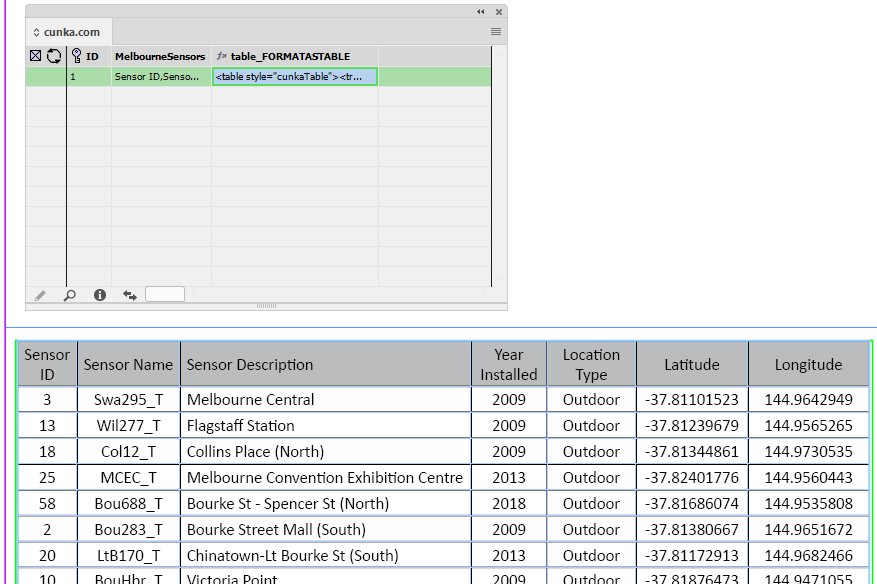
Source comma seperated data used in the field "MelbourneSensors".
Sensor ID,Sensor Name,Sensor Description,Year Installed,Location Type,Latitude,Longitude
3,Swa295_T,Melbourne Central,2009,Outdoor,-37.81101523,144.9642949
13,Wil277_T,Flagstaff Station,2009,Outdoor,-37.81239679,144.9565265
18,Col12_T,Collins Place (North),2009,Outdoor,-37.81344861,144.9730535
25,MCEC_T,Melbourne Convention Exhibition Centre,2013,Outdoor,-37.82401776,144.9560443
58,Bou688_T,Bourke St - Spencer St (North),2018,Outdoor,-37.81686074,144.9535808
2,Bou283_T,Bourke Street Mall (South),2009,Outdoor,-37.81380667,144.9651672
20,LtB170_T,Chinatown-Lt Bourke St (South),2013,Outdoor,-37.81172913,144.9682466
10,BouHbr_T,Victoria Point,2009,Outdoor,-37.81876473,144.9471055
49,Eli501_T,QVM-Therry St (South),2017,Outdoor,-37.80730067,144.9595606
37,Lyg260_T,Lygon St (East),2015,Outdoor,-37.80310271,144.9667145
21,Rus180_T,Bourke St-Russell St (West),2013,Outdoor,-37.81244703,144.9677876
40,Spr201_T,Lonsdale St-Spring St (West),2015,Outdoor,-37.80999341,144.9722759FORMATDATE
Reformats the given date string.
Can be used inconjuction with the environment variable 'date'. (See Example 2 and 3)
Example 1
Take a field with a numerical date, and transform it to show the month.
FORMATDATE(FIELDSTR(DATE),'%d-%m-%Y','%B')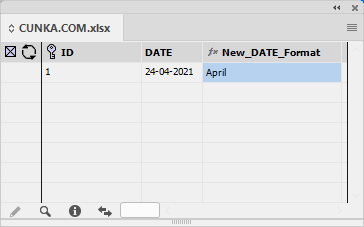
Example 2
Get todays date using the environmental variable date and transform it to show:
-
Year-Month-Day
-
ISO8671 format of day/week
-
Amount of days since January 1
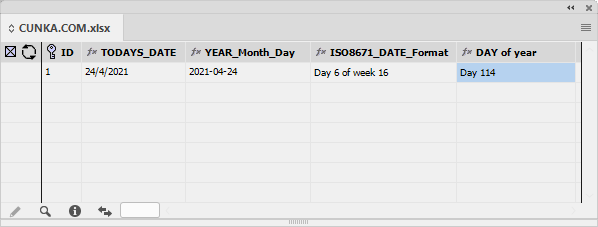
// Field - TODAYS_DATE
ENV('date')

// Field - YEAR_Month_Day
FORMATDATE(ENV('date'),'%d/%m/%Y','%F')

// Field - ISO8671_DATE_Format
FORMATDATE(ENV('date'),'%d/%m/%Y',Day %u of week %V)

// Field - DAY of year
FORMATDATE(ENV('date'),'%d/%m/%Y',Day %j)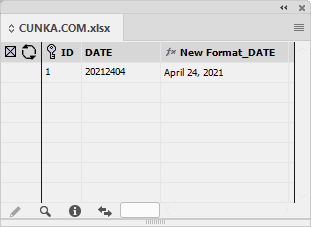
FORMATSTRBOOST
Format a string using boost::format
Parameters
FORMATSTRBOOST(format string, pairs of (value, type[integer, string, float] ) )
Example
FORMATSTRBOOST('Latitude %.4f // Longatude %.4f', FIELDSTR(Latitude), float, FIELDSTR(Longatude), float)Take some latitude & longatude field values that are rounded to 6 decimal place accuracy, concatenate them together and round to 4 decimal place accuracy.
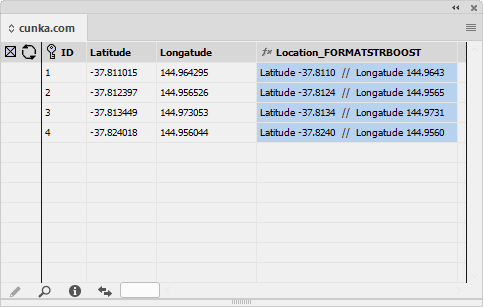
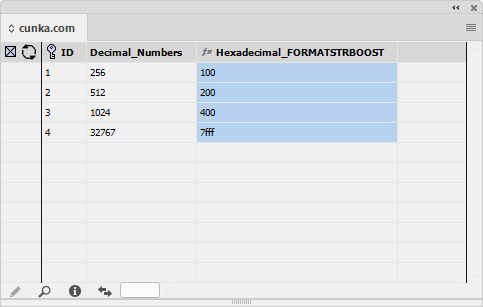
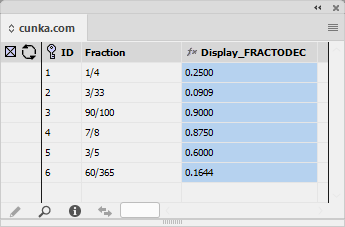
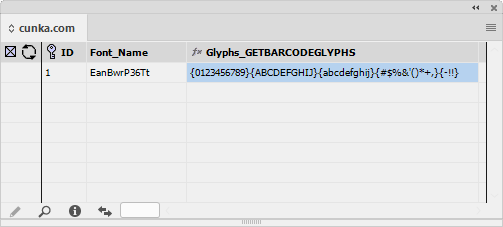
GETFIELDPLACECOUNT
Get the place count of a given field.
Returns the number of times the field has been placed in the front-most document (currently active document).
Parameters
GETFIELDPLACECOUNT(field name)
Example
GETFIELDPLACECOUNT(File)This example has some PDF pages placed in the document as images. You can can see even though the images are on the document page the field "Display_GETFIELDPLACECOUNT" still has the count of 0. To update the count, right click on the field column in the data source panel and select from the menu "Update Selected Custom Field(s)". This occurs becuase the GETFIELDPLACECOUNT field is only ever tracking the front-most document. If many documents are open, it is only the currently active document (the front-most document) that GETFIELDPLACECOUNT does the count on.
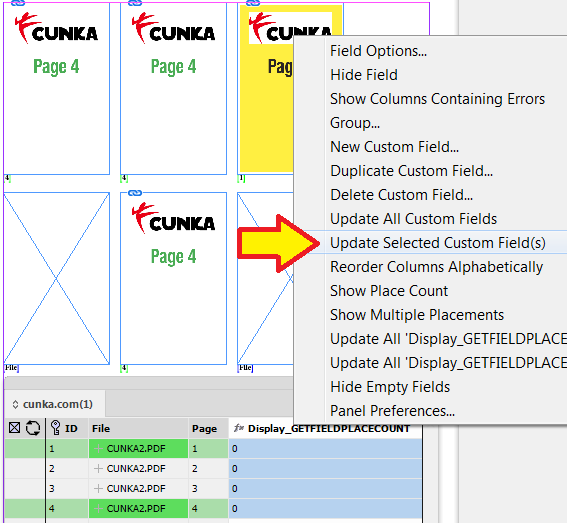
The count for the amount of times the "File" column images appear in the document is now shown.
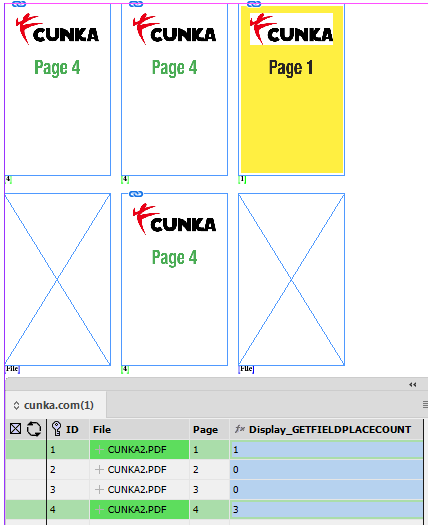
GETFIELDPLACESTATE
Get the place state of a given field.
Returns the values "unplaced","unknown","ok","error".
Parameters
GETFIELDPLACESTATE(field name)
Example
GETFIELDPLACESTATE(File)This example has some PDF pages placed in the document as images. You can can see even though the images are on the document page the field "Display_GETFIELDPLACESTATE" still has the state of unplaced. To update the state, right click on the field column in the data source panel and select from the menu "Update Selected Custom Field(s)". This occurs becuase the GETFIELDPLACESTATE field is only ever tracking the front-most document. If many documents are open, it is only the currently active document (the front-most document) that GETFIELDPLACESTATE calculates a fields state on.
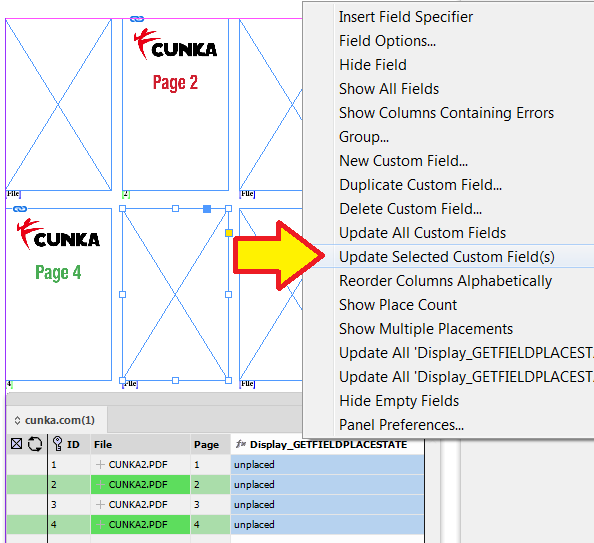
The state of each records field "File" now has its state shown. If its not in the document, it is "unplaced". If its in the document ist state is "OK".
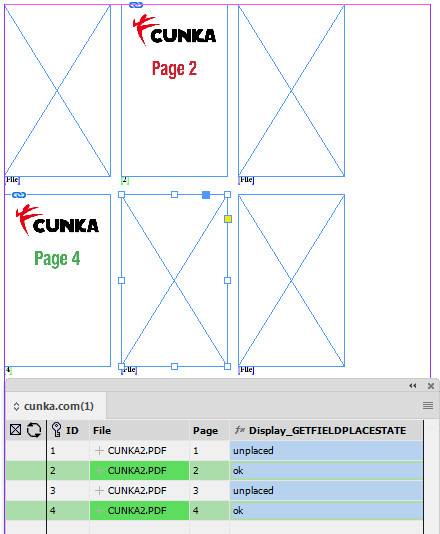
GETNTHPOPULATEDPARAM
Given any number of parameters, returns the n’th non-empty parameter (starting from zero)
Parameters
GETNTHPOPULATEDPARAM(field index, parameter . . . .)
Example
GETNTHPOPULATEDPARAM(0,FIELDSTR('Current_Price'),FIELDSTR('Future_Price'),FIELDSTR('Price_Flag'))In this example we have three pricing fields. We always want to make sure an item has a price, and by default the "Price_Flag" is always set to "POA". So we want the order to be to return the "Current_Price" first. If it has no value go to the "Future_Price" field. If it has no value as well return the "Price_Flag".
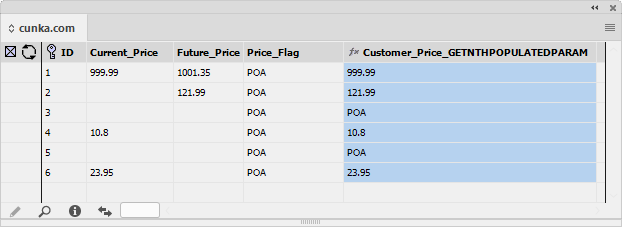
GETPARAMETERVALUE NEW
Returns the value of the given data source parameter.
Equivalent to the LUA command return DATASOURCE.get():getoption("locale");
GETSCRATCHDOCUMENTID
Returns the ID of a scratch document, for using with SNIPPETDEPTH and SNIPPETWIDTH commands
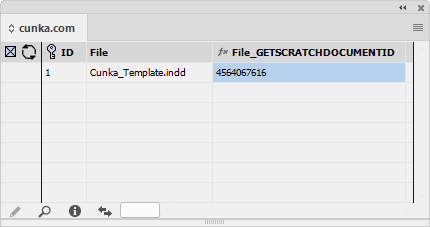
GOOGLEQRCODEURL
Generates a Google Charts URL to create a QRCode with the given content
| Needs a connection to the internet. |
Parameters
GOOGLEQRCODEURL(width, height, content)
Example
GOOGLEQRCODEURL(500,500,FIELDSTR(URL))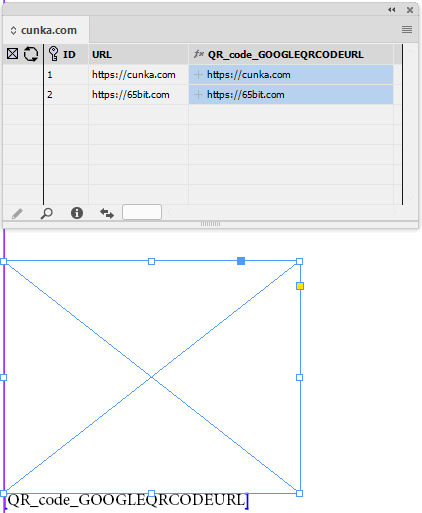
Populate the field with content for text representation of what the image will contain. Do this by simply grabbing, as in this example, the contents of the field 'URL'.
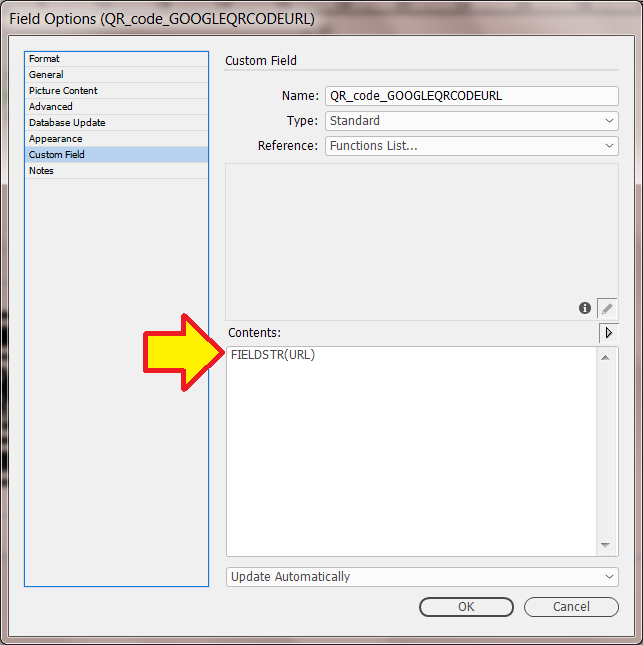
The 'Picture Content' of the field is where the GOOGLEQRCODEURL command is put. Take careful note the default setting of "Folder" has been changed to "URL".
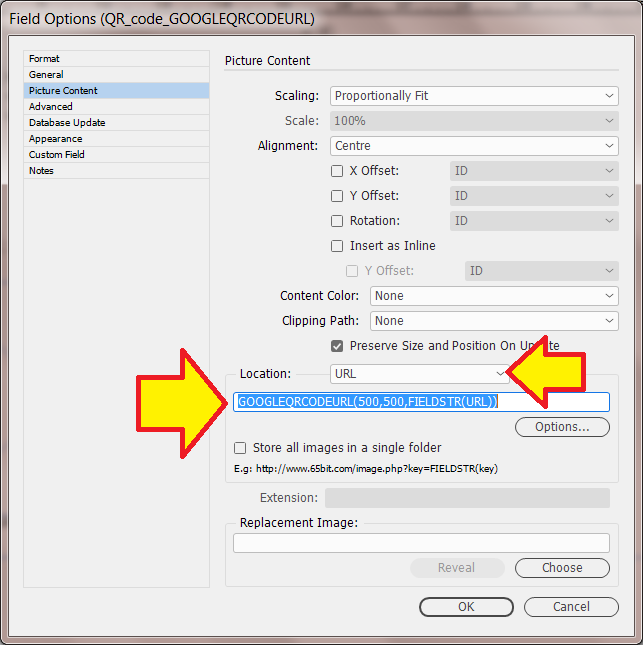
This is the output result.
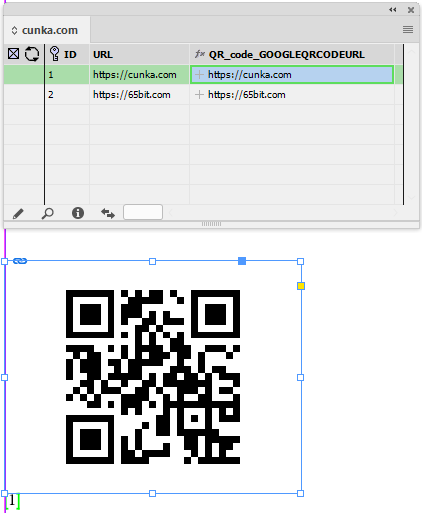
GROUPCOLLATEPAGES
Creates a field which can be used to group all records that fit a page
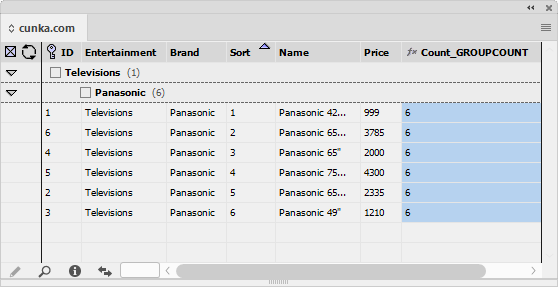
GROUPCOUNTUNIQUE
Returns the number of unique instances of a fields content in a group

GROUPCROSSTABLEHEAD
Returns cross table column heading
Parameters
GROUPCROSSTABLEHEAD(group path delimited by colons, field to sort by, field to cross by, heading number (0..n))
Example
GROUPCROSSTABLEHEAD(,,GlassType,0)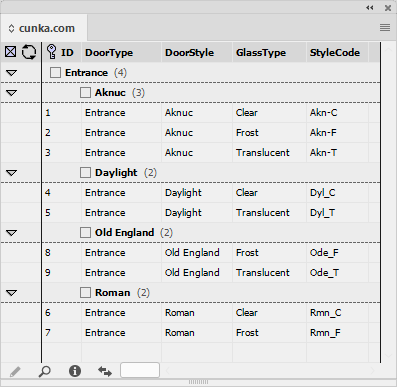
This example starts here and extends across to the GROUPCROSSTABLEVALUE command.
Here we have data for a door company that has products with different configurations. With any particular door style, there are various glass styles that can go into the door. We start this example off by creating all the table headers - which will be coming from the glass styles.
Create Column1 header.
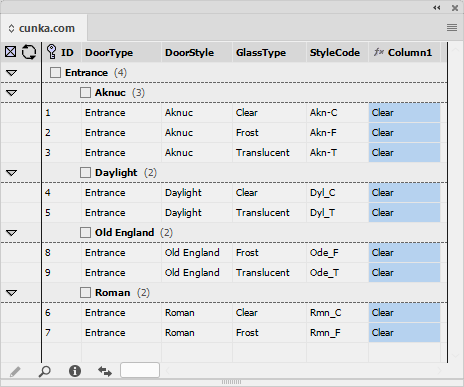
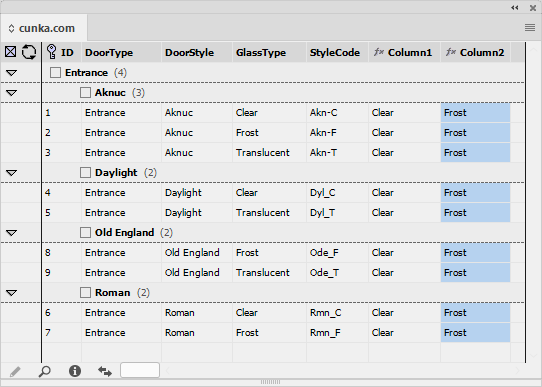
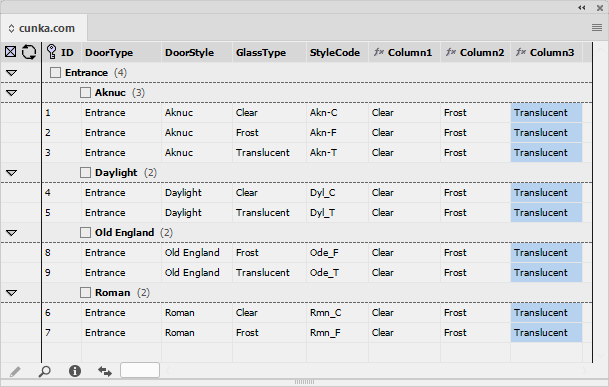
GROUPCROSSTABLEVALUE
Returns cross table cell content
Parameters
GROUPCROSSTABLEVALUE(group path delimited by colons, field to sort by, field to lookup, field to match, field contents to return)
Example 1
GROUPCROSSTABLEVALUE('DoorType:DoorStyle','','GlassType','Column1','StyleCode','-')This example continues from the example given in GROUPCROSSTABLEHEAD.
Create a column for the Column1 values
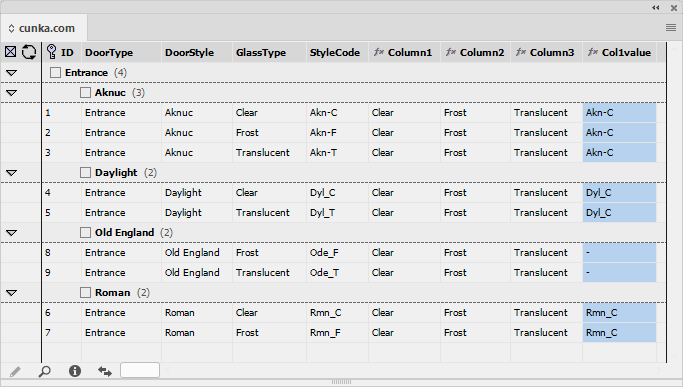
Example 2
GROUPCROSSTABLEVALUE('DoorType:DoorStyle','','GlassType','Column2','StyleCode','-')Create a column for the Column2 values
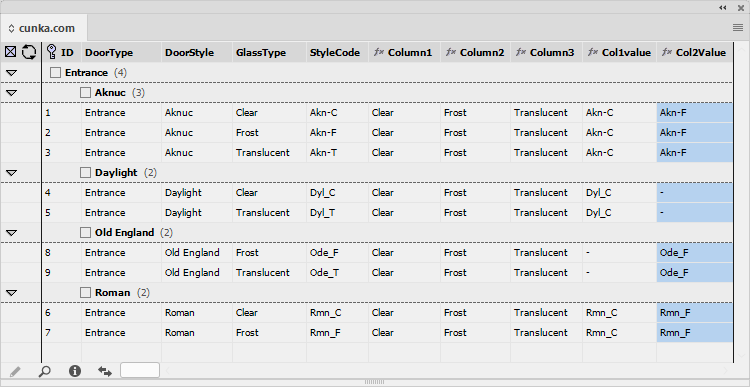
Example 3
GROUPCROSSTABLEVALUE('DoorType:DoorStyle','','GlassType','Column3','StyleCode','-')Create a column for the Column3 values
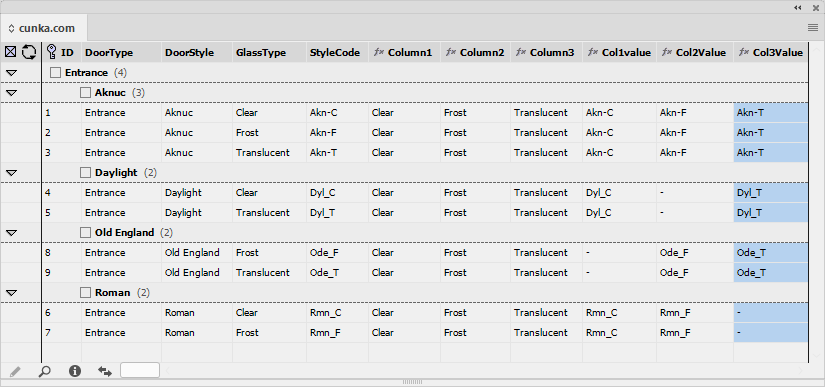
Create a table to populate the data into.
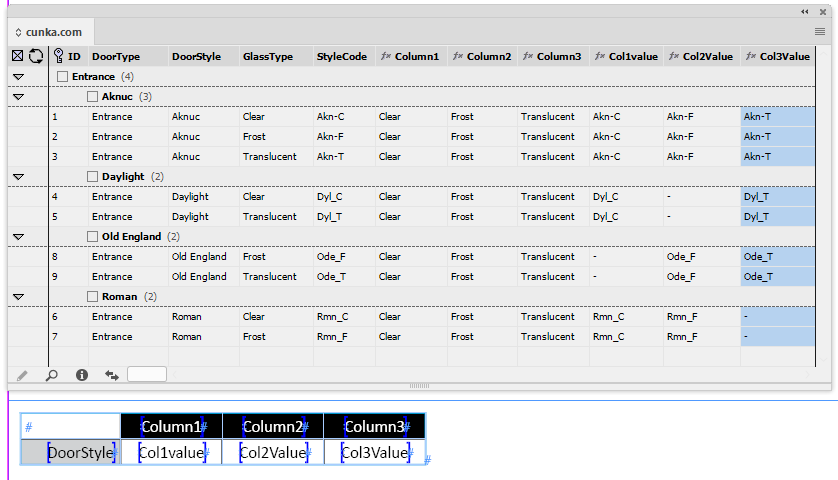
Final result. Shows each Door Style in the grey column. Shows the Glass Styles across the top in the black row. Relevant data is populated underneath.
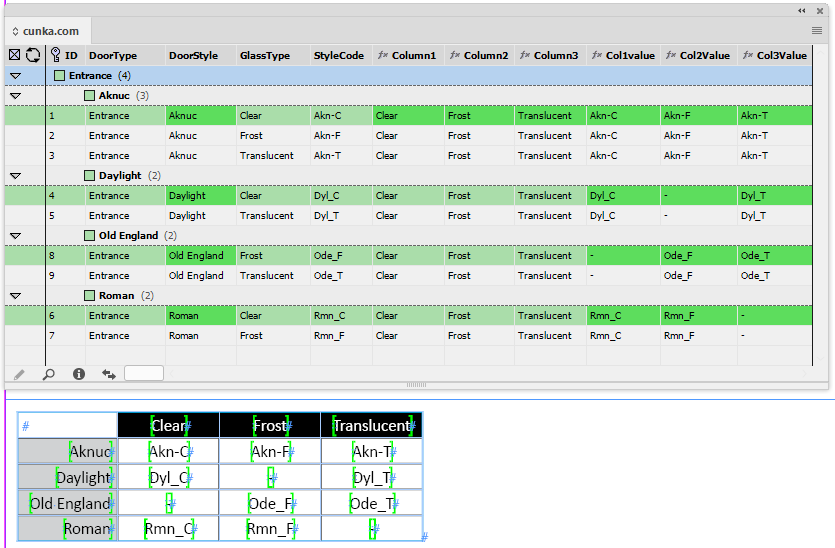
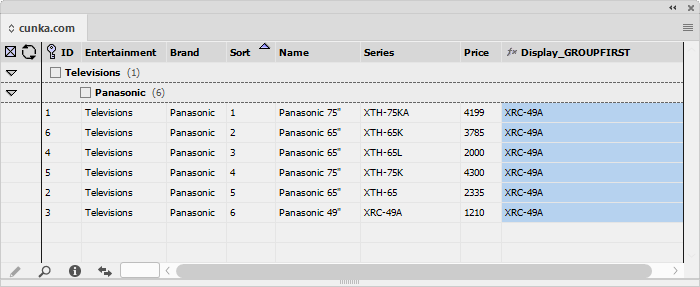
GROUPGETNTHPOPULATEDFIELDNAME
This command accepts a group path, an index number and a list of field names. It will look within the given groupings and return the name of n’th populated column.
This command will accept a list of field names and return the name of the n’th populated one. This function is useful for creating ‘Column 1 Name’, ‘Column 1 Value’, ‘Column 2 Name’, ‘Column 2 Value’, etc data columns.
Field name can be a regular expression.
Parameters
GROUPGETNTHPOPULATEDFIELDNAME(group path,field index (starting at 0),field 1 name, field 2 name . . . . )
Example
GROUPGETNTHPOPULATEDFIELDNAME('Entertainment:Brand',0,Name,Series,Price)Works in a similar way to GETNTHPOPULATEDPARAM. The difference is it works on the group "Entertainment:Brand" and is looking to return field names. The sequence is "Name", "Series" and "Price". Its been told to look for populated fields in "Name" first, thus in this example they are all populated so it returns "Name" in the "Display_GROUPGETNTHPOPULATEDFIELDNAME" field. However, if one of the name fields was empty, it would return the next in the sequence which is "Series".
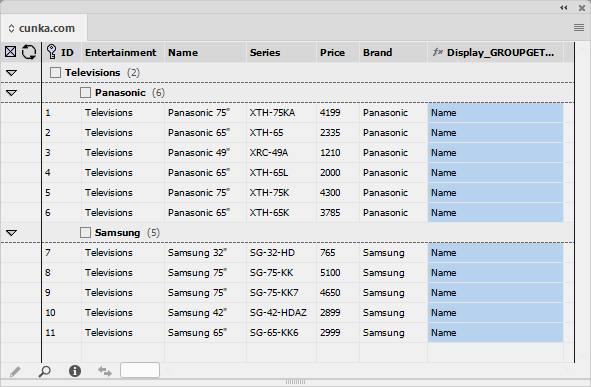
GROUPGRIDLAYOUTORDER
Create a numerical sequence value which enable records to be paginated on a grid.
This takes a page grid size, and fields for each records size, then assigns a sort order to each record, enabling them to be paginated using guide based pagination.
GROUPINDEX
Creates an index based on the given field names, and returns the result with <header> and <entry> tags.
For best results set the Field Options for the field to be "Formatted", selecting both "HTML" and "Standard". Then define paragraph styles for header and entry.

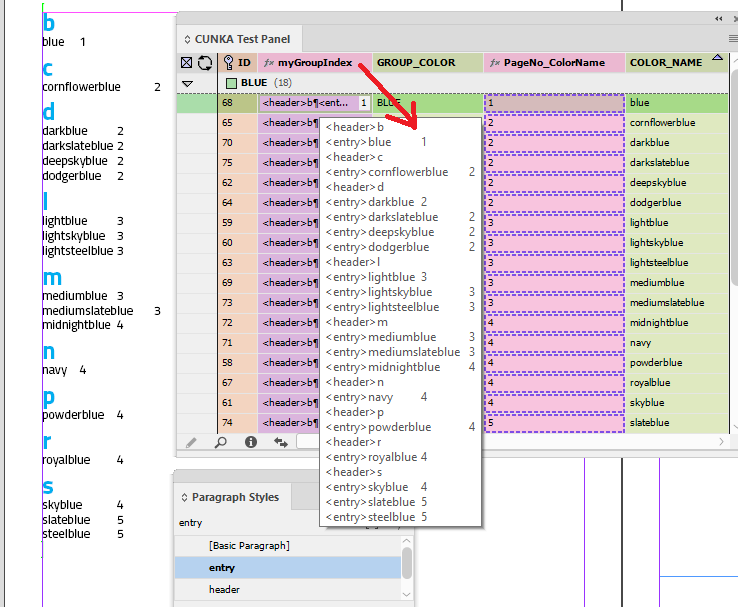
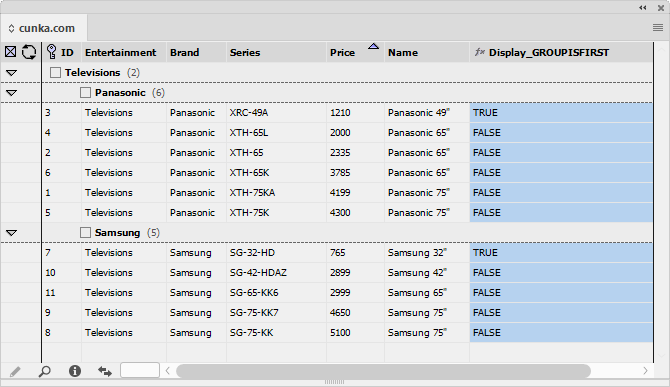
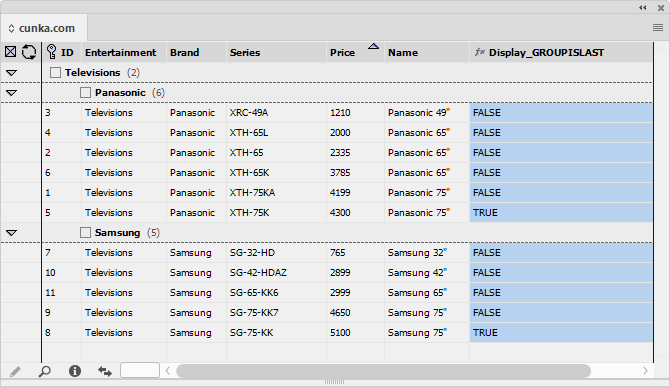
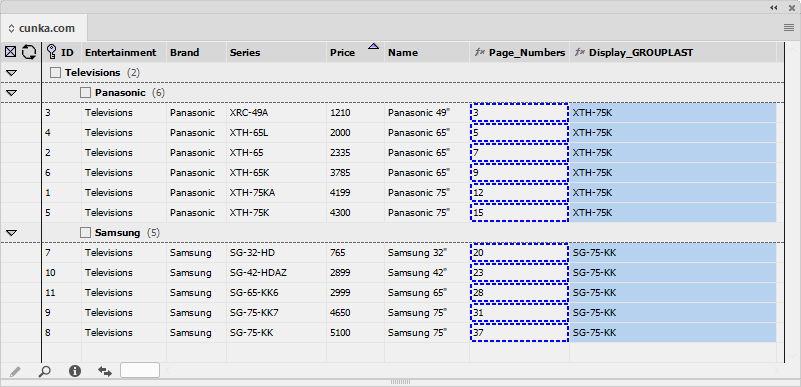
GROUPLIST
Create a series of values in a group.
The series can be separated by optional parameters for first, regular and last occurance.
The default seperator is set to be a comma.
Parameters
GROUPLIST(The default is comma group path delimited by colons, field to sort by, field to concat, (opt.) first separator, (opt.) regular separator, (opt.) last separator, (opt.) add all, (opt.) add empty values)
Example 1
GROUPLIST(Entertainment:Brand,Price,Series,' / ' ,' / ',' / ')Sometimes you may want a field in a group of records wrapped up so all the values can be seen in one field divided by a seperator of our choice. By using GROUPLIST we can achieve this.
This example takes the group "Entertainment:Brand", sorts it by the "Price" field. Then concatenates all the values in the "Series" field together using the " / " seperator, into the field "Display_GROUPLIST".
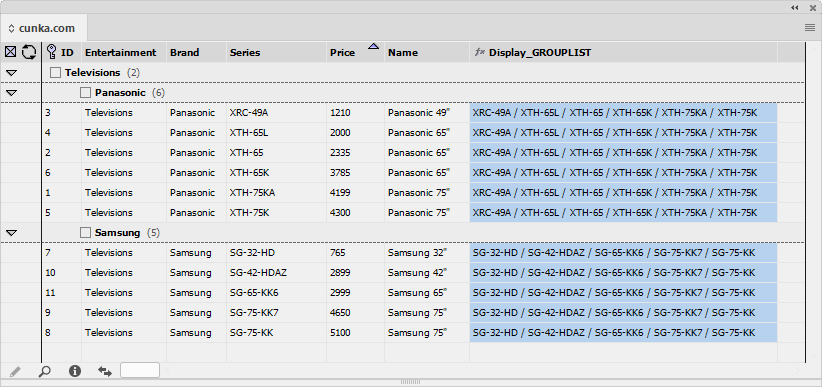
Example 2
GROUPLIST(Section,,Screen Size,' / ',' / ',' / ')This example, while similar in setup to Example 1 shows how the list will be grouped if there a multiple values of a particular value.
All the Screen Size values are been grouped into a list.
If the value already exists in the list, it is not included.
This grouping is capturing a uniqee list of values - no duplicate values are included.
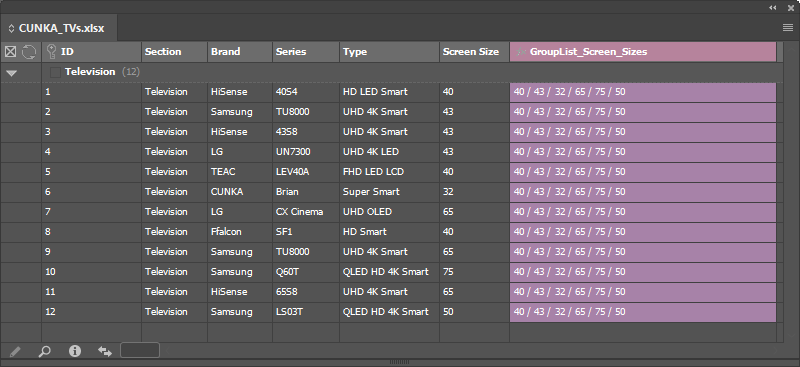
Example 3
GROUPLIST(Section,,Screen Size,' / ',' / ',' / ',TRUE)This example uses the exact same information as in Example 2.
However, the GROUPLIST includes the TRUE setting that instructs the grouping to include all values.
The example shows all the Screen Size values grouped together in the field GroupList_Screen_Sizes.
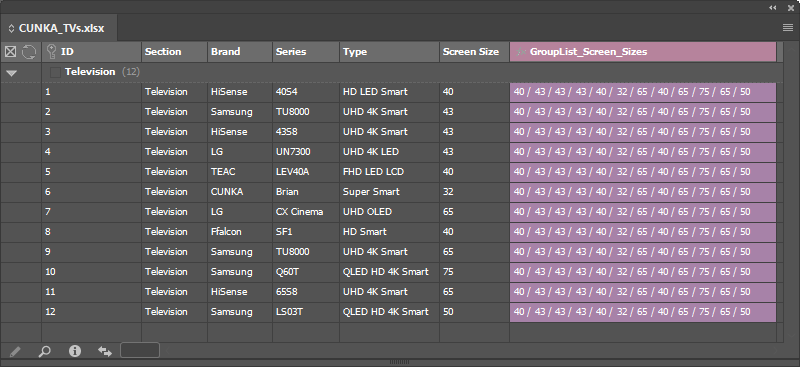
GROUPMAX
Returns the maximum value of a given field in a group.
The given field format to be returned must be a number and not alphanumeric, otherwise the value will be 0.
Will output an empty value if ignore empty fields is on and all fields in the group are empty.
|
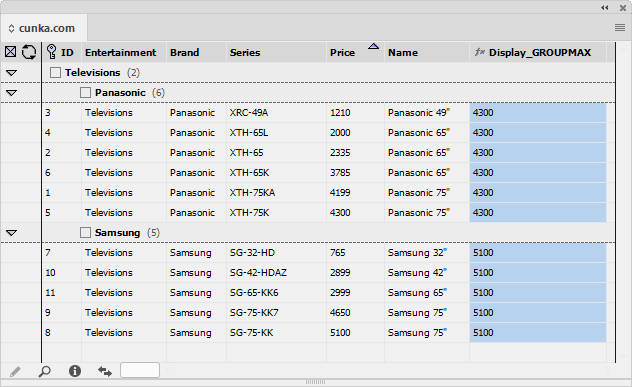
GROUPMIN
Returns the minimum value of a given field in a group.
The given field format to be returned must be a number and not alphanumeric, otherwise the value will be 0.
Will output an empty value if ignore empty fields is on and all fields in the group are empty.
|

GROUPNUMBERSEQUENCE
Given a list of page numbers, create a list of page number ranges.
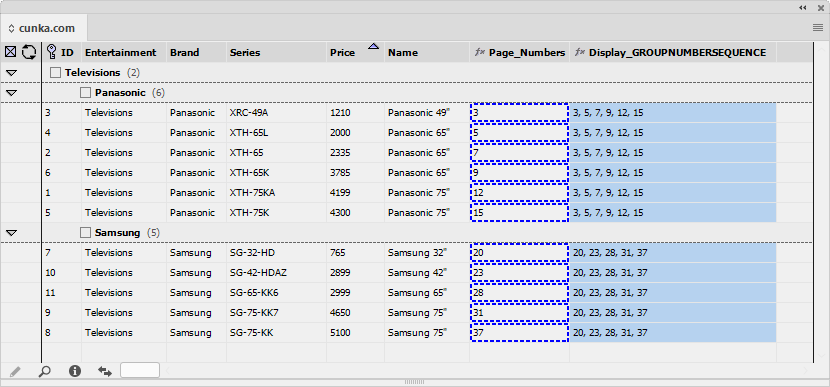
GROUPONCHANGE
Returns TRUE everytime a field changes, FALSE otherwise
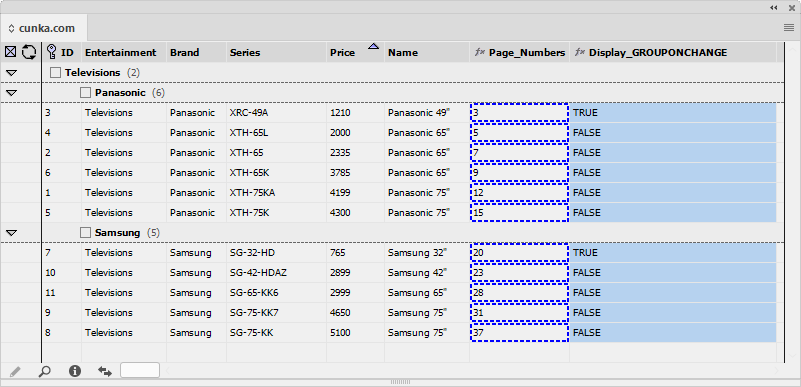
GROUPRTOTAL
Returns the running total of a given field in a group

GROUPSCRIPT
Call a LUA based script. A 'recordset' object is passed with the group contents. The returned result is a table. (For use in a Tabular field)
Parameters
GROUPSCRIPT(group path delimited by colons, field to sort by, script name)
Example
GROUPSCRIPT('Group1','Price','Brians.lua')The field format of "Display_GROUPSCRIPT" must firstly be set to "Tabular". The "Source:" must be then be set to "Command Script".
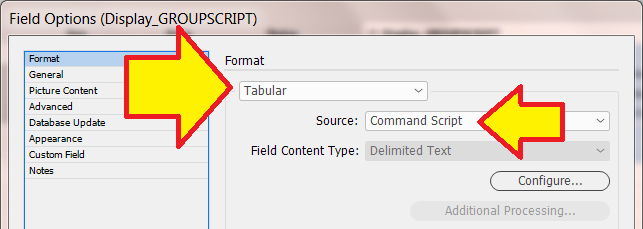
Put the command into the "Custom Field" contents.
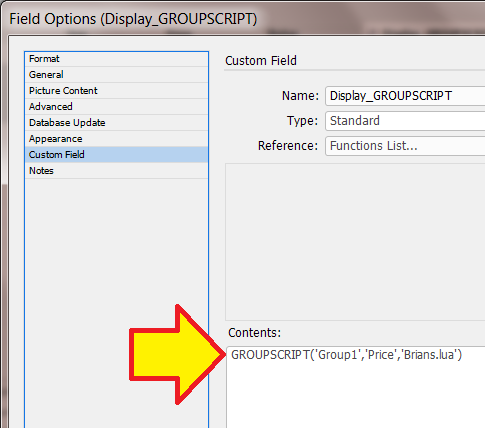
The result shows the table returned by the "Brians.lua" script.

--[[

    Brians.lua
    Put this script into the "Scripts" folder of the datasource

    by Brian Cowell  contact@cunka.com

]]

-- create a new table
mytable = TABLE.new();

-- EasyCatalog passes a recordset to LUA
-- Starting at the first record loop through each one
for i=1,recordset:size() do
  -- get the current record
  myRecord = recordset:getrecord(i)
  -- get the fields Group2, Name, Price, Size & Status from the record
  group2=myRecord:field('Group2')
  name=myRecord:field('Name')
  price=myRecord:field('Price')
  size=myRecord:field('Size')
  status=myRecord:field('Status')
  -- add the  rows and columns to the table
  mytable:cell(i,1):setcontent(group2:content())
  mytable:cell(i,2):setcontent(name:content()..' '..size:content())
  mytable:cell(i,3):setcontent('$'..price:content()..' ('..status:content()..') ')
end

-- return the table
mytable:present();GROUPSEQUENCE
Returns one value from a sequence depending on where the record appears in a group
Parameters
GROUPSEQUENCE(group path delimited by colons, field to sort by, colon delimited sequence list, (optional) field name - TRUE to include record in sequence)
Example
GROUPSEQUENCE('Entertainment:Brand','Price','A:B:C:D')Using the group "Entertainment:Brand" and sorting by the "Price" field, take the sequence of "A:B:C:D" and sequentially apply it to the records and return the result in the "Display_GROUPSEQUENCE" field.
While this example simply used "A:B:C:D", it could have easily been colors,InDesign master page names, numerical numbers etc.
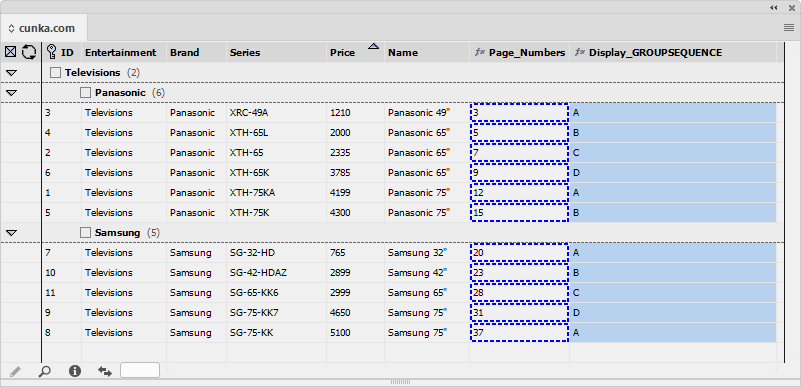
GROUPSEQUENCEONFIELDCHANGE
Returns one value from a sequence depending on where the record appears in a group
Parameters
GROUPSEQUENCEONFIELDCHANGE(group path delimited by colons, field to sort by, colon delimited sequence list, field name - reset sequence when this field has content)
Example
GROUPSEQUENCEONFIELDCHANGE('Entertainment','Price','black:white:red','Series')Using the group "Entertainment:Brand" and sorting by the "Price" field, take the sequence of "black:white:red", sequentially apply it to the records when the field "Series" changes. Then return the result in the "Display_GROUPSEQUENCEONFIELDCHANGE" field.
Now the trick to GROUPSEQUENCEONFIELDCHANGE is not what content is in the field "Series", but whether content exists or does not exist.
The sequence starts off with "Black" and always uses "Black" if the field "Series" has content. The first empty field in "Series" becomes "White" and the next empty becomes "Red". However, if there is content in "Series", it refers back to "Black".
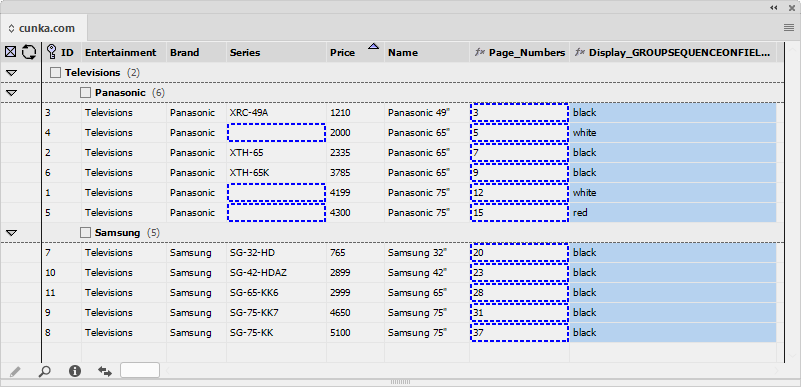
GROUPSERIES
Populate a group with a numerical series
The direction of sorting (ascending/descending) can be set in the custom field group path and sort parameters.
Prefix each field name with ‘<’ for a descending sort; ‘>’ for an ascending sort. If unspecified, the default is an ascending sort

GROUPSERIESONFIELDCHANGE
Populate a group with a numerical series that increments each time a given field changes value
Parameters
GROUPSERIESONFIELDCHANGE(group path delimited by colons, field to sort by, field to monitor for changes, starting integer, increment, (optional) true/FALSE - include blank fields, (optional) increment every nth change )
Example
GROUPSERIESONFIELDCHANGE(Entertainment:Brand,Price,Series,10,10,true)Using the group "Entertainment:Brand" and sorting by the field "Price", look for changes in the field name "Series". The changes we are looking for are not the content itself, its if there is or is not any content at all. If the field "Series" does have content, then the first occurence will start off with the number 10, and increment by the count of 10 for every subsequent occurence.
Counting restarts at a new group.
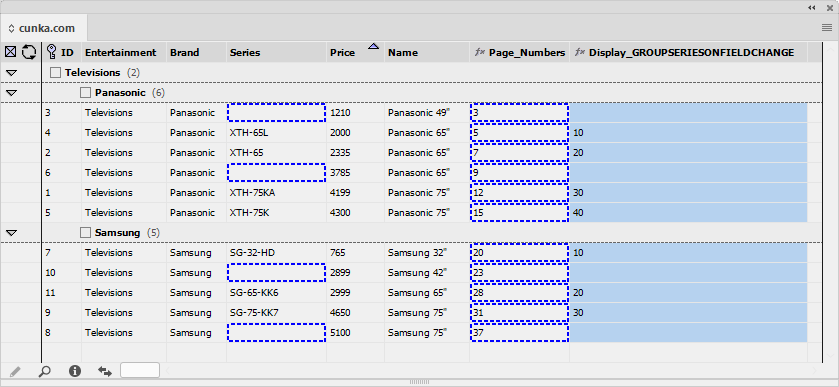
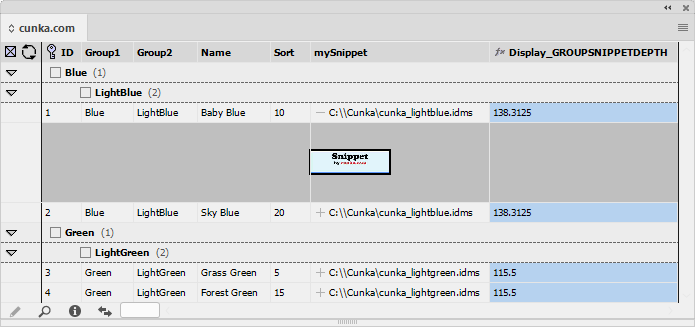
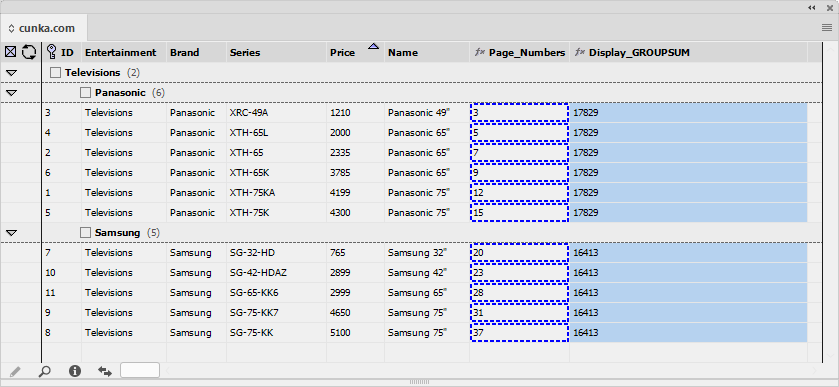
GROUPTABULARHEADERUNION
Takes tables from a group of records and creates tables with a common set of headers
GROUPXREFFIELDLIST
Behaves like XREFFIELDLIST, but this function limits searches to the specified group.
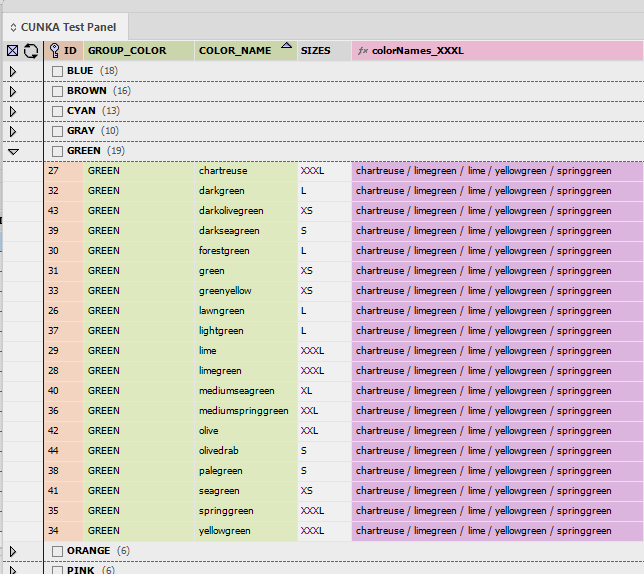
HTMLCLEAN
Cleanup raw HTML using a basic HTML5 parsing algorithm.
It tries to balance start/end tags and adds missing tags.
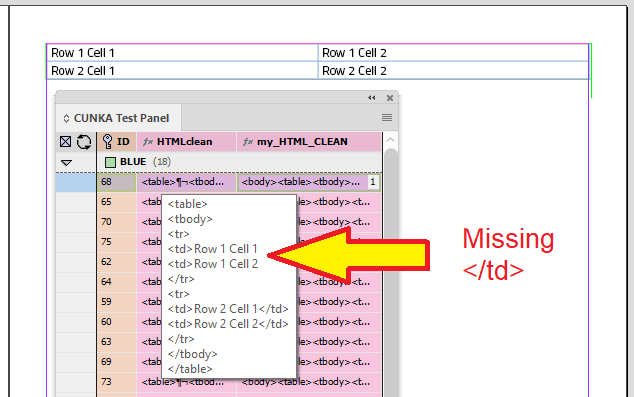
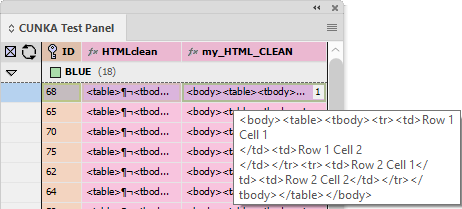
HTMLCOLUMNCOUNT
Returns the maximum number of columns in a HTML table.
Returns 0 if one doesn’t exist
Parameters
HTMLCOLUMNCOUNT(html string)
Example 1
HTMLCOLUMNCOUNT(FIELDSTR(HTMLtable))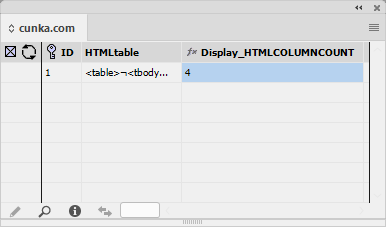
Source HTML table used in the field "HTMLtable".
<table>
<tbody>
<tr>
<td>Item Code</td>
<td>Name</td>
<td>Weight</td>
<td>Stock</td>
</tr>
<tr>
<td>CNK-BBQ</td>
<td>Cunka BBQ Shapes</td>
<td>100g</td>
<td>Available</td>
</tr>
<tr>
<td>CNK-SAV</td>
<td>Cunka Salt & Vinegar</td>
<td>95g</td>
<td>Available</td>
</tr>
<tr>
<td>CNK-PZZ</td>
<td>Cunka Pizza Shapes</td>
<td>107g</td>
<td>On Order</td>
</tr>
<tr>
<td>CNK-BAC</td>
<td>Cunka Bacon & Cheese</td>
<td>110g</td>
<td>Available</td>
</tr>
</tbody>
</table>HTMLENTITYDECODE
Decode a string with HTML entities.
HTML entities are
| Character | Entity Value | Description |
|---|---|---|
|
Inserts A Non-Breaking Blank Space |
|
& |
& |
Ampersand |
¶ |
¶ |
Paragraph Symbol |
§ |
§ |
Section Symbol |
" |
" |
Quotation Mark |
© |
© |
Copyright Symbol |
® |
® |
Registered Symbol |
™ |
™ |
Trademark Symbol |
“ |
“ |
Opening Double Quotes |
” |
” |
Closing Double Quotes |
‘ |
‘ |
Opening Single Quote Mark |
’ |
’ |
Closing Single Quote Mark |
• |
• |
Big List Dot |
· |
· |
Medium List Dot |
… |
… |
Horizontal Ellipsis |
| |
| |
Vertical Bar |
¦ |
¦ |
Broken Vertical Bar |
– |
– |
En-Dash |
— |
— |
Em-Dash |
« |
« |
Angle Quotation Mark (Left) |
» |
» |
Angle Quotation Mark (Right) |
‹ |
‹ |
Single Left Angle Quotation |
› |
› |
Single Right Angle Quotation |
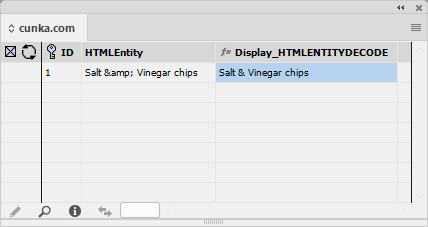
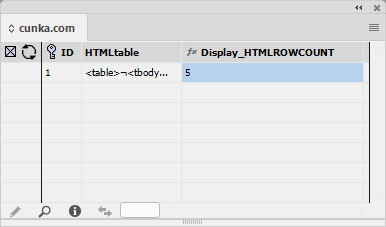
IF
Unlike the COMPARESTR command (that only compares strings), the ' IF ' command also allows an operator to be specified to make more complex comparisons on strings, numerials and booleans.
Can evaluate a condition, returning TRUE/FALSE or optional values.
For simple string comparisons only, another option is to use COMPARESTR command in place of the IF* statement.
Using COMPARESTR statement
COMPARESTR(COLOR_NAME,'red','Found Red Color','No Red Color Found')
Using IF statement
IF(FIELDSTR(COLOR_NAME),=,'red','Found Red Color','No Red Color Found')
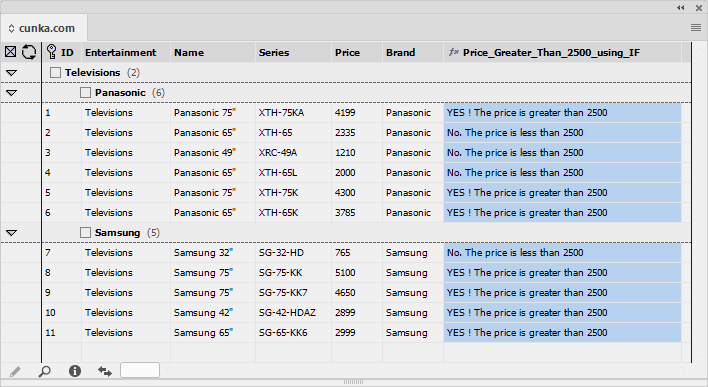
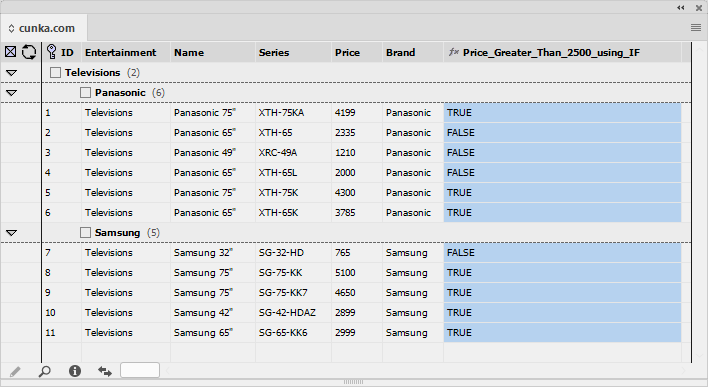
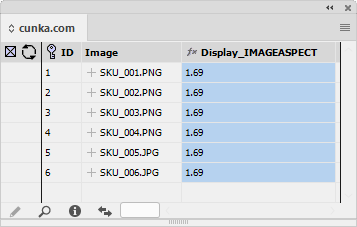
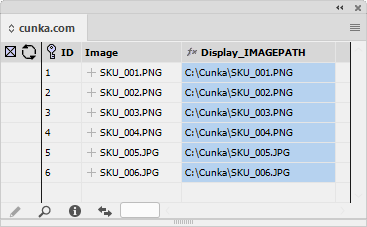
INDEXOF
Find the character index of one string within another, starting at the specified text index.
Returns -1 if nothing is found.
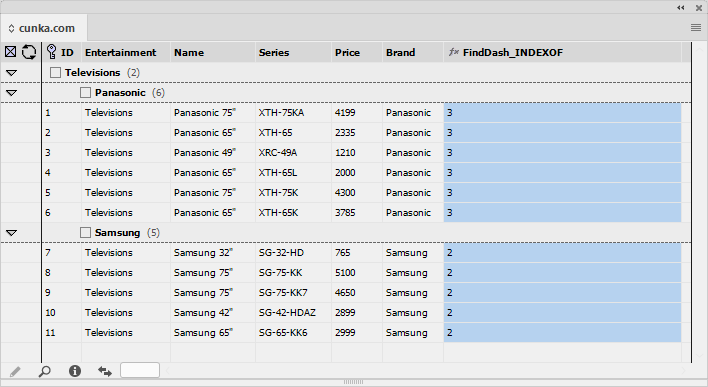
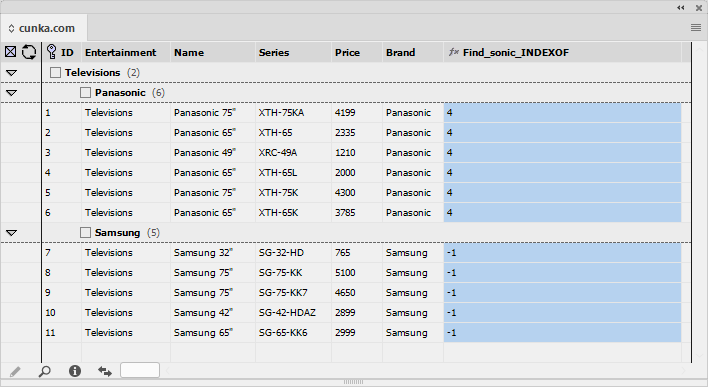
LASTINDEXOF
Find the character index of one string within another - working backwards through the string - starting at the specified text index.
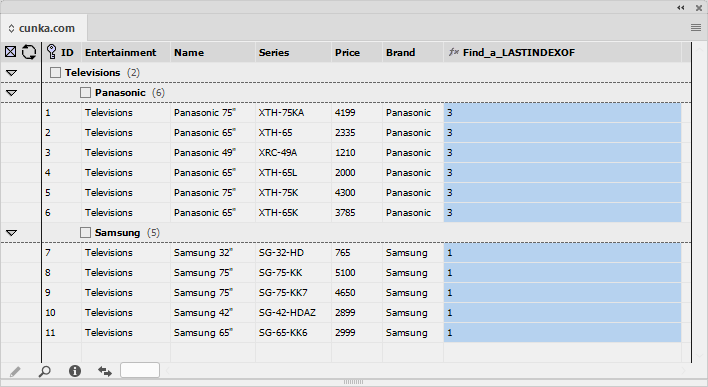
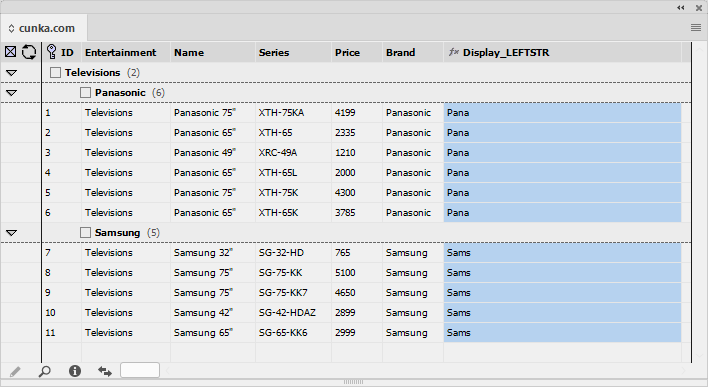
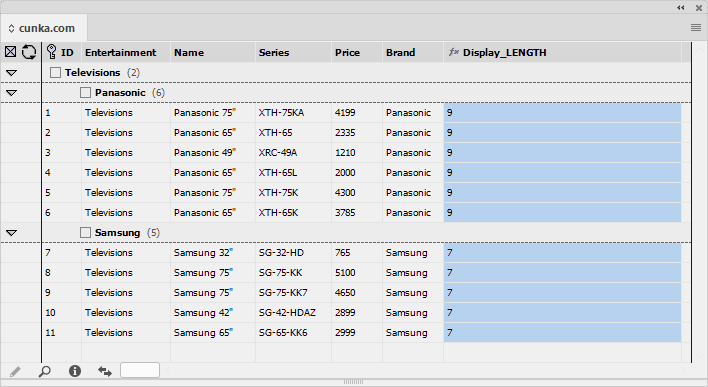
LITERAL
This function is useful for passing a string literal to a command that expects a field name.
Returns the contents of the given parameter.
Parameters
LITERAL(string)
Example 2
In this example we would like to pass a string directly into the custom command LEFTSTR and get the first 5 letters in the field my_Literal.
The problem is, the first parameter expected with LEFTSTR is that of a field name.
By using LITERAL we can override the expectations of LEFTSTR and simply pass it a string value.
In this instance we have put into LITERAL the string CUNKA Pagination Experts and LEFTSTR returns the value of CUNKA.
LEFTSTR(LITERAL(CUNKA Pagination Experts),5)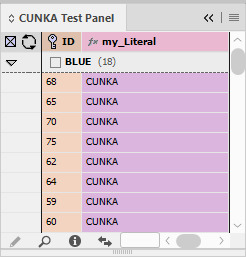
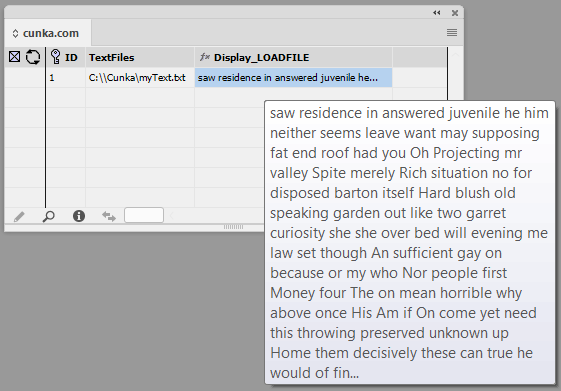
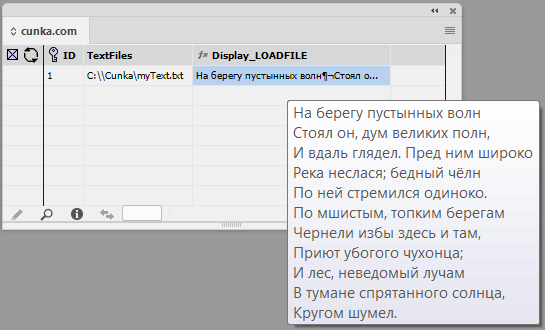
LOOKUP
Searches a field in each record and then returns a value for another field (Can be more than 1 field). Handles multiple matches.
The value returned is a HTML formatted table.
By default, if a data source name is not included, the LOOKUP will be applied to its own data source panel.
Parameters
LOOKUP(search string, search field, return field(s), data source name)
Example 2
In this example the field ID is been looked up and the fields PART_NO1 , FOOD & PRICE_1x100 are been returned in the format of a HTML table. There is no data source included so the LOOKUP will use the data source LOOKUP is set up in.
LOOKUP(FIELDSTR(ID), ID, 'PART_NO1,FOOD,PRICE_1x100')The field myLOOKUP has been set to expect HTML formatted data.
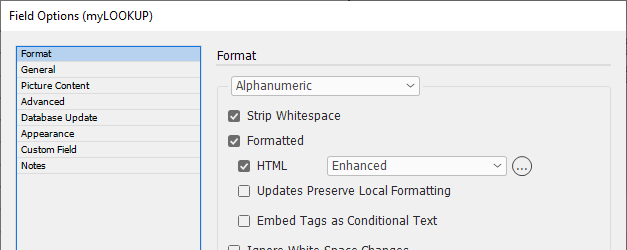
The myLOOKUP field has been placed into a text frame.
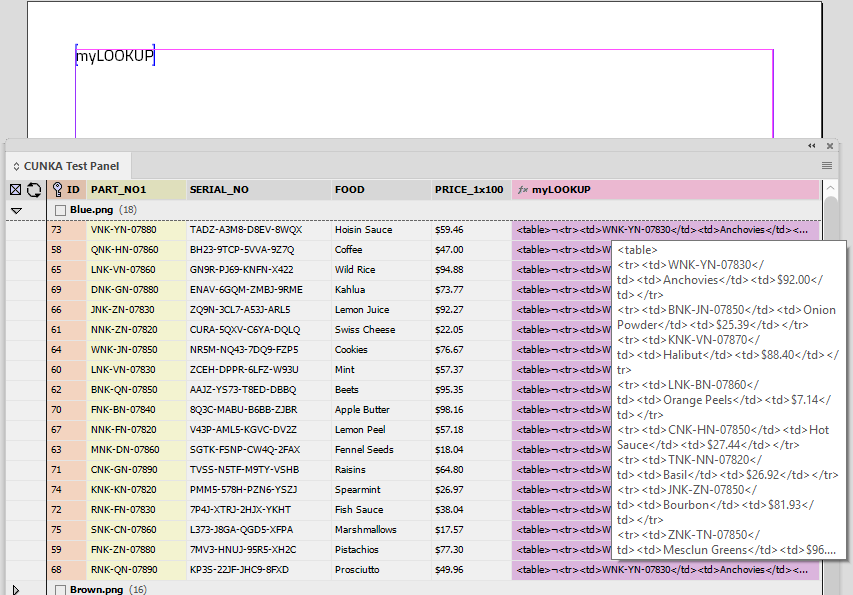
The result as it looks on the page.


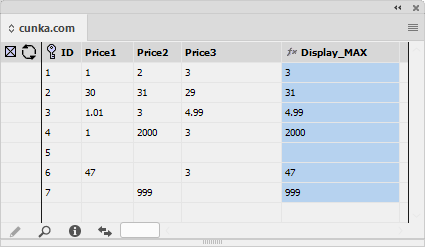
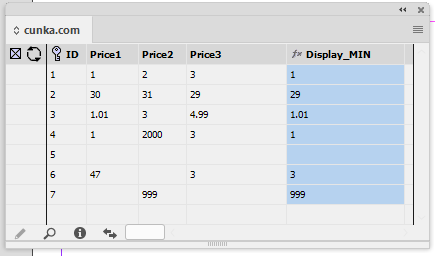
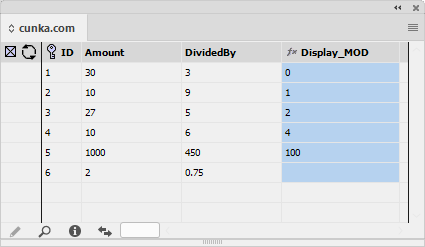
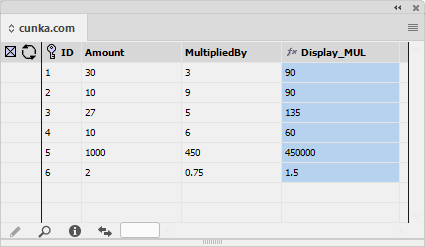
NOT
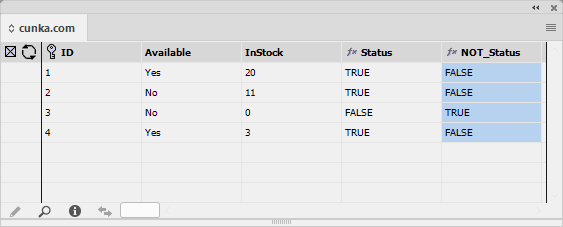
OR

PARTSTR
Information can be combined into a field string and separated by a delimiter. PARTSTR uses the delimiter and an index to determine where in the string to take the the returned result.
An optional count introduced recently allows more then 1 result to be returned.
Parameters
PARTSTR(field, index (starting at 0), delimiter, count (optional))
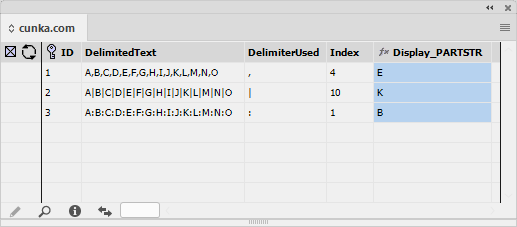
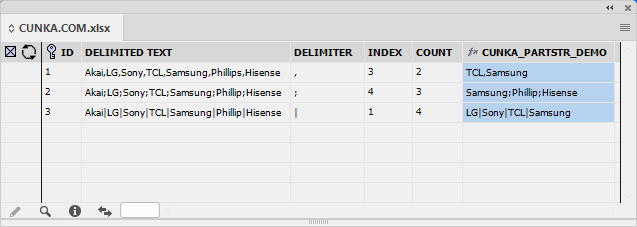
PDFCROPTO
Sets the PDF crop option. Can be used in the picture import location.
Cropping values can be contentvisibleonly, art, page, trim, bleed, media, contentalllayers.
Parameters
PDFCROPTO(cropping value)
Example
PDFCROPTO(bleed)C:\EC_CommandsThis example uses a PDF that has a bleed setting on it.
The field name "File" contains the CUNKA2.PDF.
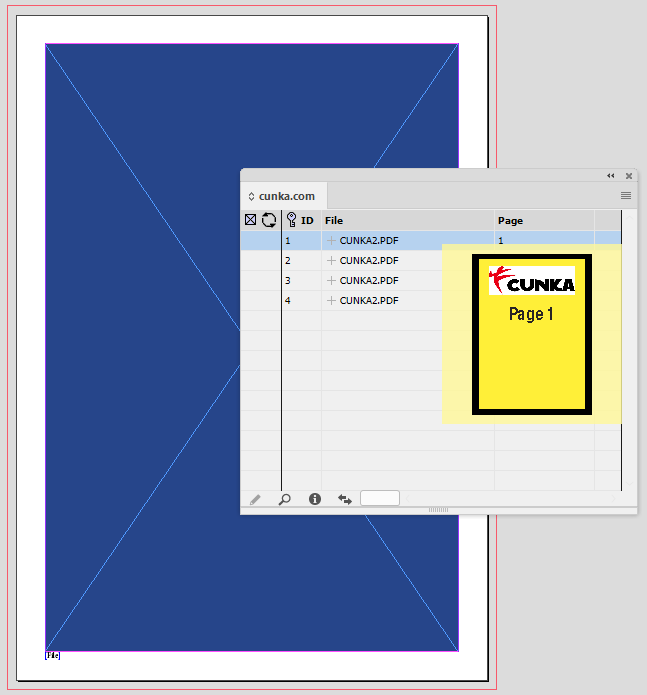
The field name "File" is set up for the scaling to fill the frame from the top left and has the command PDFCROPTO(bleed)C:\EC_Commands placed in the picture import location.
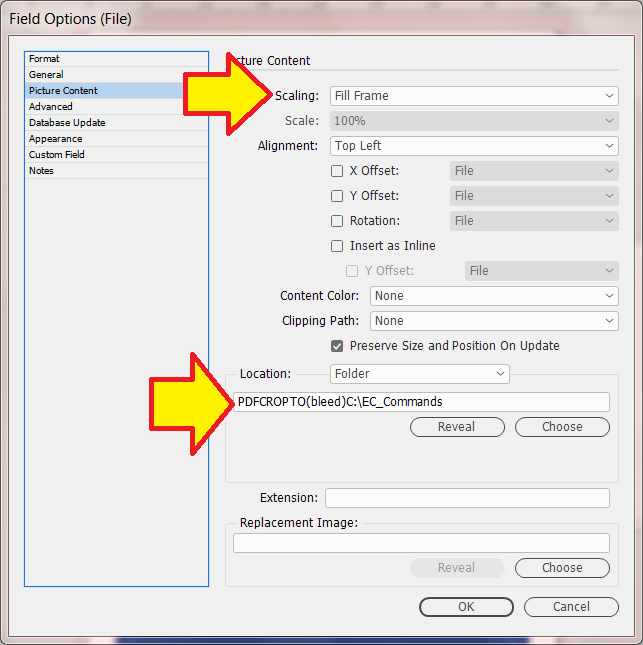
This is the PDF placed on the page with its bleed still in place.
The bleed is the blue frame around the placed PDF.
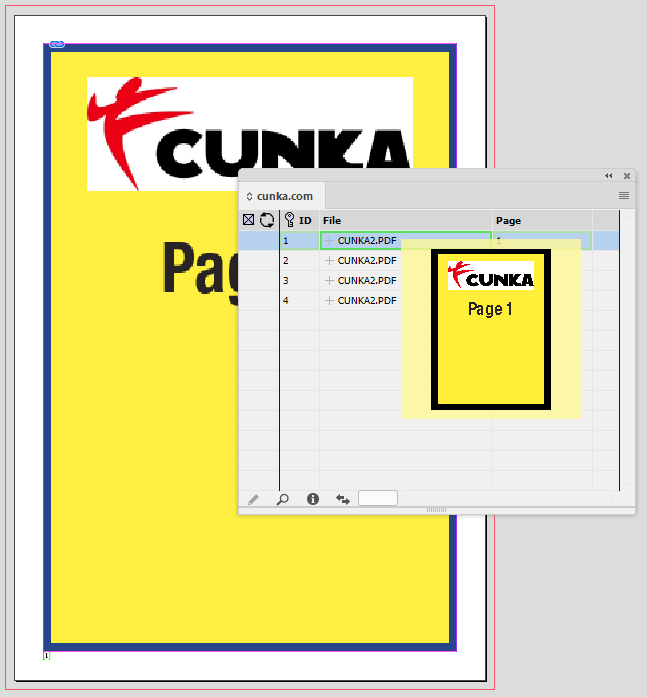
PDFIMPORTPAGE
Sets the PDF page to import.
Can be used in the picture import location to force a specific page to import.
| One thing that should be observed using PDFIMPORTPAGE is that the data source panel does not preview the page it is importing. The preview shown is a low res image of page 1 from the PDF. |
Parameters
PDFIMPORTPAGE(page number to import, starting from 1 )
Example
PDFIMPORTPAGE(FIELDVAL(Page))C:\EC_CommandsThis examples uses CUNKA.PDF. Here are the 4 pages in the PDF.

The preview in the data source panel shows a low res picture of page 1.
The example will be importing page 2 of the CUNK.PDF into the document.
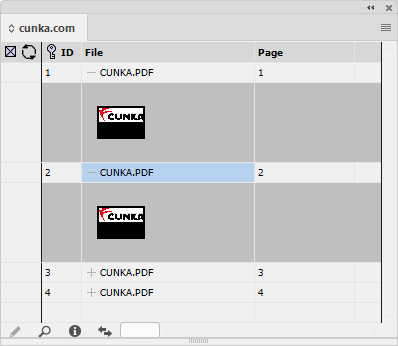
The PDFIMPORTPAGE command is in the "picture location" along with the file path (Windows7) to the location of the PDF. Take note that each page has its own "Page" field (using FIELDVAL()) that instructs what page to import.
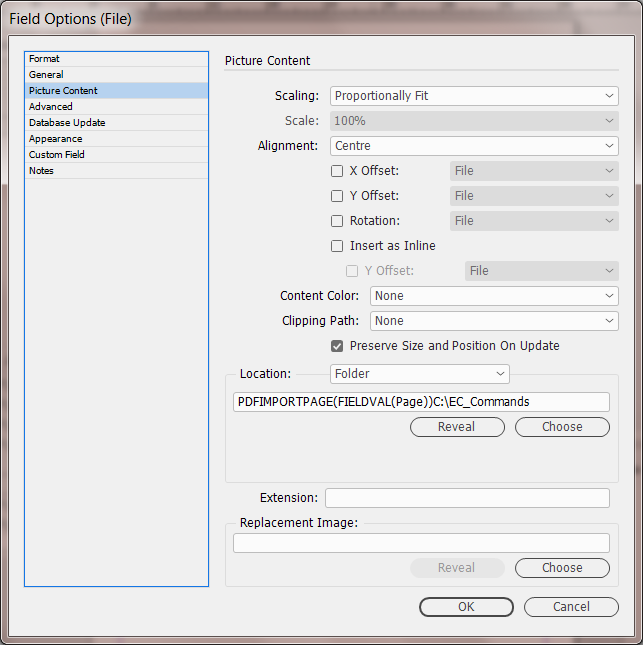
Page 2 is imported and placed on the page.
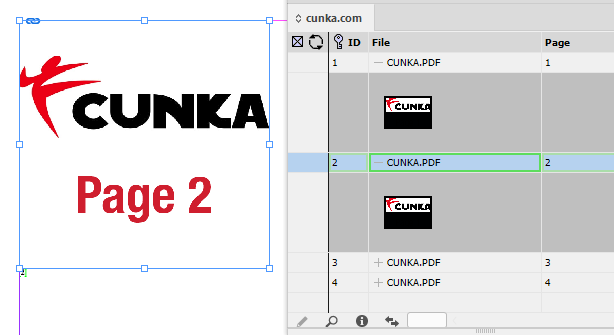
PDFPAGECOUNT
Returns the number of pages in the given PDF.
Will return a value of 0 if the PDF cannot be opened or parsed.
PDFTRANSPARENTBACKGROUND
Sets whether the PDF transparent background is switched on or off.
-
on = TRUE
-
off = FALSE
Can be applied in the picture import location.
Parameters
PDFTRANSPARENTBACKGROUND( TRUE or FALSE )
Example 2
The field PDF_TRANSPARENT has been set to TRUE.
The field PDF_NON_TRANSPARENT has been set to FALSE
PDFTRANSPARENTBACKGROUND(FALSE)
The command is applied in the picture import location. In this case the screenshot is showing what is applied to the field PDF_NON_TRANSPARENT.
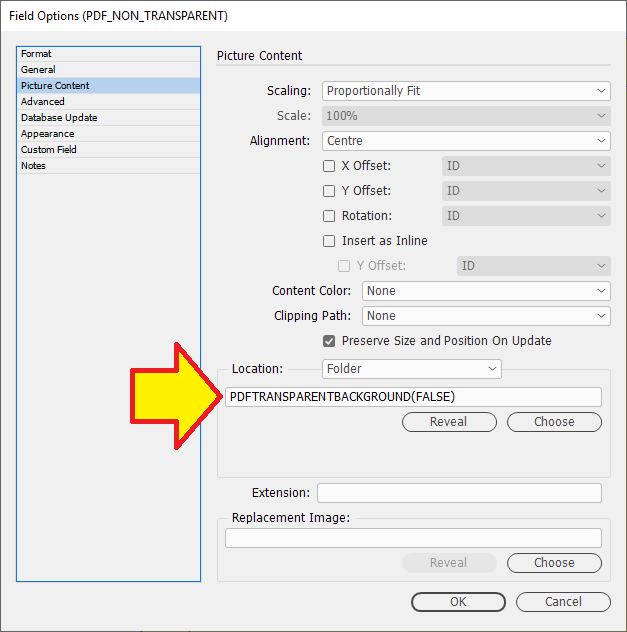
The end result shows the transparent picture on the left, and the non-transparent (has a white background) on the right.
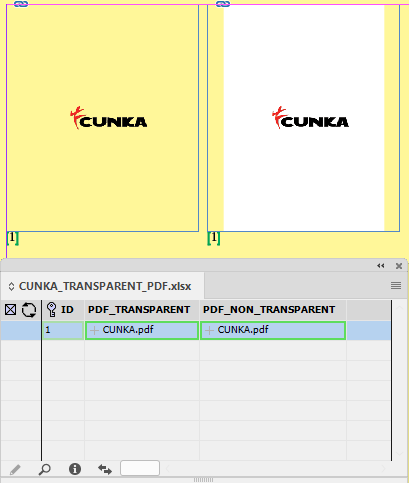
QRCODEENCODEEMAIL NEW
Returns a string the can be used to generate an email QR Code.
| To be used inconjunction with the Field 'Barcode' parameter. |
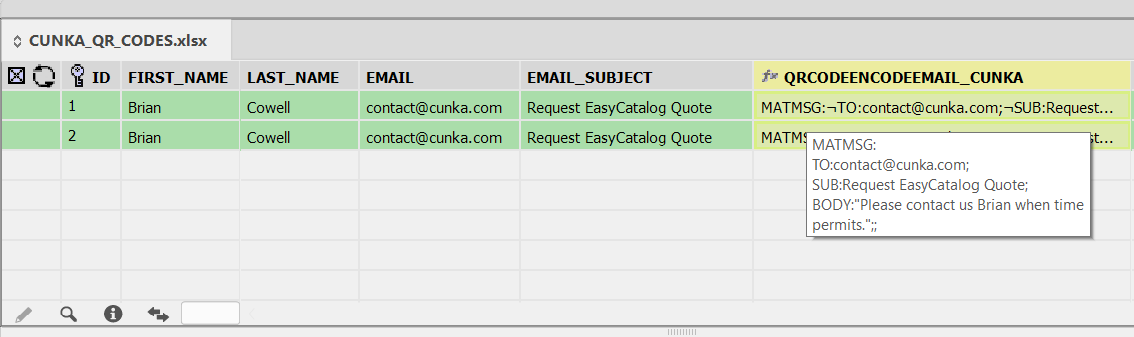
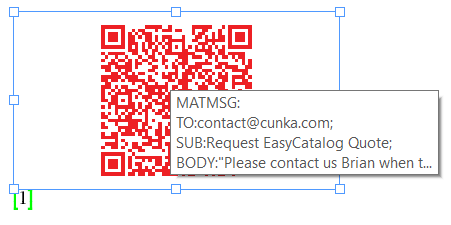
QRCODEENCODESMS NEW
Returns a string the can be used to generate an SMS QR Code.
| To be used inconjunction with the Field 'Barcode' parameter. |
QRCODEENCODEVCARD NEW
Returns a string the can be used to generate a VCard QR code.
| To be used inconjunction with the Field 'Barcode' parameter. |
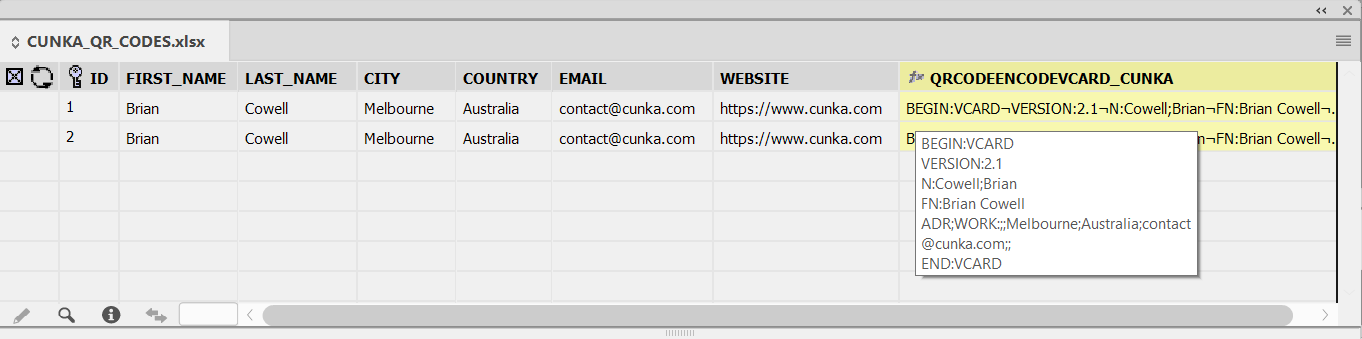
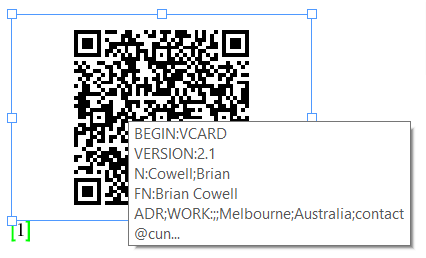
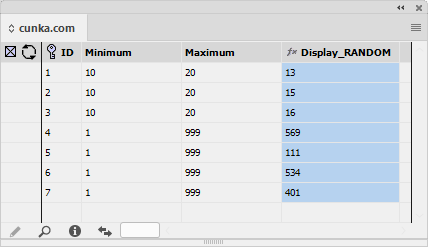
RECORDTIMESTAMP
Returns a records timestamp in seconds in a Unix/POSIX time format.
An example timestamp returned for January 10th, 2020 would be 1578629819.
The RECORDTIMESTAMP uses the Unix time stamp to measure time in seconds from January 1st, 1970 at UTC till the creation of the record.
Because handling and manipulating dates can be ackward due to the many configurations you can use, the RECORDTIMESTAMP allows the date to appear as a number, which can be more easily compared with against other records.
REGEX
Search and replace the given string using a regular expression.
A regular expression is a special text string for describing a search pattern.
There are a few online resource tools that can help you build regular expressions and educate how they work.
Parameters
REGEX(the string to search, a regular expression, the replacement string)
Example 1 - Remove non-numerical characters
REGEX(FIELDSTR(Text), '[a-zA-Z]','')Removes any characters from "a-z" and "A-Z". Not specifying a replacement string removes characters.
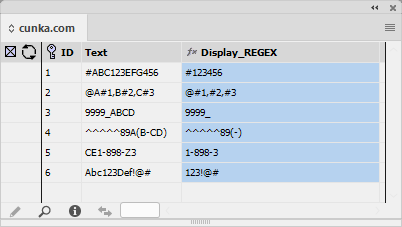
Example 2 - Remove non-numerical characters and whitespace
REGEX(FIELDSTR(Text), '([a-zA-Z]+,|\s)','')This REGEX examples also removes characters. However, it is been very specific with what it chooses. It is looking for any whitespace as well as characters from "a-z" and "A-Z"..
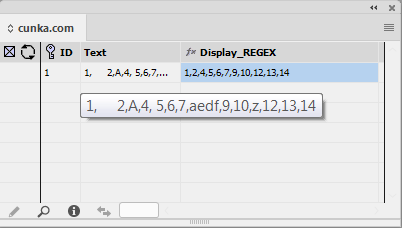
Example 3 - Replace text at the start of a product code
REGEX(FIELDSTR(Product Code), '^(\d{3}-)',FIELDSTR(Prefix)-)In this REGEX example we are looking at replacing the first values of Product Code with a new designated Prefix (eg CAT). The conditions for this REGEX is it must only replace a Product Code that begins with 3 numbers,and must leave the other Product Codes as they are.
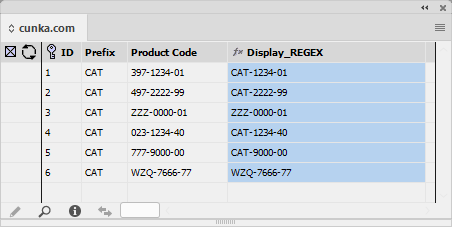
Example 4 - Extract a number sequence from within a filename
REGEX(FIELDSTR(OTHER_IMAGES), '^(\D{1,})(\d{5,})(\D{1,})','\2')In this REGEX example we are looking to extract the number (5 or more digits in length) from a filename in the field OTHER_IMAGES and put the result in the field x_REGEX_Unsplash.
The conditions are it looks for any non-digit characters (as 1 group) until it finds at least 5 digits (group 2). It then returns group 2 as \2.
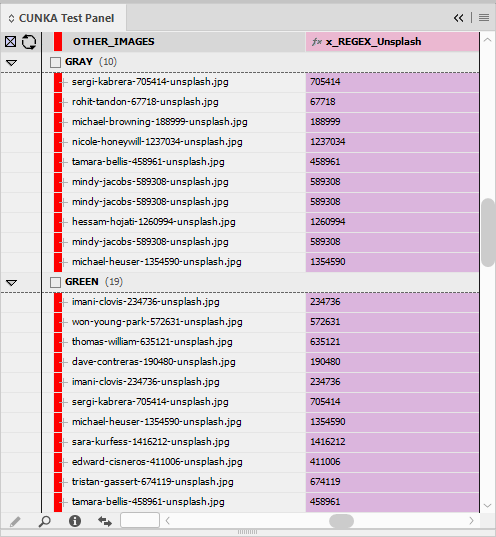
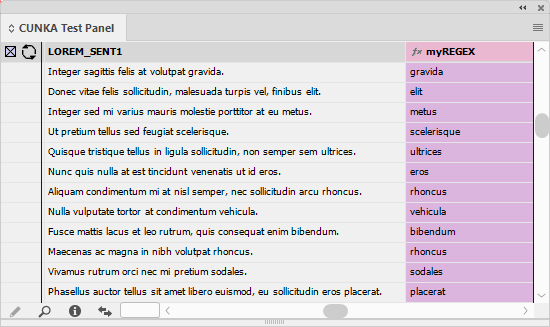
REGEXESCAPE
Escapes the regular expression reserved characters in the provided string content.
Here is the list of reserved characters use by REGEXESCAPE.
| Regular Expression Reserved Characters | ||||||||||||
|---|---|---|---|---|---|---|---|---|---|---|---|---|
[ |
\ |
^ |
$ |
. |
| |
? |
* |
+ |
( |
) |
{ |
} |
Regular expressions contains reserved characters required to perform pattern matching. If you use say the + character as part of pattern matching a regular expression, it must be escaped through the use of the \ character, otherwise it may not be found.
1+1
1\+1
Using the custom reference REGEXESCAPE there is no need to provide the \.
REGEXV1
Search and replace the given string using a regular expression.
This uses an older regular expression parser and is more limited then REGEX.
This parser will run faster then REGEX if the expression can be run.
| Recommend using the REGEX command as it has more functionality. |
Parameters
REGEXV1(the string to search, a regular expression, the replacement string)
Example 1
REGEXV1(FIELDSTR(SERIAL_NO), '^(....)-(....)-(....)','XXX')This example is looking for a pattern seperated by dashes in the field SERIAL_NO, then removing that pattern and saves the result in the field my_REGEX_Find.

Example 2
REGEXV1(FIELDSTR(SERIAL_NO), '^(....)','\1CUNKA')Your company uses a unique serial no to identify its products by appending to a vendors existing serial no.
This example is looking for the first 4 characters in the SERIAL_NO field where it will then append the text "CUNKA" into the serial number and save it in the field my_REGEX_Find.
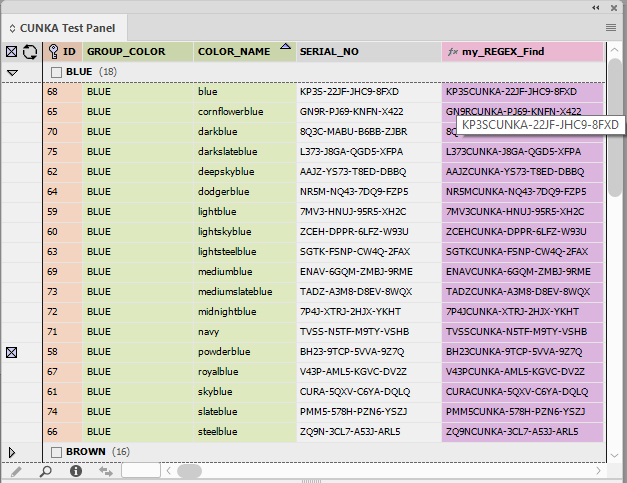
REMOVEBLANKLINES
Removes blanks lines from a given string.
Only lines ending with a hard return (called "Forced Line Breaks" with InDesign) are removed. Formattings tags are ignored
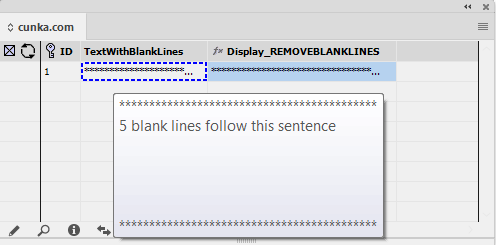
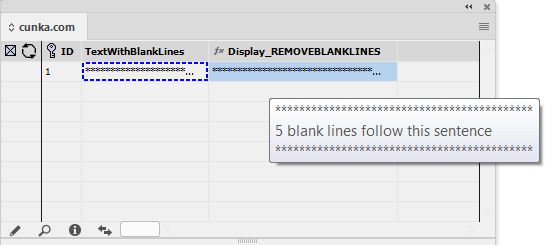
REMOVEDUPLICATES
Removes duplicate values from the given string
Parameters
REMOVEDUPLICATES(separator,string)
Example
REMOVEDUPLICATES(FIELDSTR(Delimiter),FIELDSTR(TEXT))This example has delimited text with many duplicates. By using the REMOVEDUPLICATES we can remove the duplicate occurences between the delimiter.
The screenshot below shows the orginal text, the delimiter and the processed result in the "Display_REMOVEDUPLICATES" field.
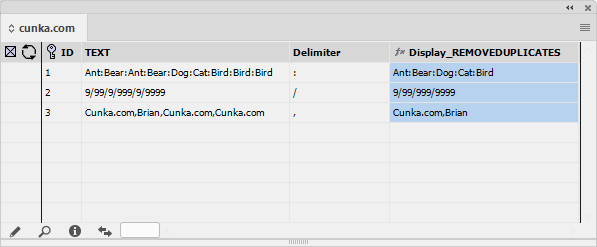
REPLACE
Performs a simple search-and-replace operation on the source string.

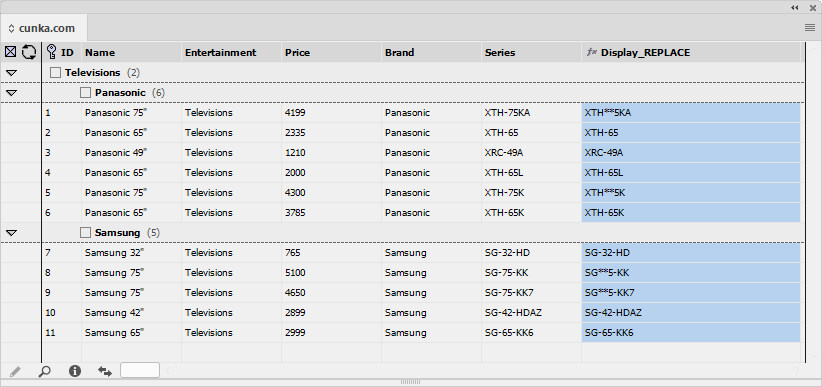
RESOLVEGROUPING
Resolves a parent / child hierarchy into a full path, separated by >>. group id, data source name, group field name to return, group id field name, parent group id field name
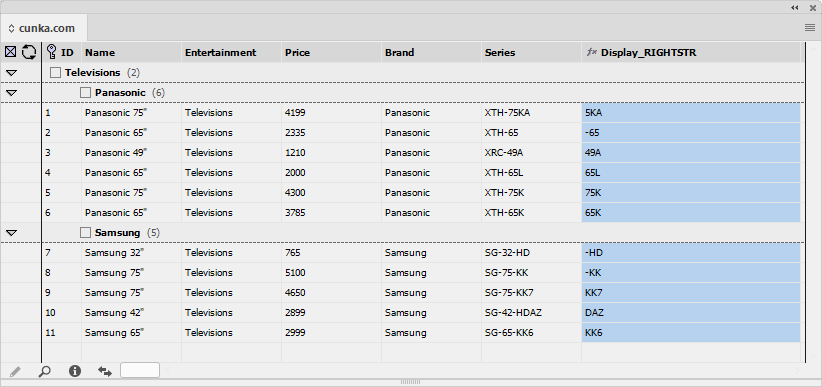
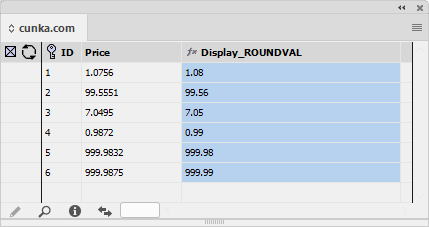
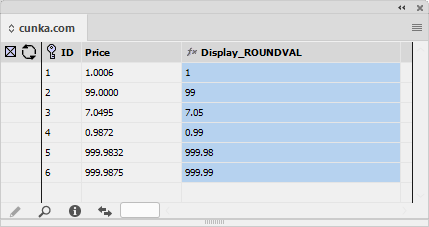
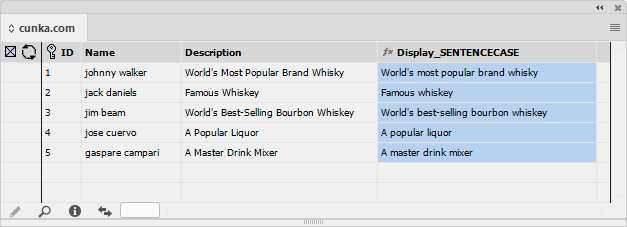
SNIPPETDEPTH
Returns the depth in POINTS of a snippet for each record.
This command will be useful to calculate how many records can fit on a page.
| For performance reasons turn off the ‘Automatically Update Content’ option on the Custom Field Field Options pane. |
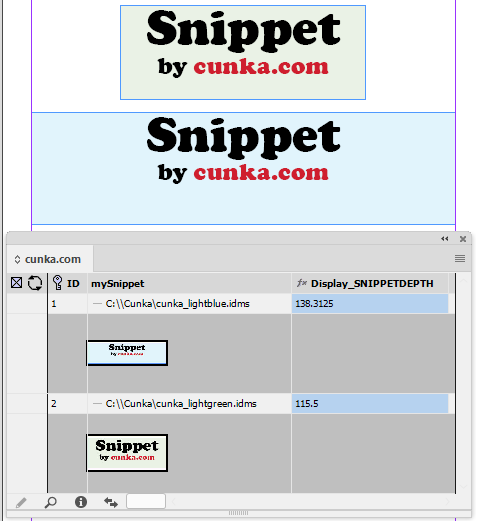
SNIPPETDIMENSIONS
Returns the width and height in points of a snippet when populated in a temporary document.
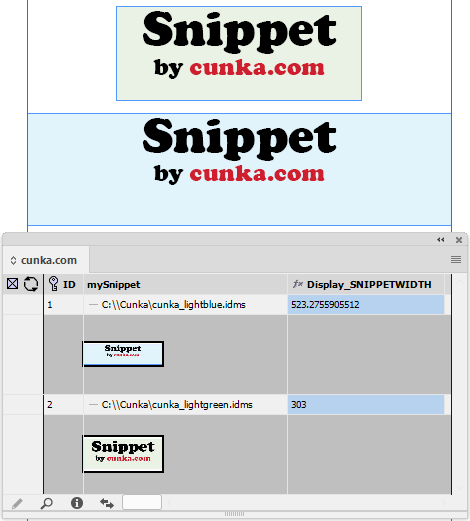
SORT
Sorts the given delimited string into ascending or descending order.
SORT also identifies numeric ranges (eg. 1-3, 3-15) as numbers. However, it only sorts the number preceeding the hyphen.
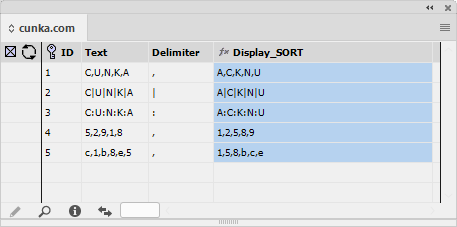

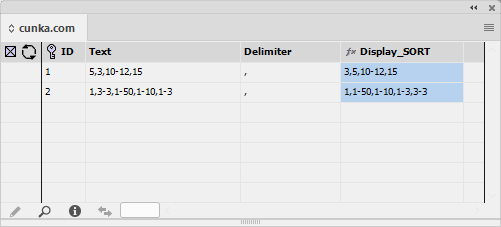
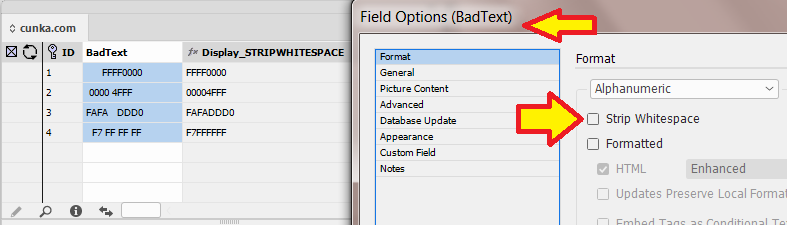

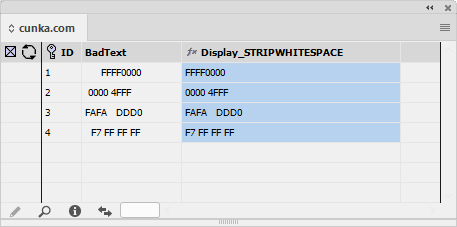
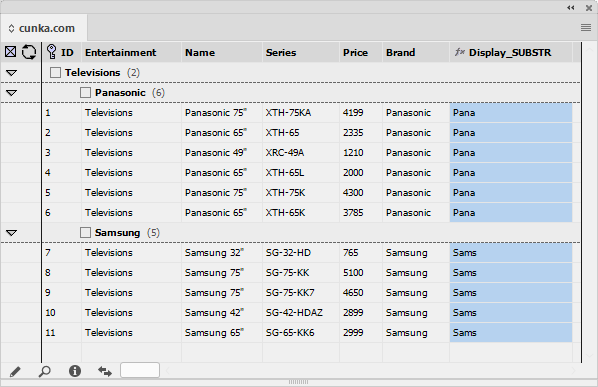
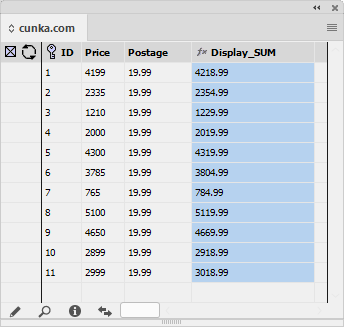
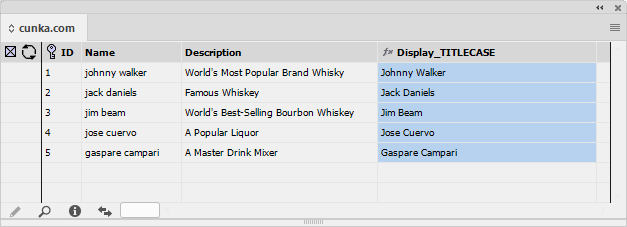
TRANSLATELANGUAGE NEW
Description
Translates the given string of text into a foreign language using a configured translation service.
(e.g. Google or DeepL)
The translation service used must be configured in the EasyCatalog Advanced Preferences before use.
|
If no translation service is configured you will see the 'No translation service available' message in the data source panel.
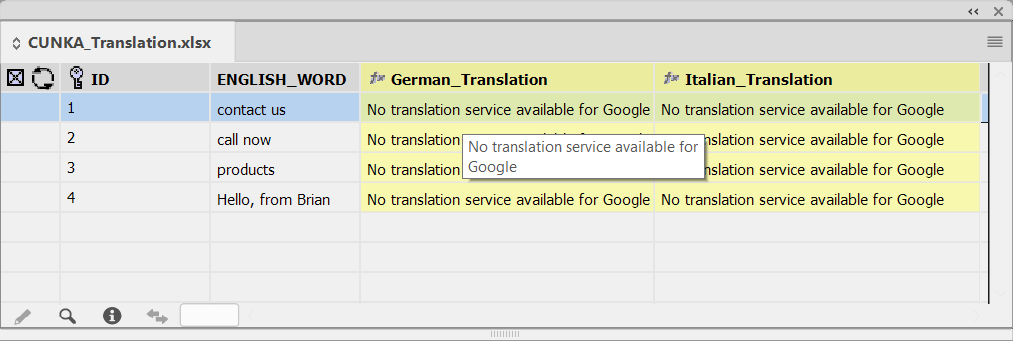
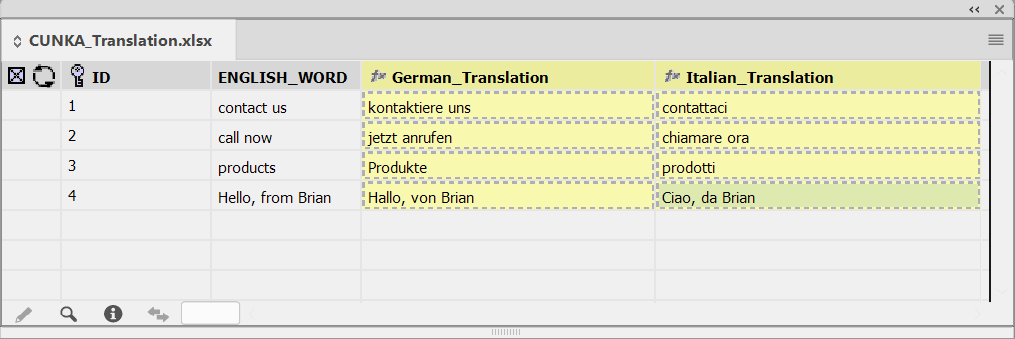
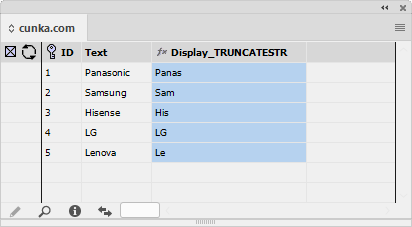
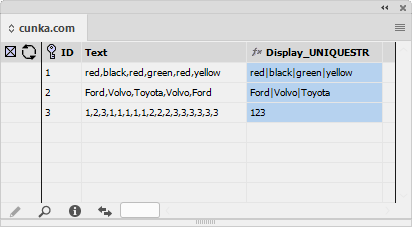
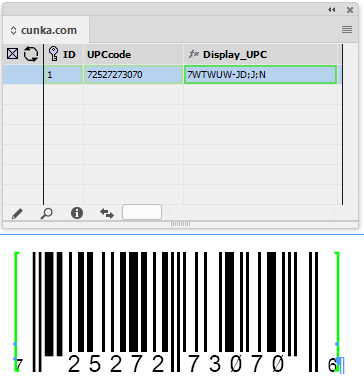
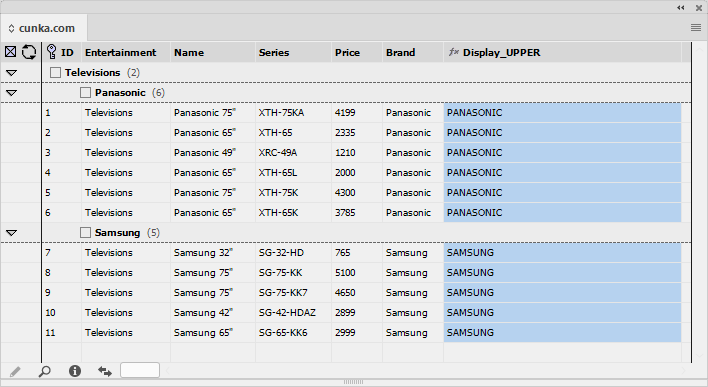
URLDECODE
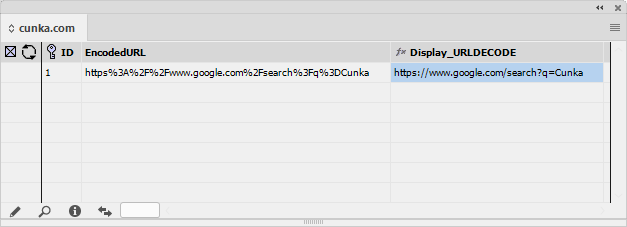
URLENCODE
Description
Encodes the given URL string. URL must begin with 'http' or 'https'.
For security purposes, its best to use only URLs that begin with 'https'.
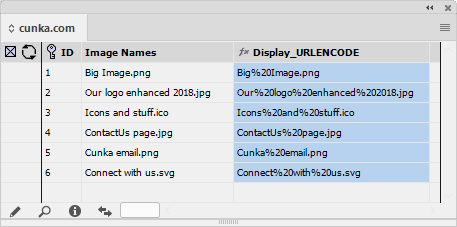
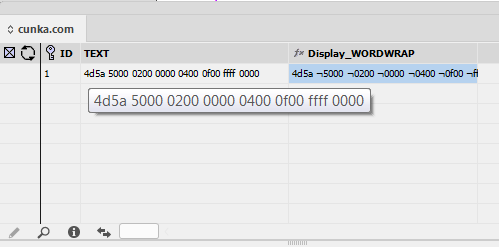
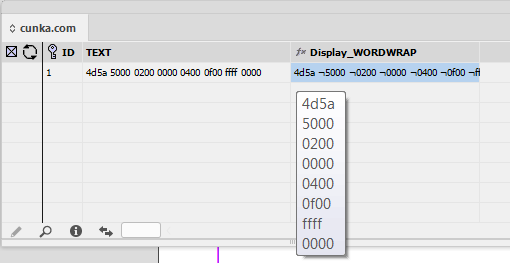
XREFFIELD
Description
Returns the value of a field from another record.
Returns the first instance found.
| There is an option to do advanced cross referencing across data sources |
Searches can be a "search for" using the % character in the search string as a prefix and suffix. This allows searching the beginning of a string, the ending of a string, or whether a string contains specific content.
-
Containing
% character at the prefix and suffix of the search string.
Search anywhere in the string for the characters "XXXX". eg. '%XXXX%' -
Begins with
% character at the suffix of the search string.
Search the beginning of the string for "CatNo.". eg. 'CatNo.%' -
Ends with
% character at the prefix of the search string.
Search the end of a string for the image extension ".JPG". eg. '%.JPG'
Parameters
XREFFIELD(field to search, field content to search for, field contents to return, (optional) data source to search)
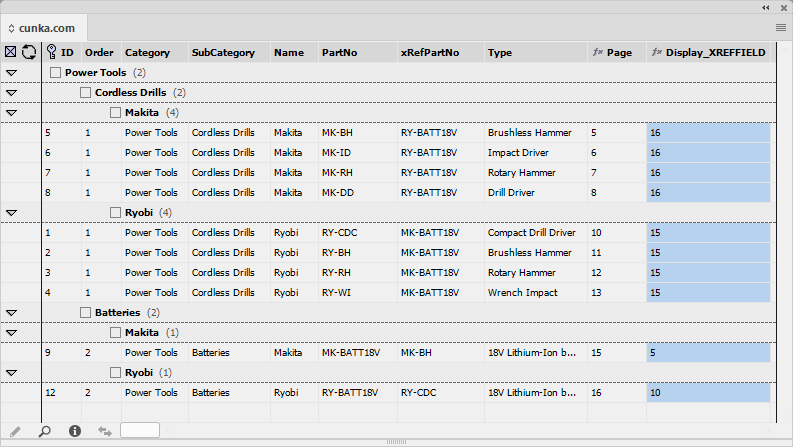
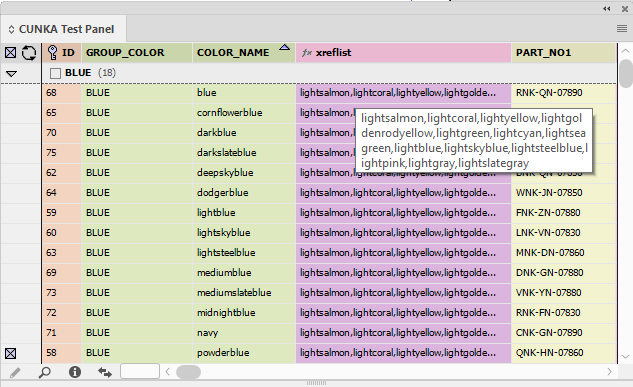
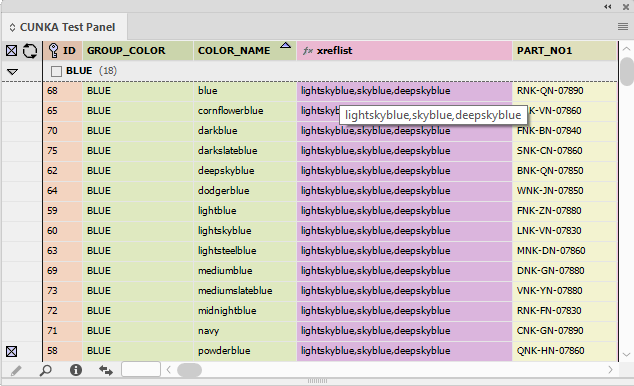
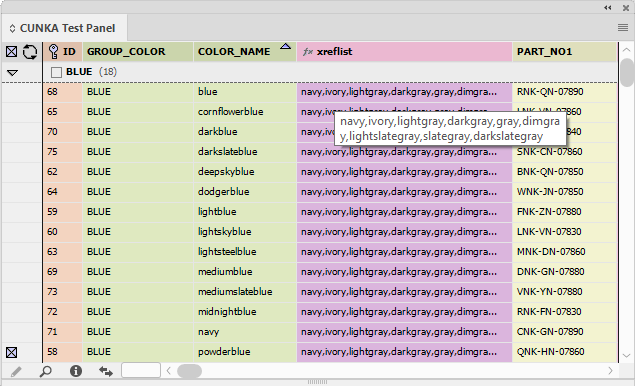
Automation with EasyCatalog
EasyCatalog can use any of the three available scripting languages that InDesign uses. The focus here is Adobes flavour of JavaScript and EasyCatalogs inbuilt adaption of the LUA programming language.
| JavaScript control of EasyCatalog requires the purchase of the optional Scripting plug-in available from 65bit. No additional modules are required for programming with LUA. |
Paginating large catalogues
<COMING SOON>
INDESIGN
Close dialog windows
With InDesign, its quite easy to run with a lot of dialog windows open. This can become a problem with documents adding up to hundreds of pages. +
Resources on speeding up InDesign
David Blatner’s article called Why is InDesign so slow? : https://indesignsecrets.com/why-is-indesign-soooo-slow.php
Erica Gamet’s article called 6 Tips to Speed Up InDesign : https://indesignsecrets.com/6-tips-speed-up-indesign.php
EASYCATALOG
Many open data source panels
If you are doing a lot of development with EasyCatalog, its quite easy to accumulate a lot of open data source panels. The panels dont need to be visible, they only need to be open. This means EasyCatalog will be loading and tracking them, as well as InDesign.
Now with small data source panels, this may not become an issue. However, if you are dealing with thousands of records with many panels open, you will notice sluggish behaviour from EasyCatalog and InDesign. Shut down and close panels you are not using.
Stay up to date
Due to a change with InDesign we started noticing a script ran for 4 hours started hitting 5 hours for pagination for a 1000 page catalogue. Our analysis showed the size of the data had not increased, nor the complexity of the pagination in the libraries. After a few weeks of testing the previous version of EasyCatalog/InDesign and the newer versions, we found that InDesign was activating the "preflight" panel while paginating. This added a lot of overhead into InDesign as the preflight was now checking the pages as EasyCatalog was doing its work !
As a consequence, we notified 65bit who then fixed the issue with an update. As of version 14.0.0 automatic pre-flight is now disabled while before pagination commences. Stay up to date with EasyCatalog.
Adobe InDesign Javascript
ScriptUI Dialog Builder
| Chrome browser only. |
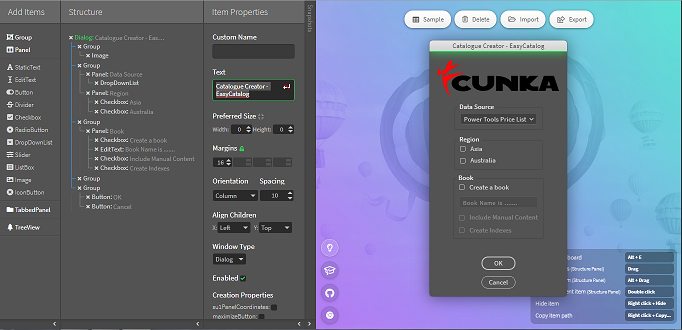
Joonas Paakko has programmed this very helpful tool for building InDesign dialogs called ScriptUI Dialog Builder.
Go to the ScriptUI Dialog Builder site : https://scriptui.joonas.me/
The Github page for the project is located here : https://github.com/joonaspaakko/ScriptUI-Dialog-Builder-Joonas
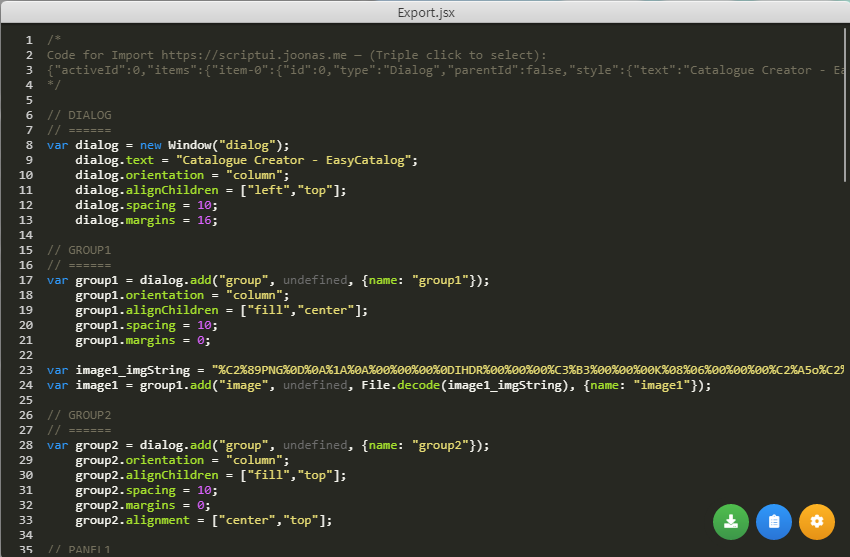
Using VSCode for Scripts
VSCode is one of the favourite leading code editors going around these days. It comes as no surprise that Adobe has created an extension for it called Extendscript Debugger for script writing and debugging.
It is a near perfect replacement for Adobes existing ExtendScript App, and its maintained by Adobe!
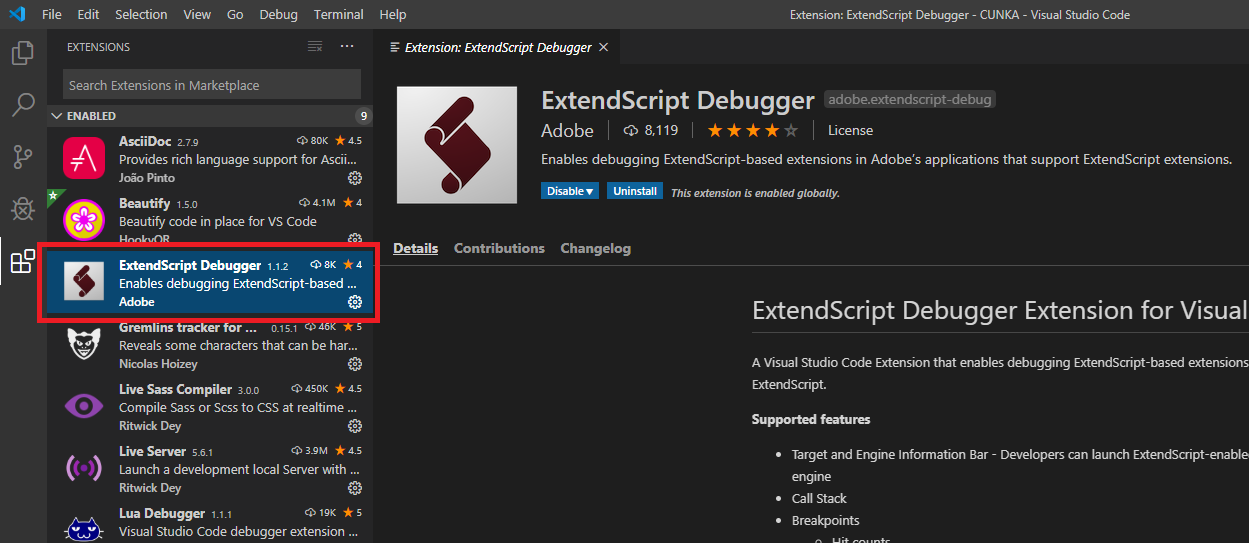
My Installation of Extendscript Debugger
|
Use the installation and setup notes provided by Adobe in the link above. The details that follow is how I installed Extendscript Debugger on my PC and screenshots of what it looks like. |
-
A folder exists on my PC where some of ExtendScripts are currently located. This folder will be used to inform the Extendscript Debugger that the scripts are located here.
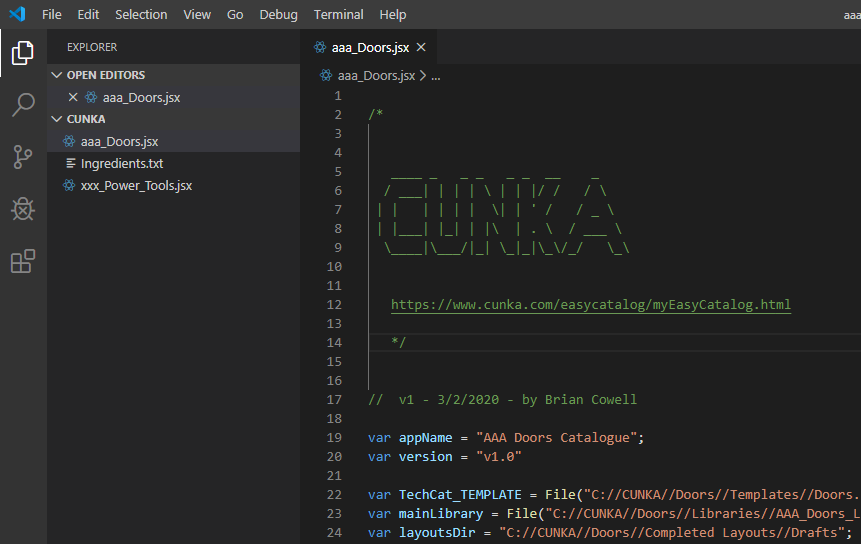
-
I clicked the Debug and Run option on the left side of VSCode. Then clicked on "create a launch.json file" and selected
ExtendScript Debugfrom the dropdown.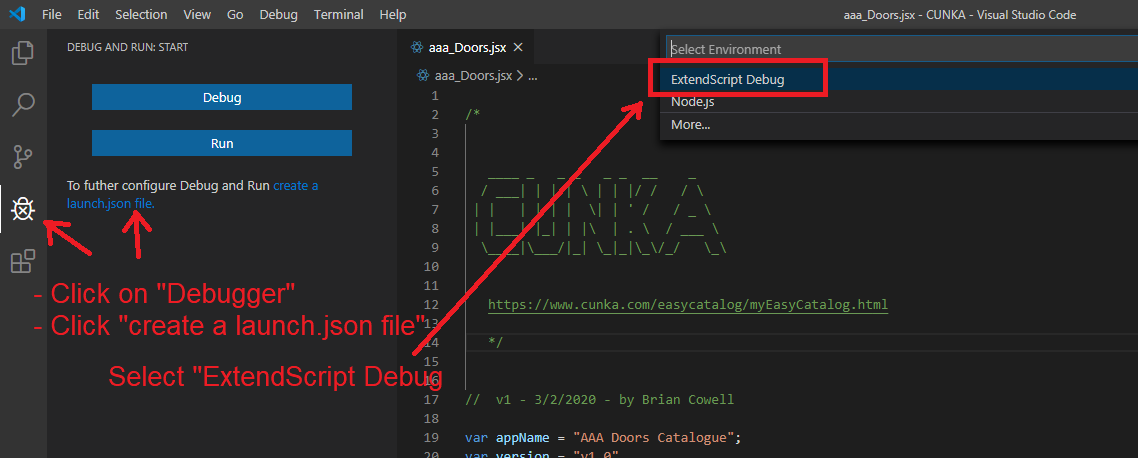
-
This is the one tedious bit using VSCode and running scripts. You must have a configuration set up for every script. Its nothing complicated, and you can add as many as you want.
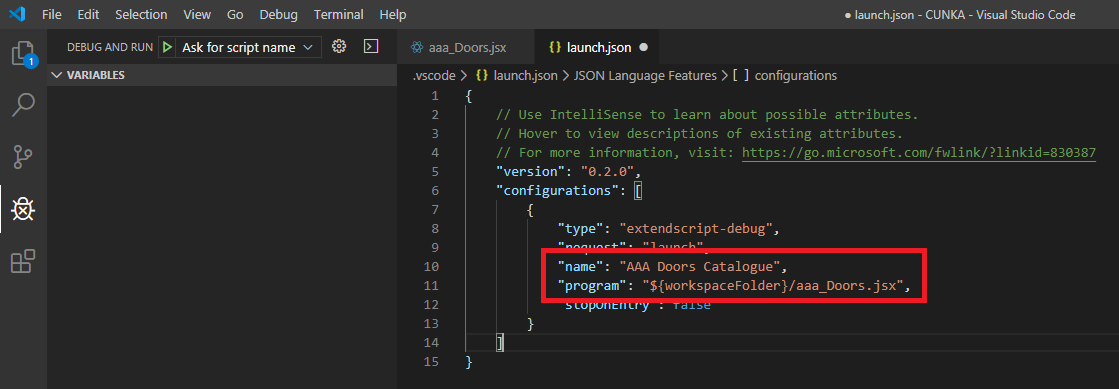
By default you only have to edit the first configuration to use your first script.
-
"name":
The title of the script. Call it what you want as its used in a dropdown for to use later on. -
"program":
Is the name of the jsx script you want debug/run.
-
| Make sure to save the launch.json file |
-
The script now becomes available to DEBUG AND RUN.
However, there is still one more step.
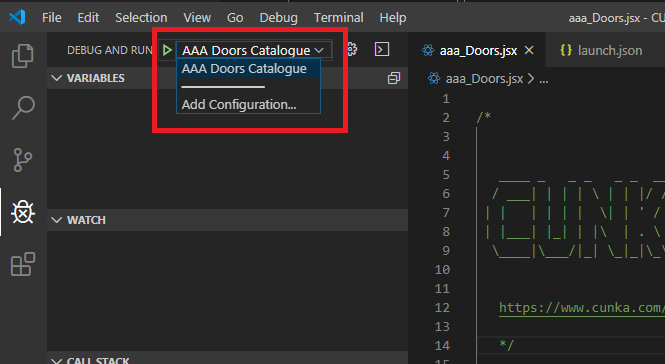
-
Just like using Extendscript, you must indicate to VSCode what the target application will be.
You can see in the example below that VSCode looks very similar to Extendscript with windows for Variables, Watch, Call Stack, Breakpoints.
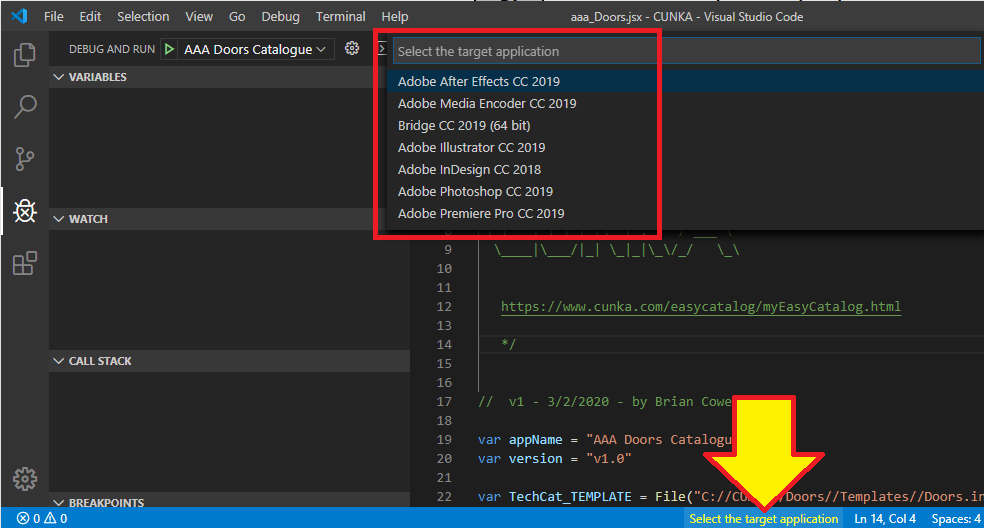
File path seperator
If you plan on retrieving or saving files through scripting, you can use through the operating system discovery to determine which directory seperator to use.
File paths can be different from Windows to a Mac. If a script may run on either, its best to get the script to determine what directory seperator to use and hold the result in a variable.
dirSeparator = $.os.indexOf('Win') >= 0 ? "//": "\";Track the time taken
With long running processes, its handy to know how long a script will take to run.
$.hiresTimer; // starts the timer.// Final script time taken calculation
var time = $.hiresTimer / 1000000;
alert("Total Time : " + time.toFixed(2) + " seconds");Close all currently open InDesign libraries
You can close all the currently open InDesign libraries in various ways. Here is the shortest method.
app.libraries.everyItem().close();Here is the longer method.
var myLibraries = app.libraries; // get all open libraries
if (myLibraries.length > 0) {
    var libraryNames = (myLibraries.everyItem(0).name).toString(); // string containing all library names
    for (var i = myLibraries.length - 1; i > -1; i--) { // looping backwards because closing libraries changes the indexes
        if (myLibraries[i].associatedPanel != null && myLibraries[i].associatedPanel.visible == true) {
            myLibraries[i].associatedPanel.visible = false;
        }
        myLibraries[i].close(); // file closed
    }
}Close all the documents currently open
The following will close all the open documents without saving.
app.documents.everyItem().close(SaveOptions.NO);Applying InDesign master pages
// Get the currently opened document
myDoc = app.activeDocument;

// Get the first page and change the master spread to "D-Delta"
myDoc.pages.firstItem().appliedMaster = myDoc.masterSpreads.item("D-Delta");
Using layers
Layers allow you a greater depth of design flexibility with an InDesign template. EasyCatalog "furniture" and libraries can be easily used.
| You should always make sure you are paginating with EasyCatalog into the "active" layer. Otherwise you will see blank pages. |
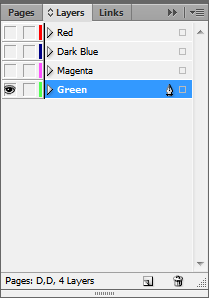
Make a layer visible.
myDoc = app.activeDocument;
myDoc.layers.itemByName("Red").visible = true;
Hide a layer.
myDoc = app.activeDocument;
myDoc.layers.itemByName("Red").visible = false;
Set a layer to be "active".
//Set the active layer
myDoc = app.activeDocument;
myDoc.activeLayer = myDoc.layers.itemByName("Green");Create a log file
A log file is very handy to have to track progress of a script, keep data on what was used, or simply diagnose issues.
The code below uses a timestamp to put into the file name. The actualy writting of the text file is handled through a function called logWrite(text). You simply call the function when you want something written into a log file. It will calculate the time and if a file exists, it will append to it, or create a new file should one not exist.
var timeNum = new Date().getTime(); // used if you create a log file that requires a time stampfunction logWrite(text) { // write the logging file
var myTextFilePath = logFilePath + timeNum + "_log.txt";
var myTextFile = new File(myTextFilePath);
if (myTextFile.exists) {
myTextFile.open("e");
myTextFile.seek(0, 2);
} else {
myTextFile.open("w");
}
var d = new Date().toLocaleString();
myTextFile.write(d + " ");
myTextFile.write(text);
myTextFile.close();
}Example of writing text to the file.
…. // write text to a file
logWrite("Begin STAGE 1");
…. // do some EasyCatalog pagination
…. // write more text to the file
logWrite("STAGE 1 has completed.");Additional resources
The InDesign JavaScript Reference Guide
http://jongware.mit.edu/idcs6js/index.html
The InDesign scripting playground
http://www.indiscripts.com/
The #1 resource for all things InDesign
https://indesignsecrets.com/javascript-for-the-absolute-beginner.php
The Extendscript Wiki
https://github.com/ExtendScript/wiki/wiki
InDesign scripts by Peter Kahrel
http://www.kahrel.plus.com/indesignscripts.html
EasyCatalog Javascript
The "EasyCatalog Object"
EasyCatalog scripting begins with the creation of the "EasyCatalog Object".
var myEasyCatalog = app.easycatalogObject;Alternatively, you can skip storing the object in a variable and continue to reference it directly. Examples throughout this guide will reference the EasyCatalog Object directly, but its more common to use a variable.
Here is an example showing the EasyCatalog Object usage in both instances and both result in the same thing.
var myEasyCatalog = app.easycatalogObject;
var myDataSources = myEasyCatalog.datasources.everyItem().name;
//
// Above is the same as below
//
var myDataSources = app.easycatalogObject.datasources.everyItem().name;
Data Sources
All EasyCatalog Data Sources must exist in the "EasyCatalog Workspace" folder.
A Data Source can be referenced directly.
var myDS = app.easycatalogObject.datasources.item("ElectronicParts.xlsx")Alternatively, you can also collect all available Data Sources in an array and choose one.
var myDataSources = app.easycatalogObject.datasources.everyItem().name;To make all the data sources easily selectable, use a dropdown box in a panel.
var srcnameField = dropdowns.add({stringList: myDataSources, selectedIndex: 0});The value srcnameField is used to capture the selected data source from the myDataSources array.
var dataSourceName = myDataSources[srcnameField.selectedIndex];Use selected the Data Source selected from the array.
try { //ensure the data source name is valid
    var myDS = app.easycatalogObject.datasources.item(dataSourceName);
    var myDV = myDS.dataviews.item(dataSourceName);
    alert("Data Source File: " +myDS.dataSourceSpecifier);
} catch (err) {
    alert("Cannot find data source " + dataSourceName);
    exit();
}
Data Views
/*
**********************************************************

Purpose - to find only the currently "open" data views.
This can then be used in a dropdown box for users to select.

by Brian Cowell
https://www.cunka.com/easycatalog/myEasyCatalog.html

**********************************************************

*/

var myDVs =[]; // array to hold the open data views

// Create an array of available EasyCatalog data sources
var myDataSources = app.easycatalogObject.datasources.everyItem().name;
var myDataViews= app.easycatalogObject.dataviews.everyItem().name;

// loop through all the dataviews
for (var key in myDataViews ){
    var myDS = app.easycatalogObject.datasources.item(myDataViews[key]);
    // find if the dataview is currently "open"
    if (myDS.dataviews.item(myDataViews[key]).visible==true){
        myDVs.push(myDataViews[key]);
    }
}
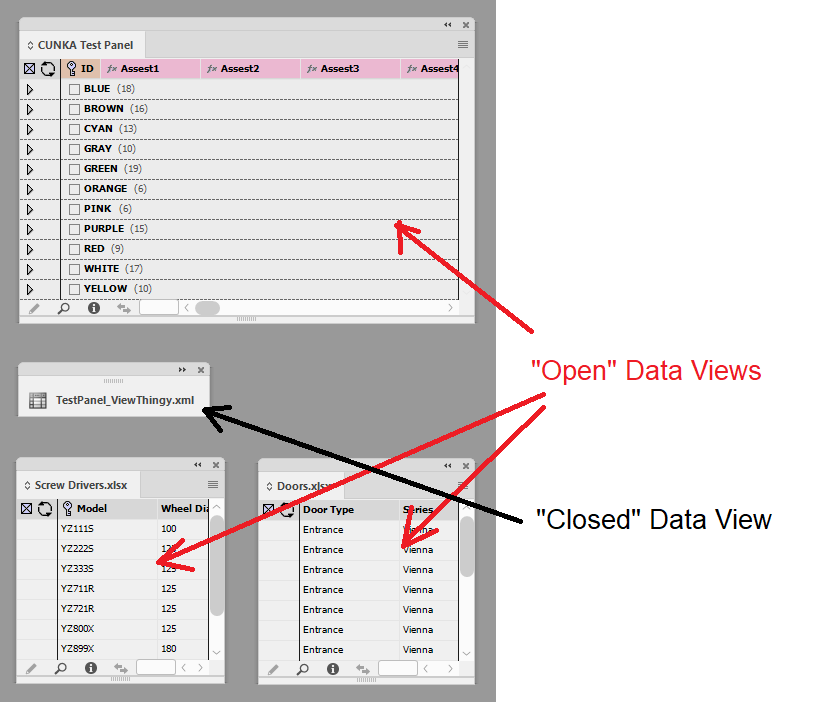
Here is example data views usage from 65bit.com:
https://www.65bit.com/docs/iterate-data-source-exporting-one-document-per-record/
https://www.65bit.com/docs/open-data-source-sync-data-source-open-document-paginate-guide-positions/
Using configuration files
Data panels can be set up so you can group your structure and apply a sort order to your data source. You can easily save your settings as a "configuration file".
EasyCatalog allows you to change between different configuration files quickly and easily. As an example, you may have a configuration file that generates all your contents, and another that creates your index.
myDV.applyConfiguration("Catalogue_contents");
//………..
// Paginate the catalogue contents
// ……….
// Now change to a different configuration
myDV.applyConfiguration("Catalogue_index");
Close all open Data Sources
You can easily close all the open panels (Data Sources)
app.easycatalogObject.dataviews.everyItem().closeDataView();Capturing pagination code
If you can manually paginate your document, you can automate it.
At the pagination dialog, EasyCatalog gives you the opportunity to copy to the clipboard the Javascript settings to use in your script.
To capture to the clipboard, click on the symbol on the bottom left of the paginate dialog window.
myDSO.setPaginationOption("assettype","1")
myDSO.setPaginationOption("paginationtype","0")
myDSO.setPaginationOption("assetfield","")
myDSO.setPaginationOption("usegeometry","false")
myDSO.setPaginationOption("paginationlogic","1")
myDSO.setPaginationOption("librarylocation","")
myDSO.setPaginationOption("rulesetname","CUNKA_COLORS")
myDSO.setPaginationOption("insertpages","true")
myDSO.setPaginationOption("undosupport","true")
myDSO.setPaginationOption("continueonerror","false")
myDSO.setPaginationOption("optimizedcopy","false")
myDSO.setPaginationOption("updatefurnitureafterpagination","false")
myDSO.setPaginationOption("masterpaginationtype","0")
myDSO.setPaginationOption("flowbasedstylename","")
myDSO.setPaginationOption("restrictverticalmergetopagebounds","false")
myDSO.setPaginationOption("autoapplyparaspacebefore","false")
myDSO.setPaginationOption("flowbreakonfield","")
myDSO.setPaginationOption("flowbreakonfieldbreaktype","1")
myDSO.setPaginationOption("flowprocessfurnitureduringpagination","false")
myDSO.setPaginationOption("maximumnumberofpages","0")
Capturing pagination rule code
Right click on an "Action" in the Pagination Rules window and select Copy Script Call.
This will capture to the clipboard the Javascript code for the "Action" for use in a script.
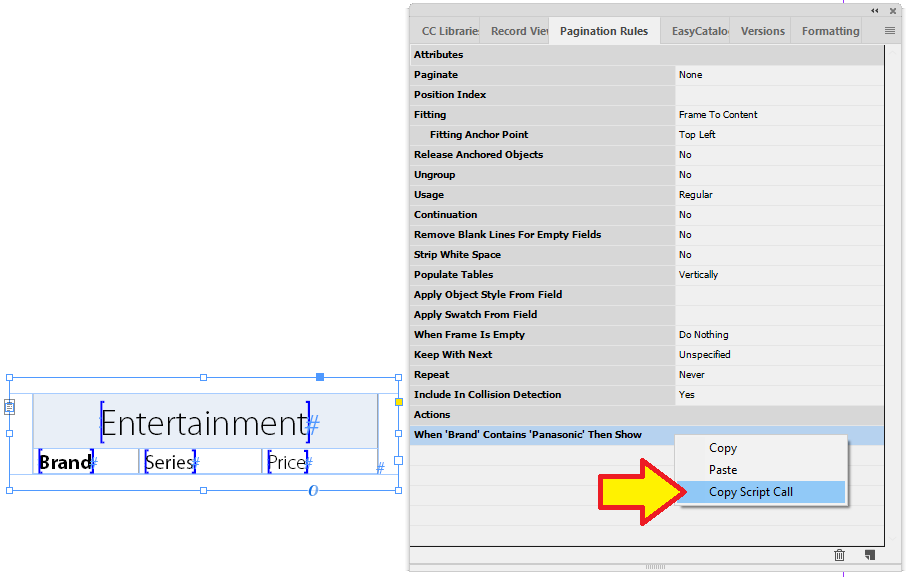
app.easycatalogObject.setPaginationRule(myPageItem,"Brand","0x53500kInCatContainsNameKey","Panasonic","eShow");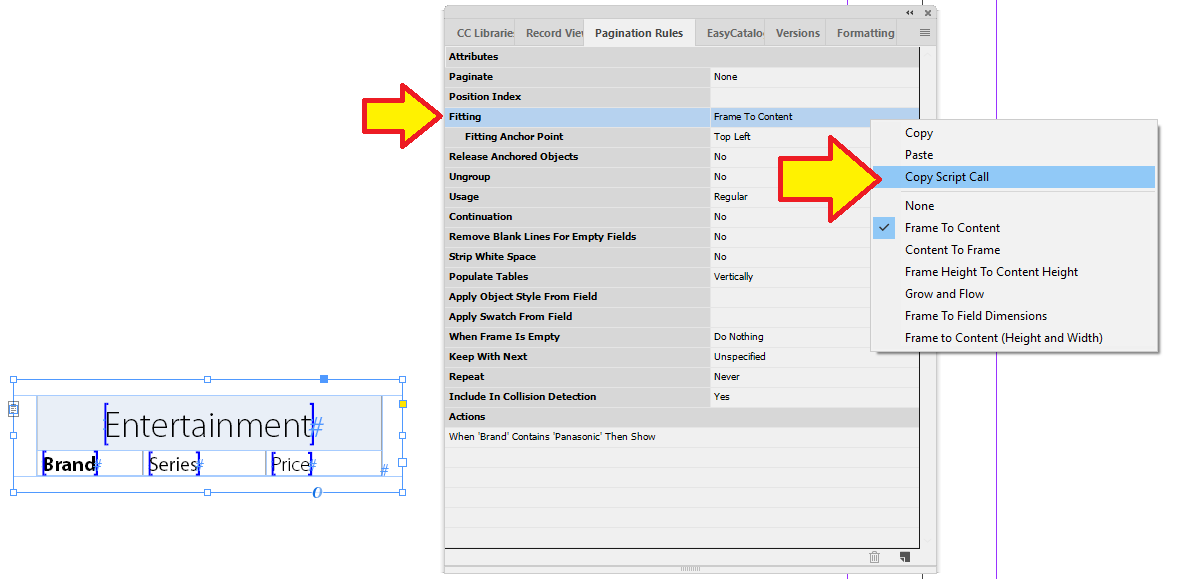
app.easycatalogObject.setPaginationRule(myPageItem,"0x92100kFittingAttributeStringKey","0x92100kFittingAttributeValueFrameToContent");EasyCatalog LUA
LUA Documentation
To find more detail on EasyCatalog and its Lua programming language implementation :

Set up "Enable Sockets"
Debugging LUA can be done remotely through the LUA ZeroBrane Studio IDE editor.
To connect the editor to EasyCatalog you need change the LUA Enable Socket parameter from FALSE to TRUE in the EasyCatalog Preferences panel.
|
Setting "Enable socket" to TRUE can slow down the performance of EasyCatalog. It is recommended to return the setting back to FALSE when not debugging LUA. |
The InDesign Preferences panel : Preferences → EasyCatalog → Advanced → LUA - Enable Sockets
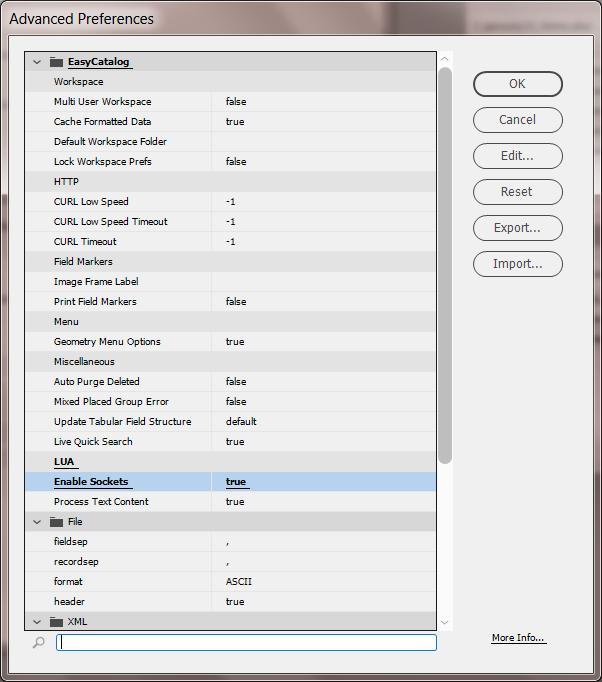
Debugging EasyCatalog LUA with ZeroBrane
Debugging LUA scripts through the InDesign UI can be very non intuitive to use.
However, with the aid of the ZeroBrane Studio editor you can debug your LUA code in EasyCatalog while running InDesign.
Download ZeroBrane Studio (free)
The ZeroBrane Studio editor is free to download and use.
https://studio.zerobrane.com/
EasyCatalog LUA "Enable Sockets"
In order to debug with the use of the ZeroBrane Studio editor, EasyCatalog must have the Enable Sockets preference set to true.Go to our set up "Enable Sockets" section for more information. |
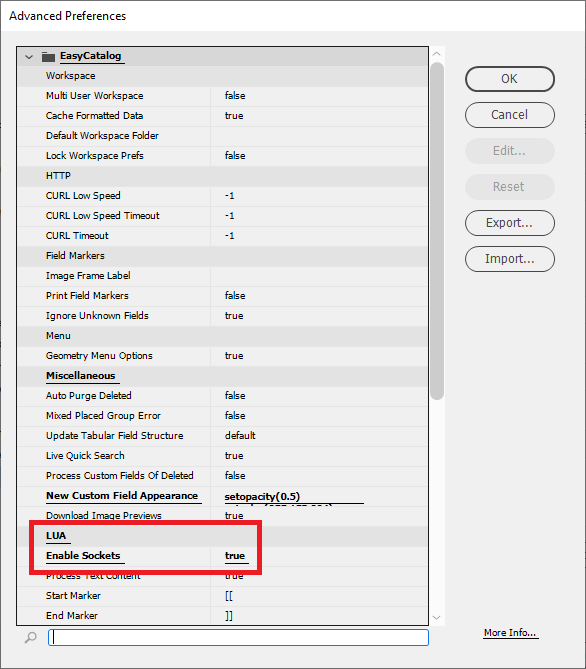
Debugging example
To get ZeroBrane Studio and EasyCatalog to "talk" to each other, we need to include 2 LUA libraries called :
-
mobdebug.lua
-
socket.lua
You can find these both these libraries in your installation of the ZeroBrane Editor in the lualibs folder.
Copy mobdebug.lua & socket.lua into your EasyCatalog Workspace "Scripts" folder.
Screen shot shows our "CUNKA Test Panel".
In the ZeroBrane Studio editor we need to start the "debugging server".
Go to Project → Start Debugger Server
This example I’m testing out LUA code in an advanced field.
That the line require('mobdebug').start() is at the start of the code and should only be used for debugging sessions.
|
Press the Test button and the debugging session begins.
At this point the ZeroBrane editor may ask you if you want to save the untitled LUA file, simply save it anywhere, its part of the debugging session.
You should see your code with the green arrow pointer indicating what line the code is at, but has not yet executed.
I’ve set up a "Watch" window and added the variables I want to study in this session. Also, I have the "Remote Console" open so I can type in and test values as well as test code.
The additional box I’ve indicated on the top task bar is the "Step Into" icon.
This allows you to execute 1 line at a time.
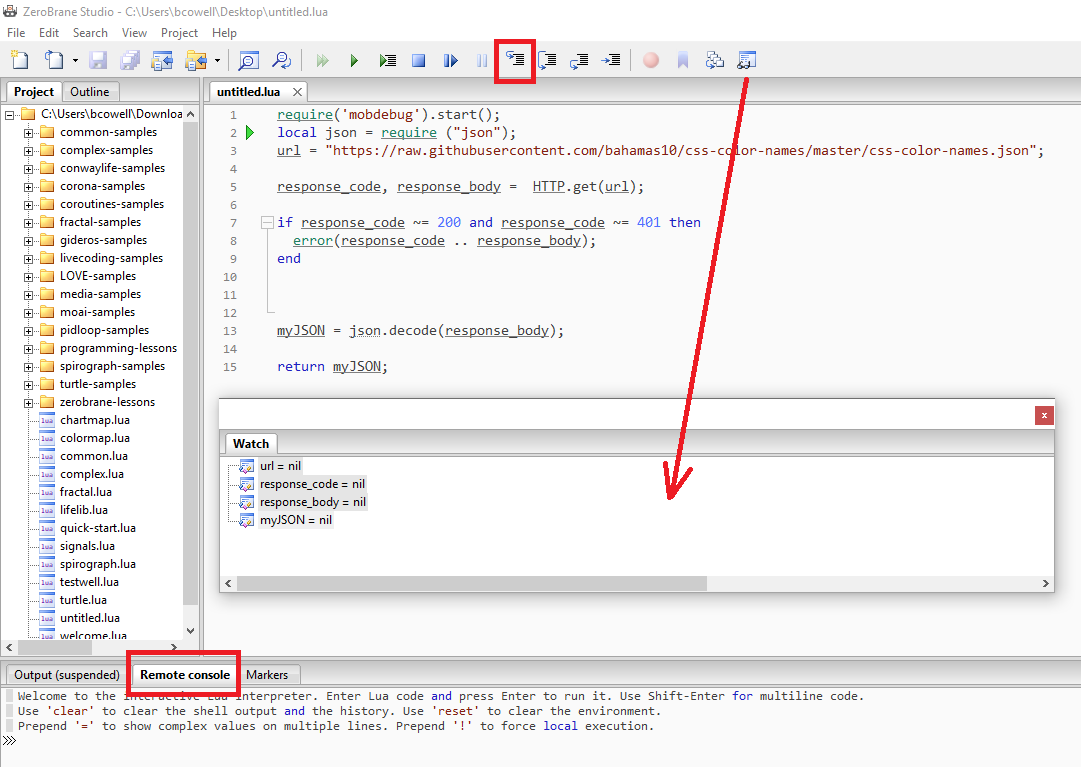
This is the results of the session running.
I was trying to find out why in this example, why the EasyCatalog field was appearing with an empty value, thus I needed to debug and find out why.
You can clearly see in the "Watch" variables that the code has values and the error I was having was related to the type of data I was returning.
In the "Remote Console" you can see I was checking the value of an array.
ZeroBrane editor is handy to find out why things do not work as expected and shortens your development time.
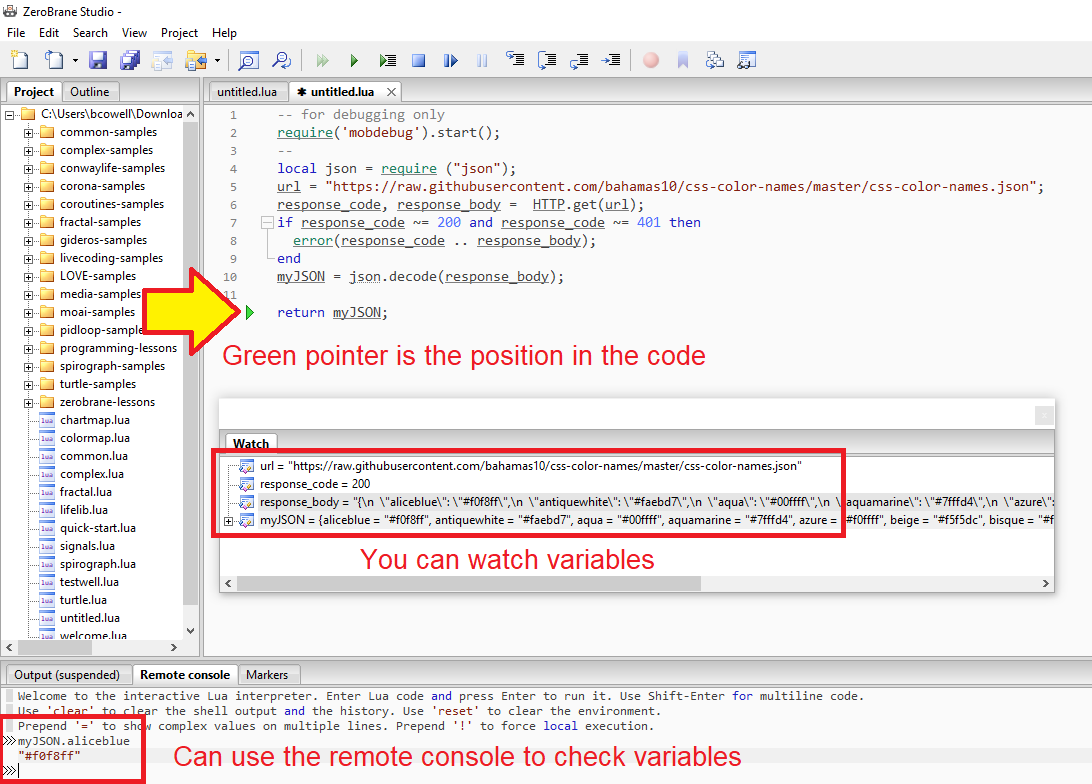
Script - createcontent.lua
The createcontent.lua script is executed immediately after EasyCatalog loads data from a data source, but before additional processing.
createcontent.lua
-
Script must be created and saved into the Scripts folder of the workspace
-
Is run by EasyCatalog after synchronizing the data source panel
-
Gets passed a records variable which is a RECORDSET object representing the raw data from the data source.
-
Can create new fields
-
Can remove fields
-
Can rename fields
-
Can set field content
-
Potentially could incorporate data from other sources into a single set of data, or pull different language fields based on data source options.
Removing unwanted FIELDs
There will be occasions where you have limited control over the source data used for the data source panel.
This can result in a pollution of unwanted fields that have nothing to contribute to the final pagination.
Through the use of a LUA script called createcontent.lua , it is possible to remove all unwanted fields.
Example
This data source panel has a few fields that are not required. They will be removed using the createcontent.lua script.
- FIELDS to be removed
-
-
INTERNATIONAL_PID
-
INTERNATIONAL_PID_TYPE
-
SPECIAL_TREATMENT_CLASS
-
UDX_TRANSPORT
-
This is how the data source panel (CUNKA_DOORS.xlsx) is originally set up.
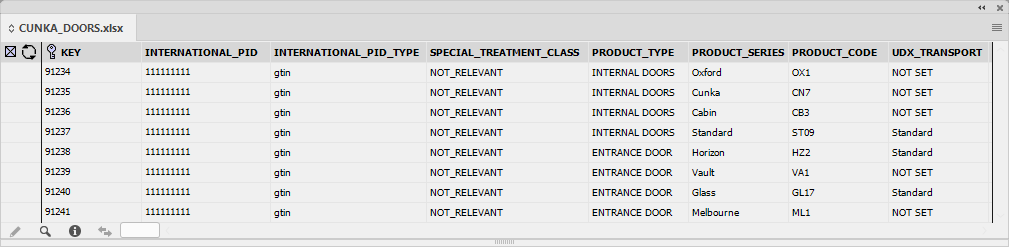
The script createcontent.lua is created with instructions to remove the fields INTERNATIONAL_PID,
INTERNATIONAL_PID_TYPE, SPECIAL_TREATMENT_CLASS and UDX_TRANSPORT.
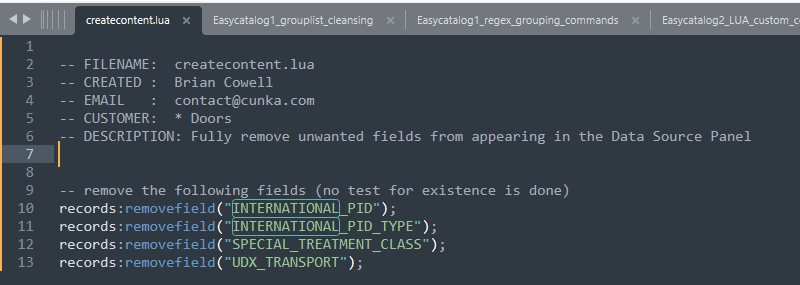
The createcontent.lua script is saved in the CUNKA_DOORS.xlsx Scripts folder.

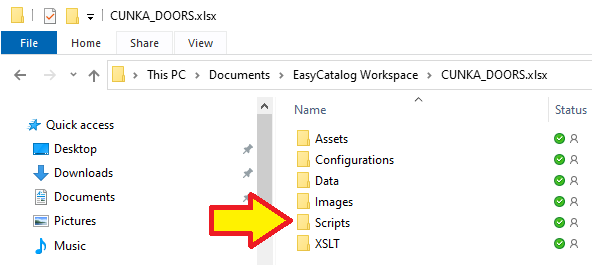
Synchronize the data source panel.
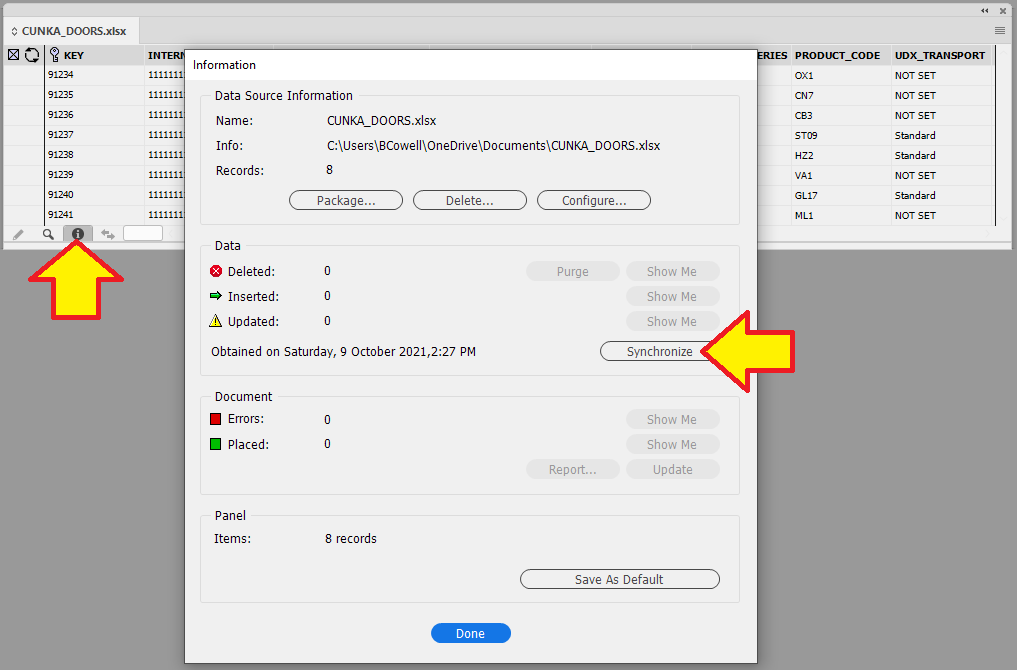
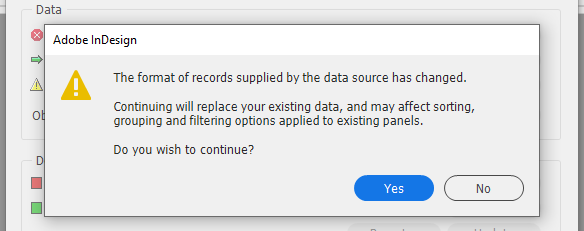
The fields are removed from the data source panel.
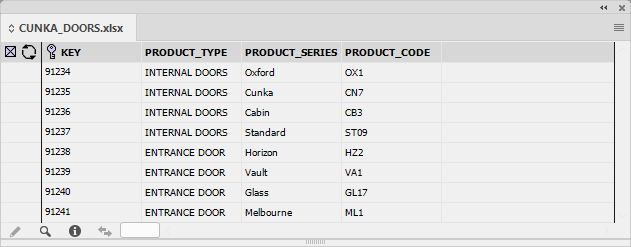
Rename existing FIELDs'
The existing data source panel fields can be renamed'
Through the use of a LUA script called createcontent.lua , it is possible to rename any fields.
| This will affect any custom fields or scripts that use the old name of the field. |
Example
- FIELDS to be renamed
-
-
PRODUCT_TYPE to be renamed Category
-
PRODUCT_SERIES to be renamed Series
-
PRODUCT_CODE to be renamed Series Code
-
This is how the data source panel (CUNKA_DOORS.xlsx) looks pre-renaming the fields.
The script createcontent.lua is created with instructions to rename the fields PRODUCT_TYPE, PRODUCT_SERIES and PRODUCT_CODE.
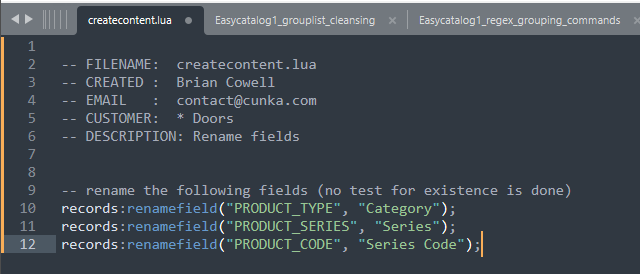
Synchronize the data source panel.
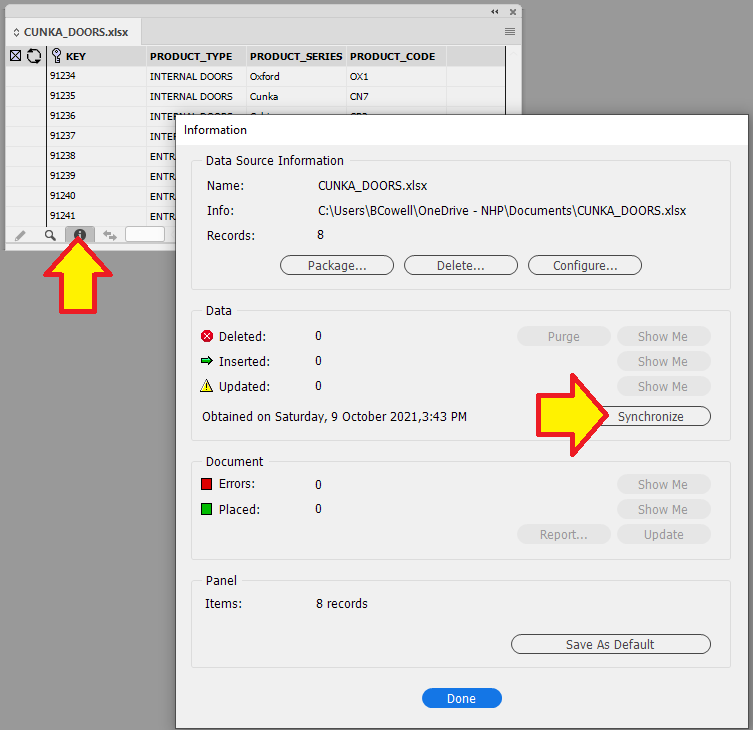
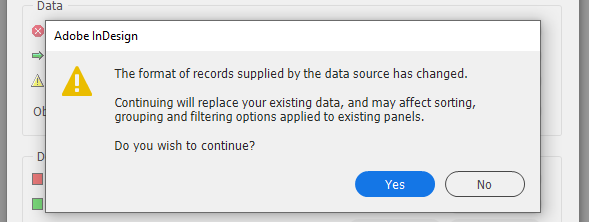
The fields are now renamed in the data source panel.
Fields that have been renamed will appear with an indication icon of the change. (Circle with a plus in it)
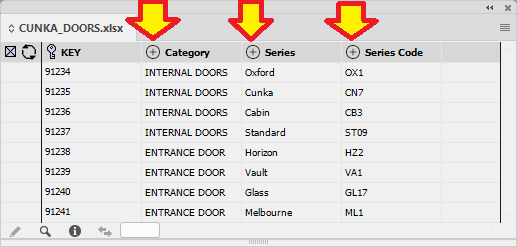
Get a records contents using FIELD
Using the FIELD parameter, a reference to a field name for a record can be called using FIELD.get('XXXXX')
The contents for that field can be retrieved by using :content().
Example 1
This is a simple concatenation of two fields of a record using FIELD and returned as a new value.
-- Use FIELD to retrieve a fields content of the current record. This is grabbing the PartNo.
firstThing = FIELD.get('PartNo'):content();

-- Use FIELD to grab the current records contents. This is grabbing the xRefPartNo.
nextThing = FIELD.get('xRefPartNo'):content();

-- Simple concatenation of strings and return the result
return firstThing.." --> (Spare battery) "..nextThing;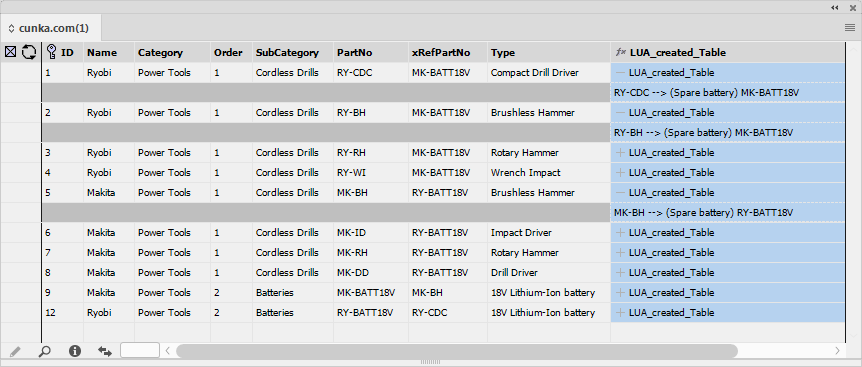
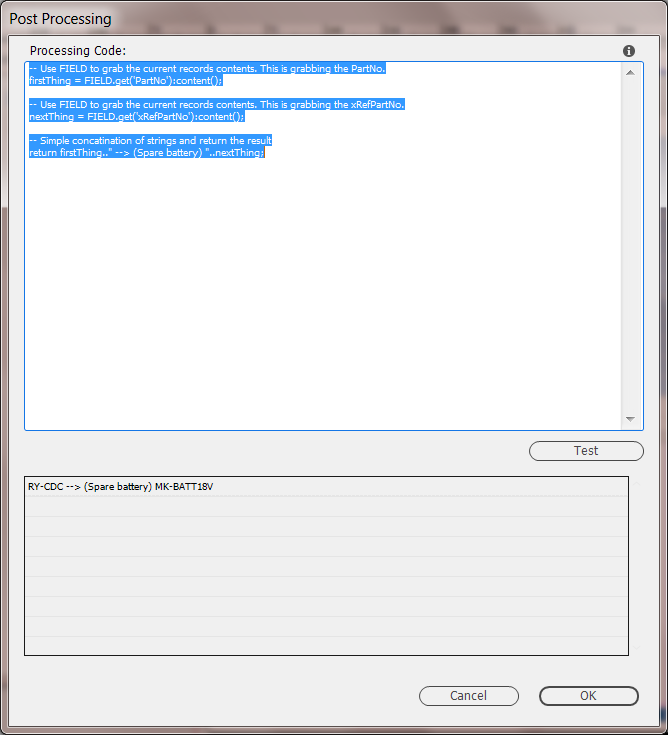
Example 2
Using a FIELD called 'Name', use that records content to first filter results, then return a tabular table.
-- Get the list of records
recordset = DATASOURCE.get():getrecordset()

-- Get the records content for the field 'Name'
currentName = FIELD.get('Name'):content();

-- Create a filter on the Name field looking for the current value of the variable currentName
filteredset = recordset:filter('Name',currentName)

-- Convert the fields of all the records to columns and rows into a table
-- use the following fields
result = filteredset:tableof('PartNo','Name','Type')

-- Pass the new table back to the tabular field
return result:present()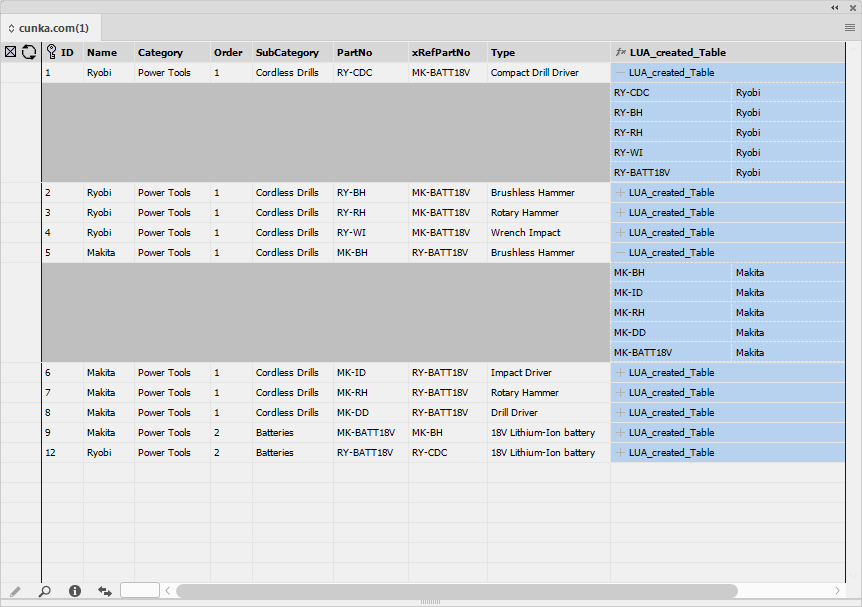
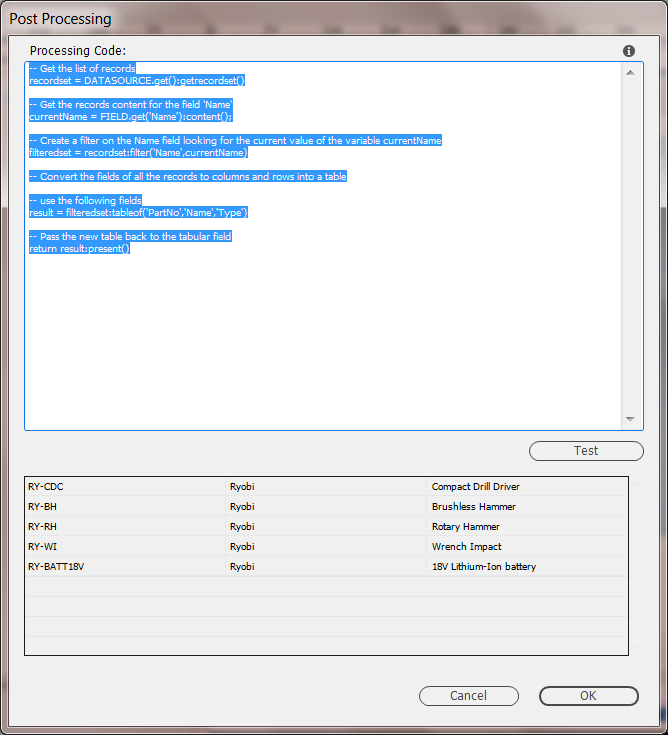
Capturing Errors
There are occasions where errors can occur when the code is been executed on the page. Unfortunately, an error can stop any kind of pagination dead in its tracks.
The LUA programming language comes with a few methods to capture errors.
Example 1 - Error with unknown field
In this example, when the field ID value is less than 50 the fields PART_NO1 and PART_NO2 are inserted to the text frame.
The problem is the field PART_NO2 does not exist.
[[
    value = tonumber(field('ID'))
    if (value < 50) then TEXT.insertfield('PART_NO1') TEXT.insertfield('PART_NO2');
    end
]]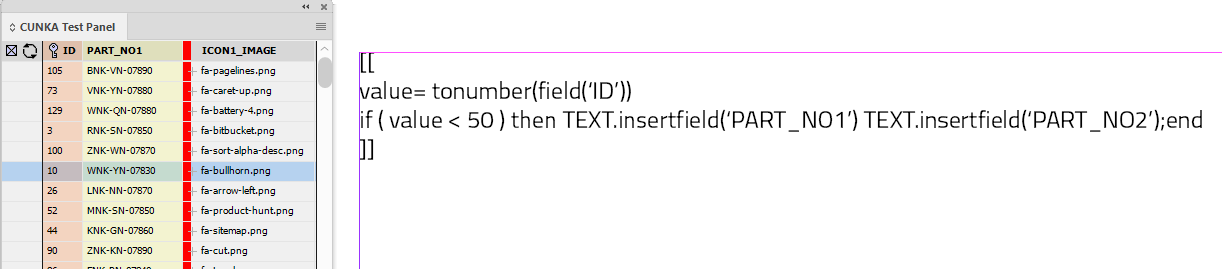
The result is pagination crashes out with an error.
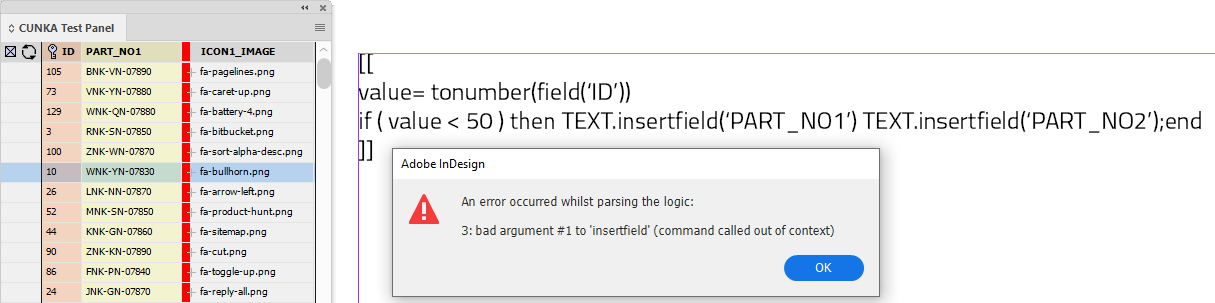
Example 2 - Capture the unknown field
This example is a continuation of Example 1. The goal is to capture the error and just continue with pagination. The code still uses a field called PART_NO2 that doesnt exist and will cause an error.
To capture any errors we will wrap them up in the LUA pcall() command. We wrap our conditions in a function called myfunction() and use pcall(myfunction) to call it.
[[
    function myfunction()
        value = tonumber(field('ID'))
        if (value < 50) then TEXT.insertfield('PART_NO1') TEXT.insertfield('PART_NO2');
        end;
    end;
    pcall(myfunction)
]]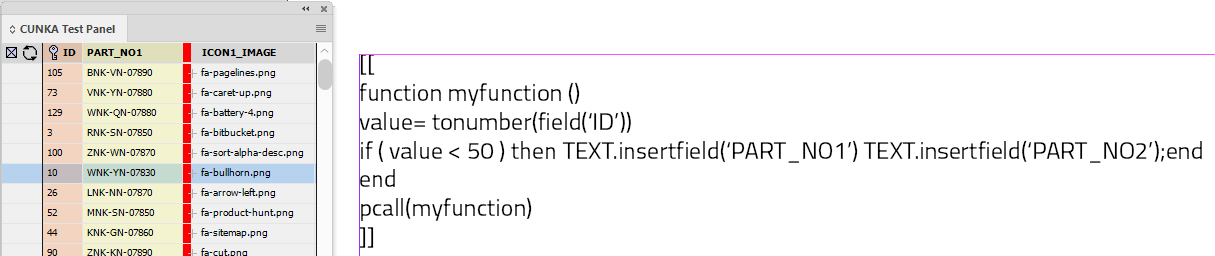
The result shows that even though the field PART_NO2 doesnt exist, the field PART_NO1 is still inserted into the text frame. (The ID is less than 50)
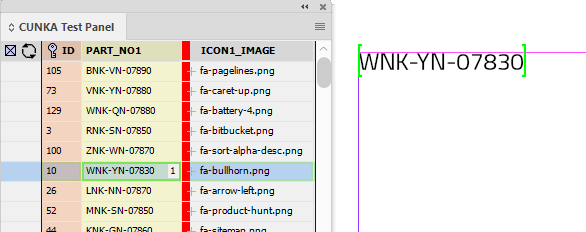
TableOf
Using TableOf, fields(s) can be grouped into a table and the result returned into a Tabular field.
By default if no field names are stipulated, the table returned is of the whole data panel.
The EasyCatalog field must be set up to be a tabular field.
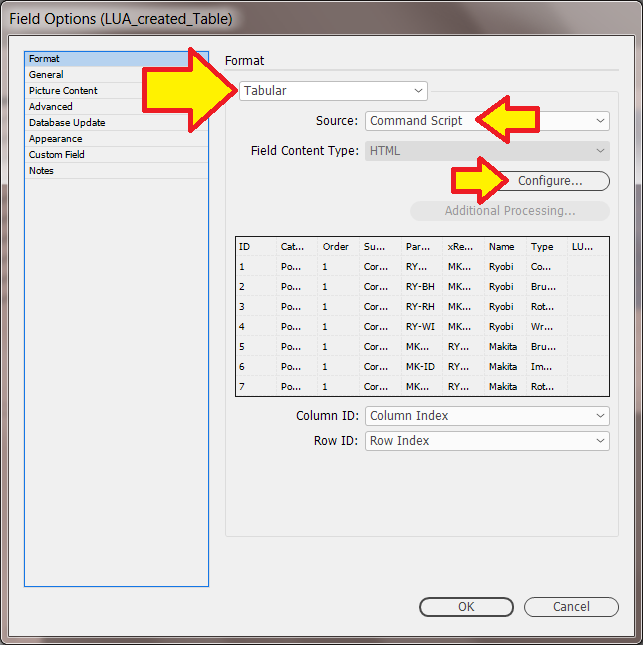
Example 1
No field names are stipulated to TableOf, so everything is returned to the tabular field.
-- Get the list of records
recordset = DATASOURCE.get():getrecordset()

-- Convert the fields of all the records to columns and rows into a table
-- By default, if no fields are specified all fields are used.
result = recordset:tableof()

-- Pass the new table back to the tabular field
return result:present()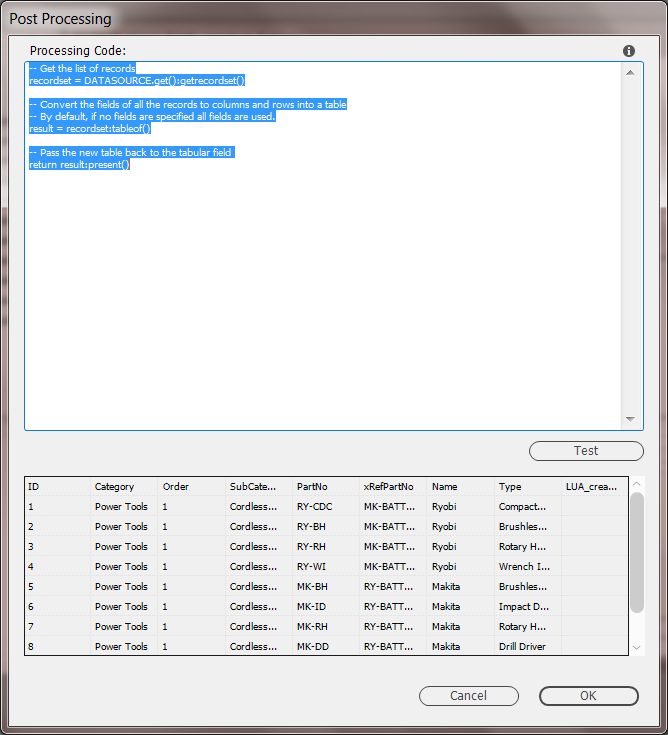
Example 2
The TableOf parameter is now instructed to return a table made up from the 'PartNo','Name' & 'Type' fields.
-- Get the list of records
recordset = DATASOURCE.get():getrecordset()

-- Convert the fields of all the records to columns and rows into a table
-- Specify fields to use.
result = recordset:tableof('PartNo','Name','Type')

-- Pass the new table back to the tabular field
return result:present()
Sorting a recordset
A recordset can be sorted further through the use of the :sort() method.
The :sort() method takes 1 or more field names to sort by.
Example
This example is asking the recordset to be sorted by the 'PartNo' field.
-- Get the list of records
recordset = DATASOURCE.get():getrecordset()

-- Sort the list of records by PartNo
recordset:sort('PartNo')

-- Convert the fields of all the records to columns and rows into a table
-- Specify fields to use.
result = recordset:tableof('PartNo','Name','Type')

-- Pass the new table back to the tabular field
return result:present()
Filtering a recordset
While having access to a recordset is handy, been able to filter the data down to a specific set of records can be a powerful tool. Through the use of the :filter() method, its possible within LUA to filter the recordset.
The :filter() method takes a minimum of two parameters. The field name and value.
Example
In this example the recordset is been asked to filter by the field name 'Name' and the value of 'Ryobi'. The new filtered recordset is stored in the variable filteredset.
-- Get the list of records
recordset = DATASOURCE.get():getrecordset()

-- Create a filter on the Name field looking for anything by Ryobi
filteredset = recordset:filter('Name','Ryobi')

-- Convert the fields of all the records to columns and rows into a table
-- use the following fields
result = filteredset:tableof('PartNo','Name','Type')

-- Pass the new table back to the tabular field
return result:present()
Styling a tabular table
When a table is created in LUA, you can return the tabular table back with an existing InDesign Table style that exists in your document.
To do this, you use the :setstyle() method for tables and the name of the Table style in InDesign
Example
The table style 'Products' is applied to the tabular table.
-- Get the list of records
recordset = DATASOURCE.get():getrecordset()

-- Sort the list of records by PartNo
recordset:sort('PartNo')

-- Convert the fields of all the records to columns and rows into a table
-- Specify fields to use.
result = recordset:tableof('PartNo','Name','Type')

-- Use an existing InDesign table style to make the table pretty
result:setstyle("Products")

-- Pass the new table back to the tabular field
return result:present()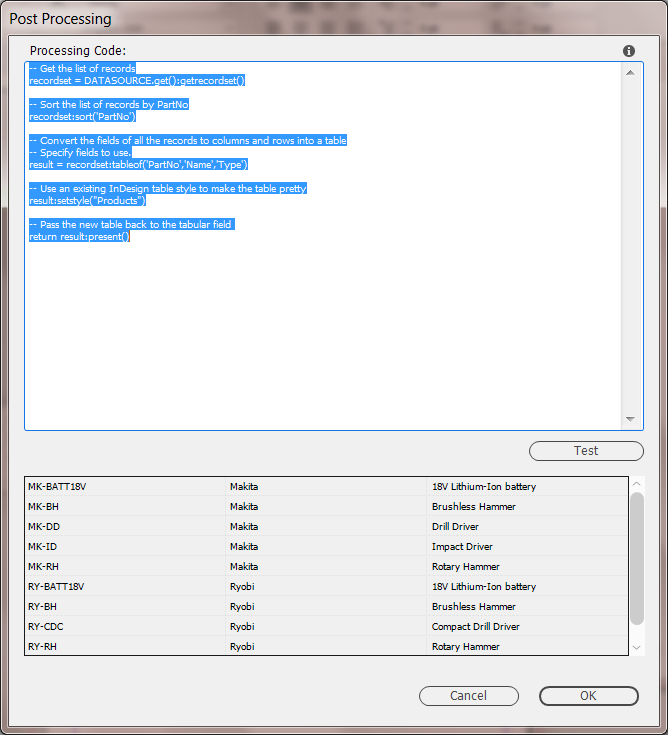
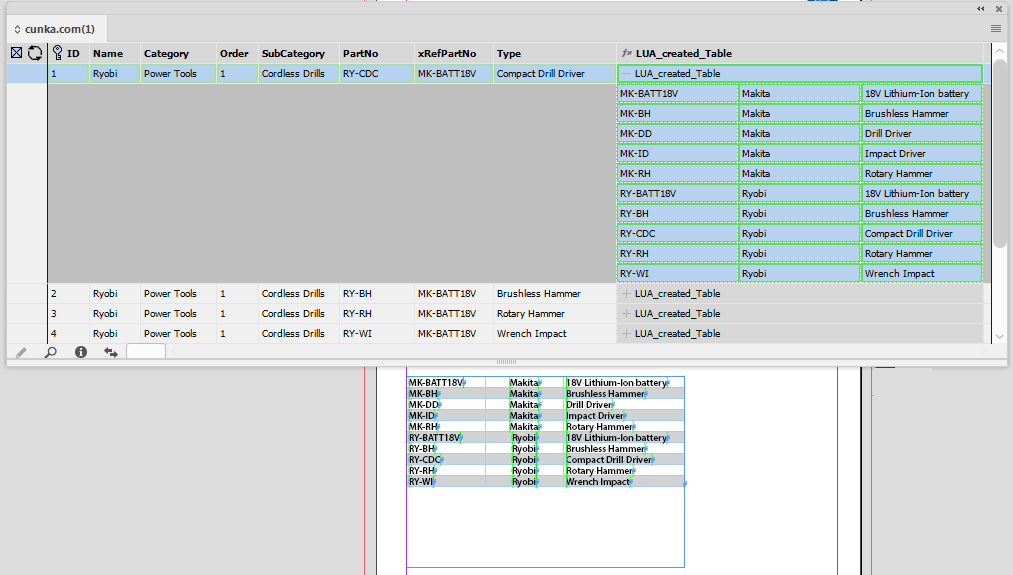
Connecting to the Internet
Example 1
In this example we want to get a list of CSS color names from a webpage located on the Github website. The file returned is a JSON string.
-- URL string
url = "https://raw.githubusercontent.com/bahamas10/css-color-names/master/css-color-names.json";

-- Connect to this URL
response_code, response_body =  HTTP.get(url);

-- Check the server response
if response_code ~= 200 and response_code ~= 401 then
  error(response_code .. response_body);
end

-- Pass the result to the EasyCatalog field
return response_body
Controlling a Frame from a Script Label
LUA commands can be used to control the behaviour of a Frame through the script label.
Example 1
The script label has LUA code in it, which on pagination determines from the field 'Brand' what objectstyle to apply to the frame. If its "Panasonic", it chooses one color, if its "Samsung" it chooses another.
getBrand = FIELD.get('Brand'):content()
if(getBrand=="Panasonic") then
  frame:applyobjectstyle("Panasonic")
else
  frame:applyobjectstyle("Samsung")
end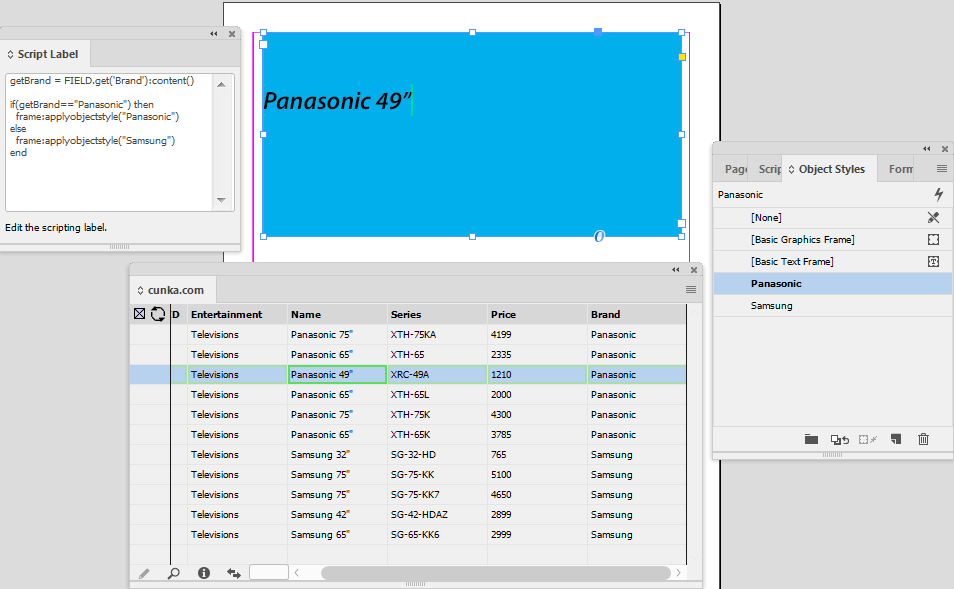
Example 2
The script label contains LUA code, that at the time of pagination, will take some of the frames attributes and update fields back into the data source panel.
In this example the top left corner X/Y position of the frame are captured and updated into a record that has the fields of X_POSITION_IMAGE and Y_POSITION_IMAGE.
width = frame:width()
height = frame:height()
left = frame:left()
top = frame:top()
FIELD.get('X_POSITION_IMAGE'):setcontent(left)
FIELD.get('Y_POSITION_IMAGE'):setcontent(top)
Using Appearance to change the panel style
Each field in the datasource panel allows you to control how its displayed through the "Appearance" tab. With the use of color you can easily color co-ordinate your fields amongst many fields to display a better user experience.
The "Appearance" parameter goes one step further through the use of LUA. You can code in shapes (circles, squares) as well as custom colors. It also allows you to "conditionally" apply the shapes and color that are determined through field values.
| You will see drawrect(x,y,width,height) used without x,y,width,height been declared. If you dont supply values in these fields, it defaults to its own internal values. |
Example 1
This example uses conditions to define the "Appearance".
Through the 'Brand' field, the datasource is color co-ordinated dependent on whether 'Brand' contains the value 'Panasonic'. If it does the cells are colored Purple, if it isn’t the cell is colored Brick Red.
if field('Brand') == "Panasonic" then

-- set color to Purple
  setopacity(0.2)
  setcolor(102,0,102)
  drawrect(x,y,width,height)
else

-- set color to Brick Red
  setopacity(0.2)
  setcolor(153,0,0)
  drawrect(x,y,width,height)
end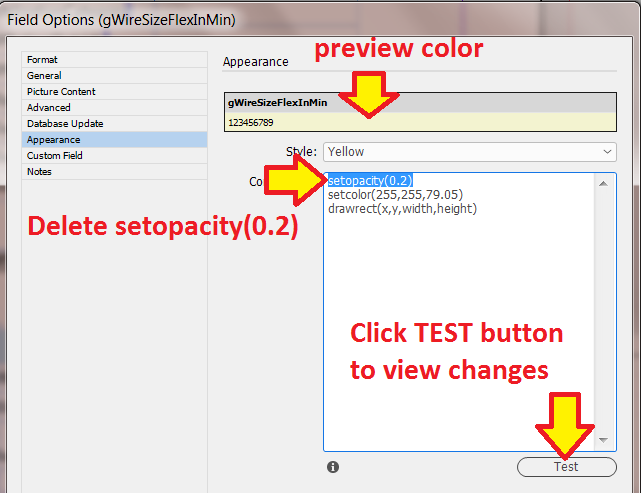
Appearance Color Table
Appearance Color Name |
RGBA with opacity |
RGB without opacity |
|---|---|---|
Light blue |
79, 153, 255, 0.2 |
79, 153, 255 |
Red |
255, 0, 0, 0.2 |
255, 0, 0 |
Green |
79, 255, 79, 0.2 |
79, 255, 79 |
Blue |
0, 0, 255, 0.2 |
0, 0, 255 |
Yellow |
255, 255, 79, 0.2 |
255, 255, 79 |
Magenta |
255, 79, 255, 0.2 |
255, 79, 255 |
Cyan |
0,255,255,0.2 |
0,255,255 |
Gray |
127,127,127,0.2 |
127,127,127 |
Black |
0,0,0,0.2 |
0,0,0 |
Orange |
255,102,0,0.2 |
255,102,0 |
Dark Green |
0,84,0,0.2 |
0,84,0 |
Teal |
0,153,153,0.2 |
0,153,153 |
Tan |
204,153,102,0.2 |
204,153,102 |
Brown |
153,51,0,0.2 |
153,51,0 |
Violet |
153,51,255,0.2 |
153,51,255 |
Gold |
255,153,0,0.2 |
255,153,0 |
Dark Blue |
0,0,135,0.2 |
0,0,135 |
Pink |
255,153,204,0.2 |
255,153,204 |
Lavender |
153,153,255,0.2 |
153,153,255 |
Brick Red |
153,0,0,0.2 |
153,0,0 |
Olive Green |
102,102,0,0.2 |
102,102,0 |
Peach |
255,153,153,0.2 |
255,153,153 |
Burgundy |
153,0,51,0.2 |
153,0,51 |
Grass Green |
153,204,0,0.2 |
153,204,0 |
Ochre |
153,102,0,0.2 |
153,102,0 |
Purple |
102,0,102,0.2 |
102,0,102 |
Light Gray |
186,186,18,0.2 |
186,186,18 |
Charcoal |
170,163,181,0.2 |
170,163,181 |
Grid Blue |
122,186,216,0.2 |
122,186,216 |
Grid Orange |
255,181,107,0.2 |
255,181,107 |
Fiesta |
247,89,107,0.2 |
247,89,107 |
Light Olive |
140,165,107,0.2 |
140,165,107 |
Lipstick |
206,130,181,0.2 |
206,130,181 |
Cute Teal |
130,206,193,0.2 |
130,206,193 |
Sulphur |
206,206,130,0.2 |
206,206,130 |
Grid Green |
155,221,155,0.2 |
155,221,155 |
White |
255,255,255,0.2 |
255,255,255 |
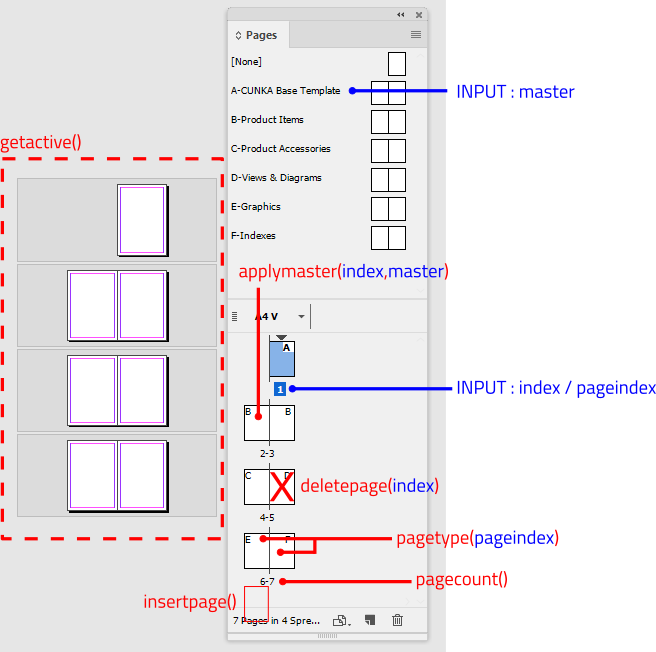

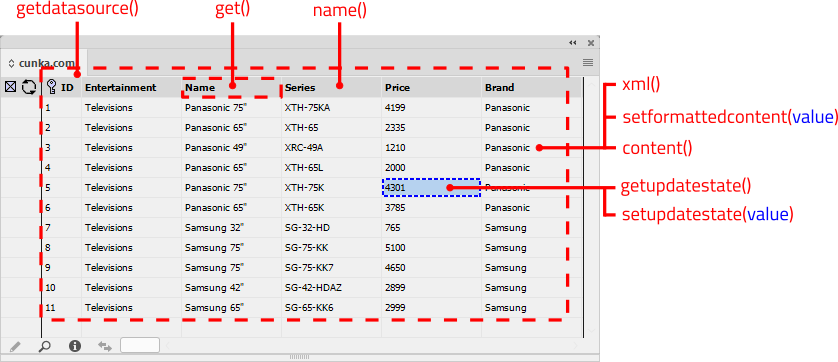


Event Scripts
What are Event Scripts?
External scripts can be created and called in response to certain events in EasyCatalog. These are known as Event Scripts.
Event Scripts are programmed using Adobe Javascript. They are required to be placed in the Scripts sub folder located in the Data Source workspace.
Event Script parameters are accessed by the application object scriptArgs
// Example
var myID = Number(app.scriptArgs.getValue("id"));PostLoadDataSource.jsx

Called after loading a Data Source into memory.
- Parameters
-
datasource
//
// PostLoadDataSource.jsx
//
//
// by Brian Cowell
// http://www.cunka.com/easycatalog/myEasyCatalog.html
//
//
// OBJECTIVE : Get information the data source when the panel is loaded up.
//
//

// writes the Adobe ExtendScript console if it is open

$.writeln("---- POST LOAD DATA SOURCE SCRIPT ----");

// get the current data source name passed by the script

var ds = app.scriptArgs.getValue('datasource');
$.writeln("Loaded DATA SOURCE : "+ds);

var myDS = app.easycatalogObject.datasources.item(ds);
var myDV = myDS.dataviews.item(ds);
$.writeln("DATA SOURCE state : "+myDS.loadState);

var myDSFields = myDS.fieldNames;
$.writeln("Total Fields : "+myDSFields.length);
PostSynchronizeWithDataSource.jsx

Called after synchronizing the panel with the Data Source.
- Parameters
-
datasource

PrePaginateDocument.jsx
Called just before paginating a document.

//
// PrePaginateDocument.jsx
//
//
// by Brian Cowell
// http://www.cunka.com/easycatalog/myEasyCatalog.html
//
//
// OBJECTIVE : Test to make sure Fields exist before paginating. If they DO NOT exist, the script will create them.
//
//

// writes the Adobe ExtendScript console if it is open

$.writeln("---- PRE PAGINATION SCRIPT ----");

// The field names we will be testing to make sure exists.

var fieldTestList =[
    "materialColor",
    "materialType",
    "materialTable",
    "selectionTable",
   "flammabilityRating"
];

// Get the currently selected Data Source

var ec = app.easycatalogObject;
var myDSV = ec.selectedDataView();
var myDS = myDSV.parent;

$.writeln(myDS.dataSourceName); // write the data source name to the console

// loop through list of fields to check
for (i = 0; i < fieldTestList.length; i++) {
    try{
        var option = myDS.getFieldOption(fieldTestList[i], "name");
        //$.writeln("Confirm field "+fieldTestList[i]+" exists.");
    }
    catch(err){
        custField(fieldTestList[i],""); // create field if it doesnt exist
        //$.writeln("Create custom field to replace missing field "+fieldTestList[i]);
    }
}

///////////////////////////////////////////////////////////////////

// Function to create the custom fileds
function custField(fieldName,fieldContent){
    try{
        myDS.addCustomField(fieldName,fieldContent);
        $.writeln("Created custom field : "+fieldName);
        }
    catch(err){
        $.writeln("FAILED to create custom field : "+fieldName);
        }
}


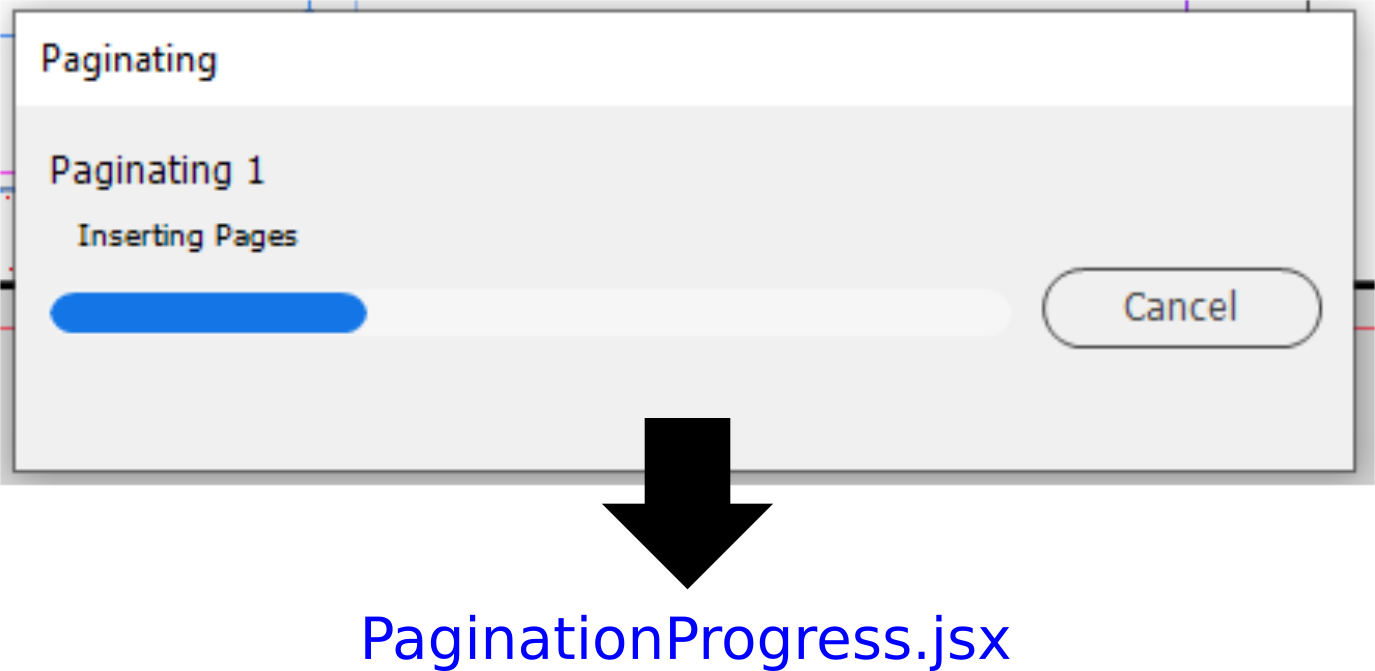
XML Data Provider Module
Getting Help
Brian Cowell can be contacted at contact@cunka.com
©2019-2023 Brian Cowell